Seagull Grey EK 2106

Post photos of your pride and joy, or updates on your rebuild!

Moderators: reidy, Blacky

vmx-mxr
Posts: 878
Joined: Mon Aug 31, 2009 10:42 am
State: NSW
Location: Sydney Hills District

Re: Seagull Grey EK 2106

Post by vmx-mxr »

FJWALLY wrote:Thanks Craig - and Dave - my motor is juts about done and should get gearbox back next week and new clutch is on the list of must do's while it's apart.
Hey Rob

Make sure the flywheel is ground too otherwise it's only 2/3 done ...

Dave
User avatar
Craig Allardyce
Posts: 1466
Joined: Sun Aug 07, 2011 7:26 pm
State: VIC
Location: Stratford

Re: Seagull Grey EK 2106

Post by Craig Allardyce »

Errol62 wrote:Any thought of installing a 0.025" spacer gasket between block and bell housing?
No I haven't thought of that........I'll keep it in mind. Thanks.
User avatar
Craig Allardyce
Posts: 1466
Joined: Sun Aug 07, 2011 7:26 pm
State: VIC
Location: Stratford

Re: Seagull Grey EK 2106

Post by Craig Allardyce »

vmx-mxr wrote:The old ute is looking good Craig, and the vid was well done - especially "beer o'clock" :thumbsup:
Can I gather the aftermarket one you used is the later 8.6" diameter set
Cheers
Dave Mac
Thanks Dave, yep 220mm. I posted the link above which has the pictures of it in my FB post.
User avatar
Craig Allardyce
Posts: 1466
Joined: Sun Aug 07, 2011 7:26 pm
State: VIC
Location: Stratford

Re: Seagull Grey EK 2106

Post by Craig Allardyce »

Early knock off today. Too bloody hot in the shed. Finished off changing the plywood floor in the back. Bastard of a job.......you cant weld wood lol.
Anyway buggered off to the river to cool down.
DSC01460.JPG
DSC01460.JPG (58.95 KiB) Viewed 958 times
DSC01463.JPG
DSC01463.JPG (66.18 KiB) Viewed 958 times
User avatar
Craig Allardyce
Posts: 1466
Joined: Sun Aug 07, 2011 7:26 pm
State: VIC
Location: Stratford

Re: Seagull Grey EK 2106

Post by Craig Allardyce »

parisian62 wrote:Well done Craig! Good times. :thumbsup: I remember when we got the wagon on the road there was a ticking noise and we thought was coming from the clutch / gearbox. Luckily it turned out to be the fan was flexing.
Thanks Stuart. I'll keep that in mind too. Still lots to get through but well on the way to making Renmark.
Brian Westlake
Posts: 423
Joined: Sun Jun 13, 2010 4:11 pm
State: NOT ENTERED

Re: Seagull Grey EK 2106

Post by Brian Westlake »

That ute looks great. Good to see youve got it going. as for the noise, can you access the offending area through the hidey hole in the bell housing or are your floor mats too good to pull up to get the cover off. If you can get that cover off you may be able to do something TRICKY in there with a die grinder. Am I on to something or have I forgotten something basic?
Tony.
In the Shed
Posts: 2126
Joined: Wed May 16, 2012 10:18 pm
State: SA
Location: South Australia

Re: Seagull Grey EK 2106

Post by In the Shed »

Cool Craig,
Looks the goods, does the mutt ride in the front or the back?
Stephen
A day in the shed beats a day at work!
User avatar
FJWALLY
Posts: 1833
Joined: Wed Nov 11, 2015 4:54 pm
State: VIC
Location: Forest Hill

Re: Seagull Grey EK 2106

Post by FJWALLY »

Make sure the flywheel is ground too otherwise it's only 2/3 done ...

Dave[/quote]


Thanks Dave - they are balancing the whole she-bang but I will double check they do the flywheel as well - makes good sense
You will find me lost somewhere!
User avatar
Craig Allardyce
Posts: 1466
Joined: Sun Aug 07, 2011 7:26 pm
State: VIC
Location: Stratford

Re: Seagull Grey EK 2106

Post by Craig Allardyce »

Thanks Wally and Tony.

Plenty of options I'll keep in mind. Tony I don't have any floor mat in it as yet. Just doing the water leak tests here and there before I commit to putting it in when I get it. Access it through the cover plate wont be any good as I know that area wont be where I want to grind. Getting the die grinder in will be like putting toothpaste back in the tube.
Wally I've taken note of Dave's post re machining the flywheel.

I think for the moment I'll run it for a bit and see what happens (head in the sand option!).

Today will be wheel alignment day.
Brian Westlake
Posts: 423
Joined: Sun Jun 13, 2010 4:11 pm
State: NOT ENTERED

Re: Seagull Grey EK 2106

Post by Brian Westlake »

Its one of those noises that can only get BETTER with time I guess.
Tony.
User avatar
Craig Allardyce
Posts: 1466
Joined: Sun Aug 07, 2011 7:26 pm
State: VIC
Location: Stratford

Re: Seagull Grey EK 2106

Post by Craig Allardyce »

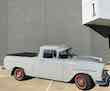
Wheel alignment done today. Had to improvise a bit as I haven't got a track rod to do the toe in. Steers well now and holds a straight line with no hands. Steering wheel nice and straight too.
Went up in main jet to 55 to accommodate the cam and to get over a slight hesitation. Pulling well off the line.
Had a great find too. Busted out some NOS Trico wiper blades and fitted them up. Cleaned up the windscreen and noticed some numbers showing up on the glass with the residual water. Hard to explain but.......the numbers are 52653S and circled 311. First one matches the chassis number....311 I have no idea about. Anyway looks to be the original windscreen.........maybe.
DSC01459.jpg
DSC01459.jpg (43.44 KiB) Viewed 1224 times
Who remembers this good old Australian made gear?
DSC01467.jpg
DSC01467.jpg (50.25 KiB) Viewed 1224 times
DSC01468.jpg
DSC01468.jpg (49.19 KiB) Viewed 1224 times
DSC01469.jpg
DSC01469.jpg (50.54 KiB) Viewed 1224 times
DSC01470.jpg
DSC01470.jpg (52.82 KiB) Viewed 1224 times
DSC01471.JPG
DSC01471.JPG (79.51 KiB) Viewed 1224 times
EK283
Posts: 2497
Joined: Thu Mar 16, 2006 9:51 pm
State: NSW
Location: SYDNEY NSW

Re: Seagull Grey EK 2106

Post by EK283 »

Craig,

That wheel alignment gear is gold !

I have used brickies string in the past to get the toe in and out, actually its quite easy to do the alignment if you've got the gear.

It always bugs me that the so called pros can't do these old cars or don't want to !!!!

Great stuff now the tyres will last forever.

Regards Greg
So many cars so little time!
User avatar
Craig Allardyce
Posts: 1466
Joined: Sun Aug 07, 2011 7:26 pm
State: VIC
Location: Stratford

Re: Seagull Grey EK 2106

Post by Craig Allardyce »

Thanks Greg, yep its not that hard but I've learnt one thing with these old busses regarding caster. Trying to get more than 1 degree change in caster is nearly impossible with what adjustment is available. Unless you index the wishbones in a staggered fashion (between top and bottom) its just about impossible to get the required caster spec for a ute. As it is I can only get sedan spec.

Today I've had a crack at doing an epoxy repair on the steering wheel for RWC. Stay tuned on that one. Also started to wire in the trailer plug (lovely Australian made Utilux 5 Pin original with towbar). Dog at least approves of the tray!
DSC01473.jpg
DSC01473.jpg (80.75 KiB) Viewed 1172 times
DSC01474.jpg
DSC01474.jpg (61.45 KiB) Viewed 1172 times
User avatar
FJWALLY
Posts: 1833
Joined: Wed Nov 11, 2015 4:54 pm
State: VIC
Location: Forest Hill

Re: Seagull Grey EK 2106

Post by FJWALLY »

What are the best spec settings for the ute alignment Craig?

Loving this resto mate - it is one amazing survivor.
You will find me lost somewhere!
User avatar
Craig Allardyce
Posts: 1466
Joined: Sun Aug 07, 2011 7:26 pm
State: VIC
Location: Stratford

Re: Seagull Grey EK 2106

Post by Craig Allardyce »

Wally I did +1 degree camber +1 1/2 degree caster & 1/16" toe in. Ute specs for caster are 0 to +1 caster but I couldn't get it down that far as I ran out of adjustment (both sides). Either way its within caster spec for sedan and steers well. I'll have to get back to later and work it out. I had similar issue with my FB sedan but not as bad. Might have to go through the service bulletins.

Today I finished off the trailer wiring. Ended up using and old loom and th3 4 way connecters and bullets. Took some fiddly solder work but come up well. Looks factory.........but no one will see it anyway............dunno why I bothered lol.

Anyway all hooked up and working and ready to go!
DSC01477.jpg
DSC01477.jpg (48 KiB) Viewed 1132 times
DSC01478.jpg
DSC01478.jpg (52.8 KiB) Viewed 1132 times
Post Reply