UBK 061 An Old Farts Last Ride
-
kelleigh54
- Posts: 242
- Joined: Wed Apr 25, 2007 12:43 am
- State: WA
- Location: PERTH WESTERN AUSTRALIA
- Contact:
Re: UBK 061 An Old Farts Last Ride
Si Senor ! Friday arvo and glad to be here . Kel is pretty well knackered , but she will get there . I'm hoping to get in the shed this arvo . 
I would rather work on a Morris 1100 than use a computer !!!!!!
Re: UBK 061 An Old Farts Last Ride
She up to visitors yet ???
I started with nothing and still have most of it left.
Foundation member #61 of FB/EK Holden club of W.A.
Foundation member #61 of FB/EK Holden club of W.A.
-
kelleigh54
- Posts: 242
- Joined: Wed Apr 25, 2007 12:43 am
- State: WA
- Location: PERTH WESTERN AUSTRALIA
- Contact:
Re: UBK 061 An Old Farts Last Ride
Well , it has been a while . I am out of action again as I had an operation on my shoulder last week . Only just getting over the op I had on my neck last September and now back to where I was . So I figured it best if I tried to bring this thread up to date for where things are at the moment .
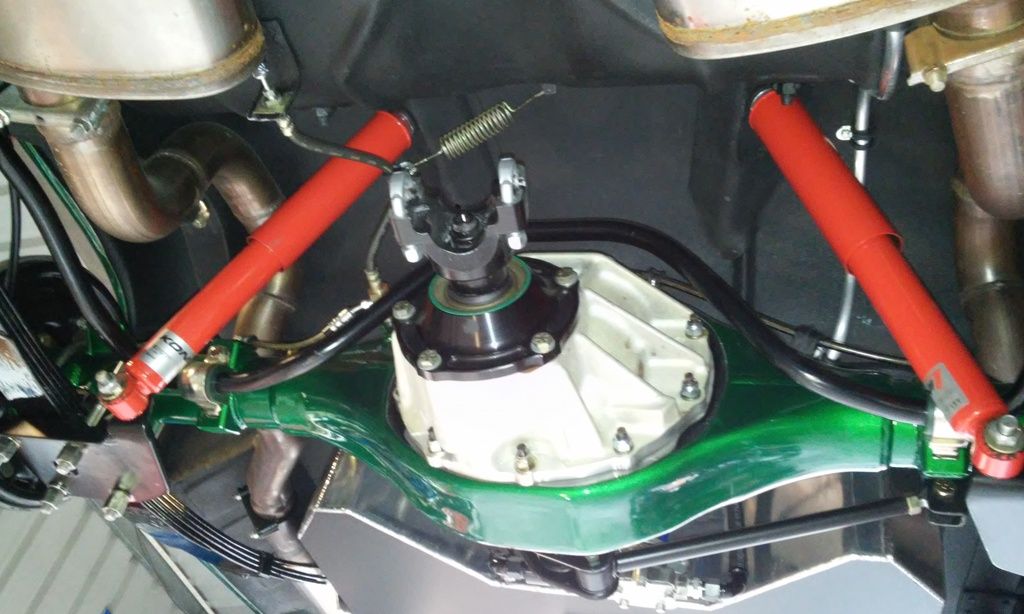
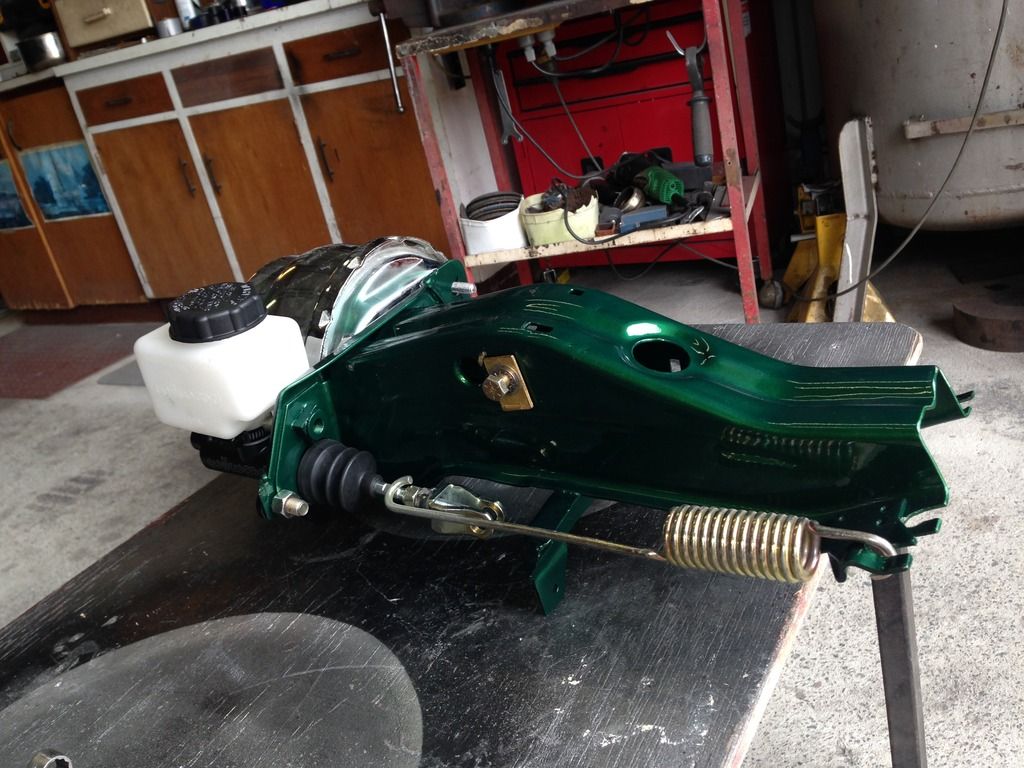
The car is back on the road , has been for a while but I am still in the throws of resolving a number of small issues . Exhaust clearance issues , rear stabiliser clearance at shocks and a couple of other quirky little things that are annoying the shit out of me over the car as a whole . The area around the diff / rear suspension is quite congested with all that is happening back there and has proven to be a right pain in the arse in a number of things . Photo's explain better than words showing all items while suspension is hanging but when in a naturally loaded state there isn't enough room for a fart to take a casual stroll . Definitely need a 4 link as that would resolve exhaust clearances and also allow for the installation of the rear disc set up I had for the FB . As I have shortened the diff and axles from what I had set up for the FB , I now have no clearance for the caliper with fouling on the spring leaf or the chassi rail above . But a 4 link is a long way off at the moment and there are other priorities that need to be resolved first .
So ! Back to the build / rebuild or however you look at it .
After building new spring plates I was able to put the old diff assy back in place allowing assessment of the shock angles at the floor which required cutting , tweaking and welding so the shock rubbers weren't to distorted .
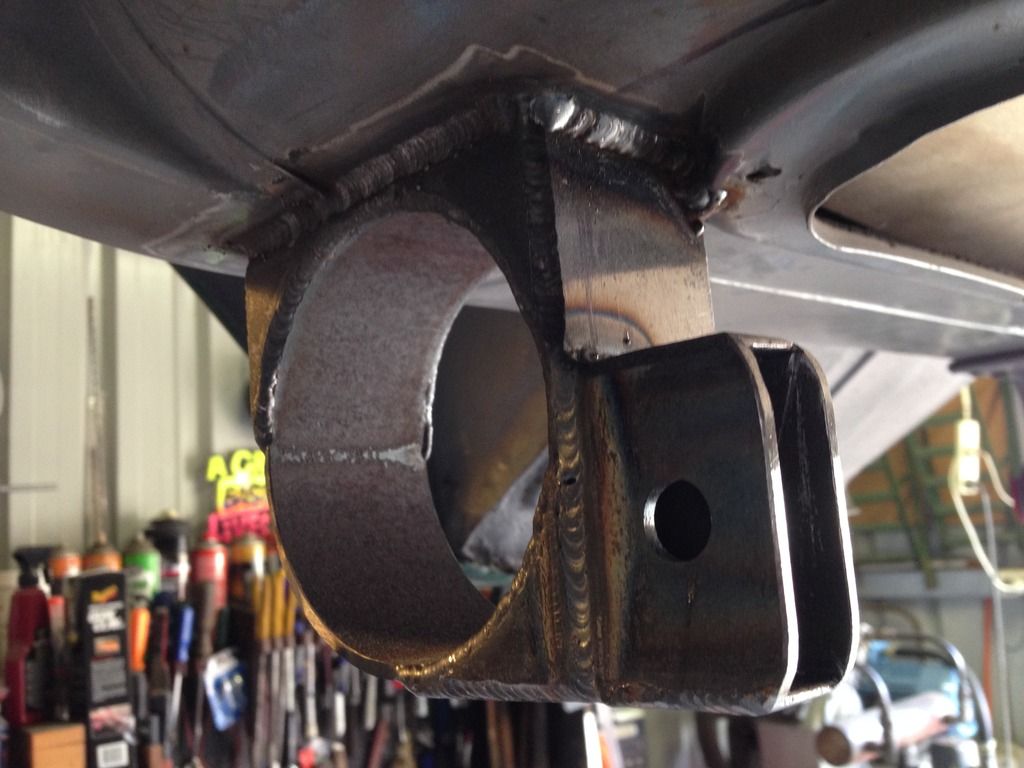
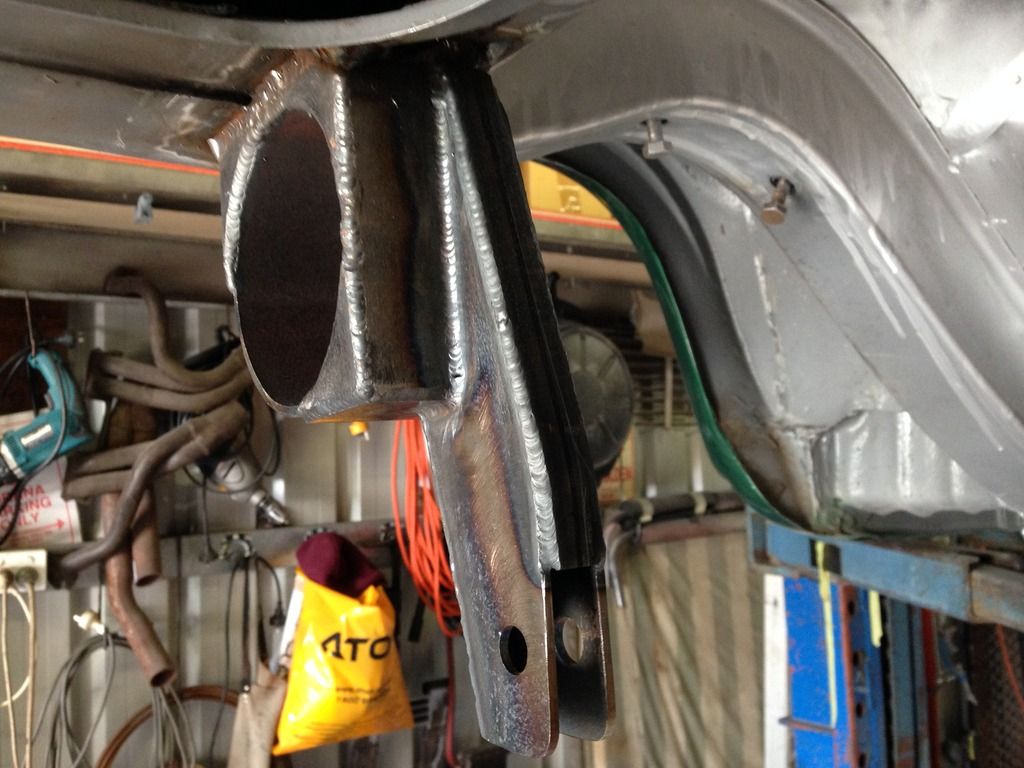
Next up was the bracket's for the Watts Link rod ends . These are located where the exhaust's run through so our option was a simple " There isn't One " choice , build a locating point around the exhaust tubing where it has to run and then the pipe can be redirected through those locating bracket's when it is renewed from the back of the muffler, up and over diff then through Watts link locating bracket , then duck across the top of the spring as there should be plenty of room at that point ( Yeah Right , that's going to come back and bite you on the arse ! ) then straighten up to run through a couple of resonators and a nice pair of droopies expelling behind and under the bumper directly below the tail light . That should be cool , no prob's , done deal !
Had some heavy walled 90mm tube up the back of the shed that was left over from the rotiserie I built for the FJ , so that's a good start . Boof cut off a couple of section's along with some flat bar and wondered off to use his mates tig for what he could then after some checking and rechecking measurement's he mig'd them into place and did a very nice job of it too . Not much use for anything else though , at least that is what I tell him . You know how it is , a parent needs to be supportive and encouraging . A good hard pat on the back , oop's ,missed , sorry about your ear .
The car is back on the road , has been for a while but I am still in the throws of resolving a number of small issues . Exhaust clearance issues , rear stabiliser clearance at shocks and a couple of other quirky little things that are annoying the shit out of me over the car as a whole . The area around the diff / rear suspension is quite congested with all that is happening back there and has proven to be a right pain in the arse in a number of things . Photo's explain better than words showing all items while suspension is hanging but when in a naturally loaded state there isn't enough room for a fart to take a casual stroll . Definitely need a 4 link as that would resolve exhaust clearances and also allow for the installation of the rear disc set up I had for the FB . As I have shortened the diff and axles from what I had set up for the FB , I now have no clearance for the caliper with fouling on the spring leaf or the chassi rail above . But a 4 link is a long way off at the moment and there are other priorities that need to be resolved first .


So ! Back to the build / rebuild or however you look at it .
After building new spring plates I was able to put the old diff assy back in place allowing assessment of the shock angles at the floor which required cutting , tweaking and welding so the shock rubbers weren't to distorted .
Next up was the bracket's for the Watts Link rod ends . These are located where the exhaust's run through so our option was a simple " There isn't One " choice , build a locating point around the exhaust tubing where it has to run and then the pipe can be redirected through those locating bracket's when it is renewed from the back of the muffler, up and over diff then through Watts link locating bracket , then duck across the top of the spring as there should be plenty of room at that point ( Yeah Right , that's going to come back and bite you on the arse ! ) then straighten up to run through a couple of resonators and a nice pair of droopies expelling behind and under the bumper directly below the tail light . That should be cool , no prob's , done deal !
Had some heavy walled 90mm tube up the back of the shed that was left over from the rotiserie I built for the FJ , so that's a good start . Boof cut off a couple of section's along with some flat bar and wondered off to use his mates tig for what he could then after some checking and rechecking measurement's he mig'd them into place and did a very nice job of it too . Not much use for anything else though , at least that is what I tell him . You know how it is , a parent needs to be supportive and encouraging . A good hard pat on the back , oop's ,missed , sorry about your ear .


I would rather work on a Morris 1100 than use a computer !!!!!!
-
bootlegger
- Posts: 2070
- Joined: Sat Sep 26, 2009 7:52 pm
- State: NOT ENTERED
- Location: sydney
Re: UBK 061 An Old Farts Last Ride
Some quality work going on there. Nothing like the folk art welding ive seen on some forums.
-
kelleigh54
- Posts: 242
- Joined: Wed Apr 25, 2007 12:43 am
- State: WA
- Location: PERTH WESTERN AUSTRALIA
- Contact:
Re: UBK 061 An Old Farts Last Ride
Thanks Bootlegger , It's because of me that he has achieved the ability to lay down a good weld . Every time he see's my effort's it just gives him another reason to try harder. I feel I have achieved a very unique and high standard when it comes to Cocky Shit .
I would rather work on a Morris 1100 than use a computer !!!!!!
-
kelleigh54
- Posts: 242
- Joined: Wed Apr 25, 2007 12:43 am
- State: WA
- Location: PERTH WESTERN AUSTRALIA
- Contact:
Re: UBK 061 An Old Farts Last Ride
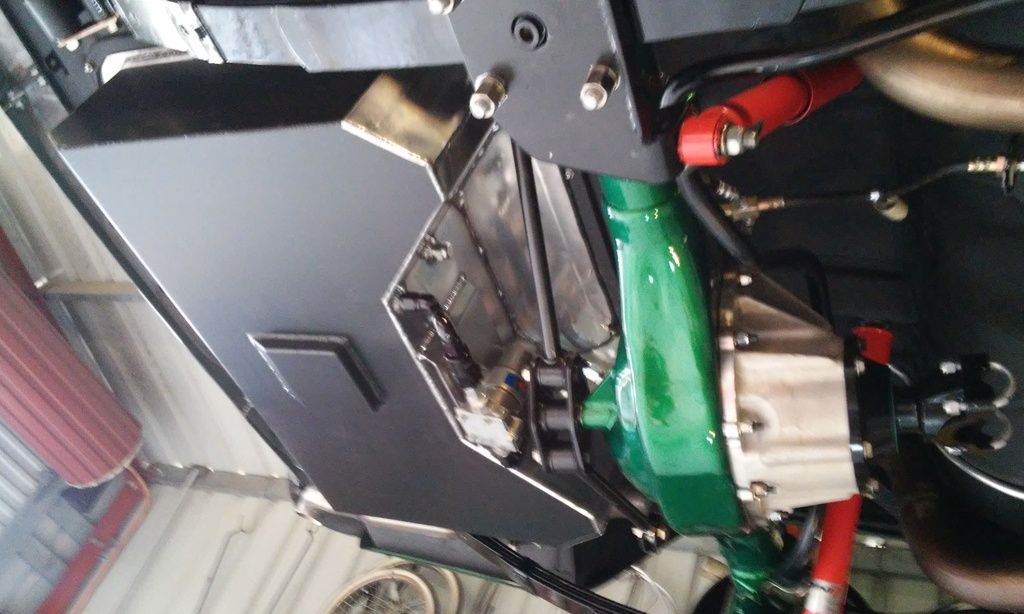
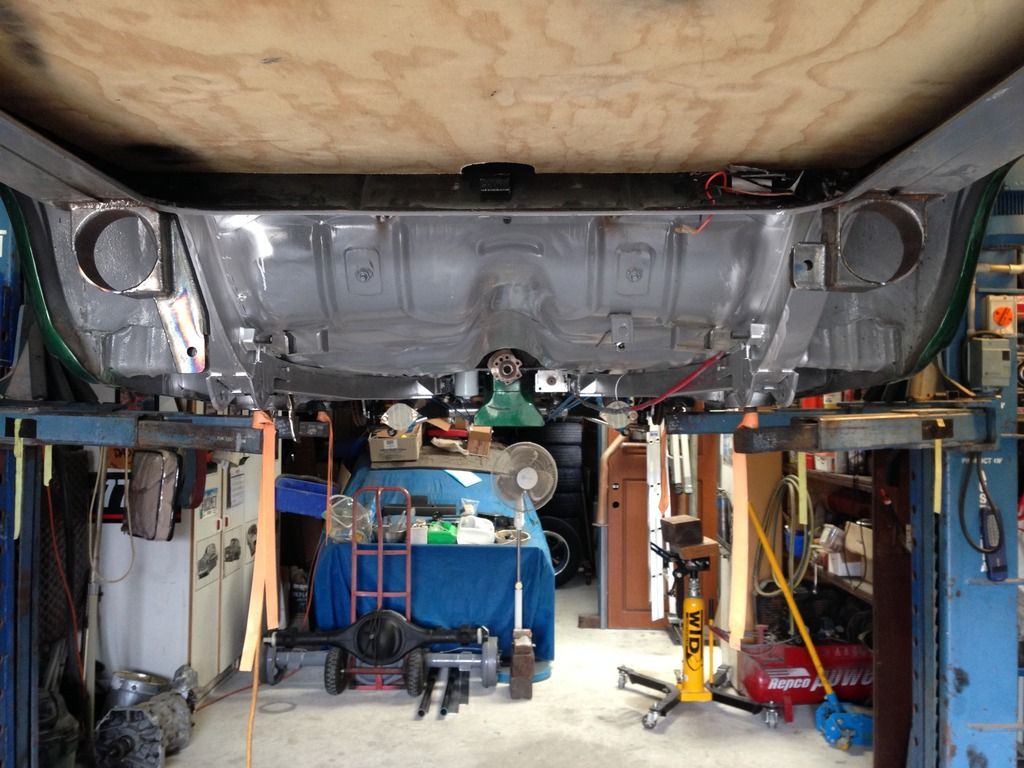
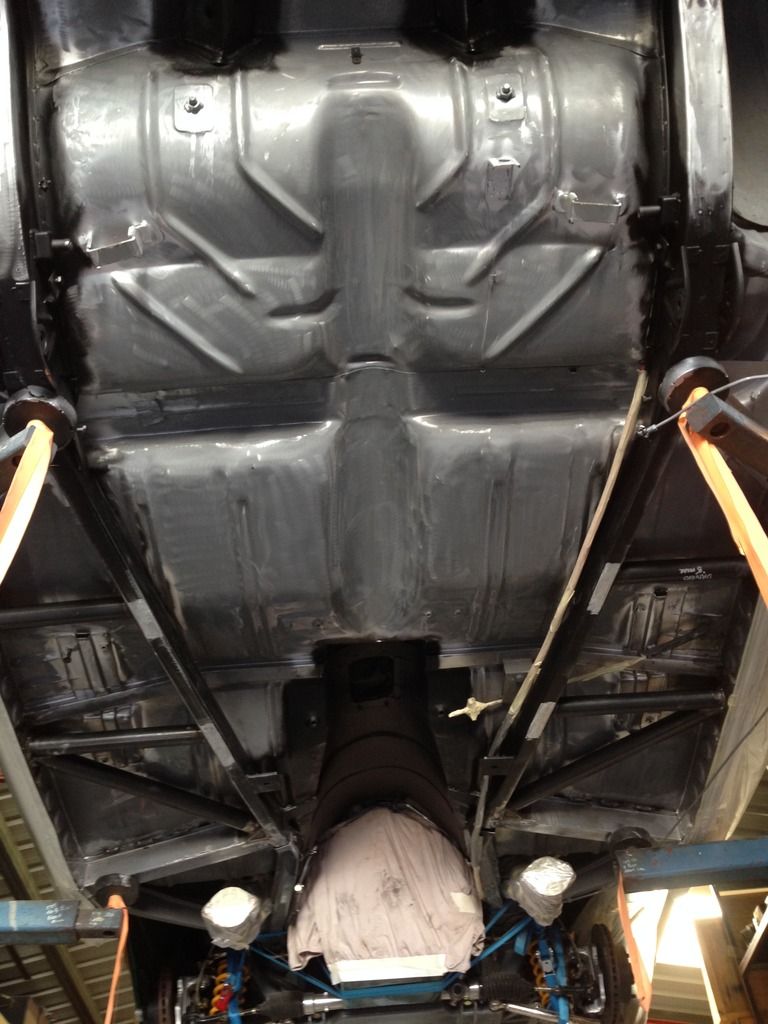
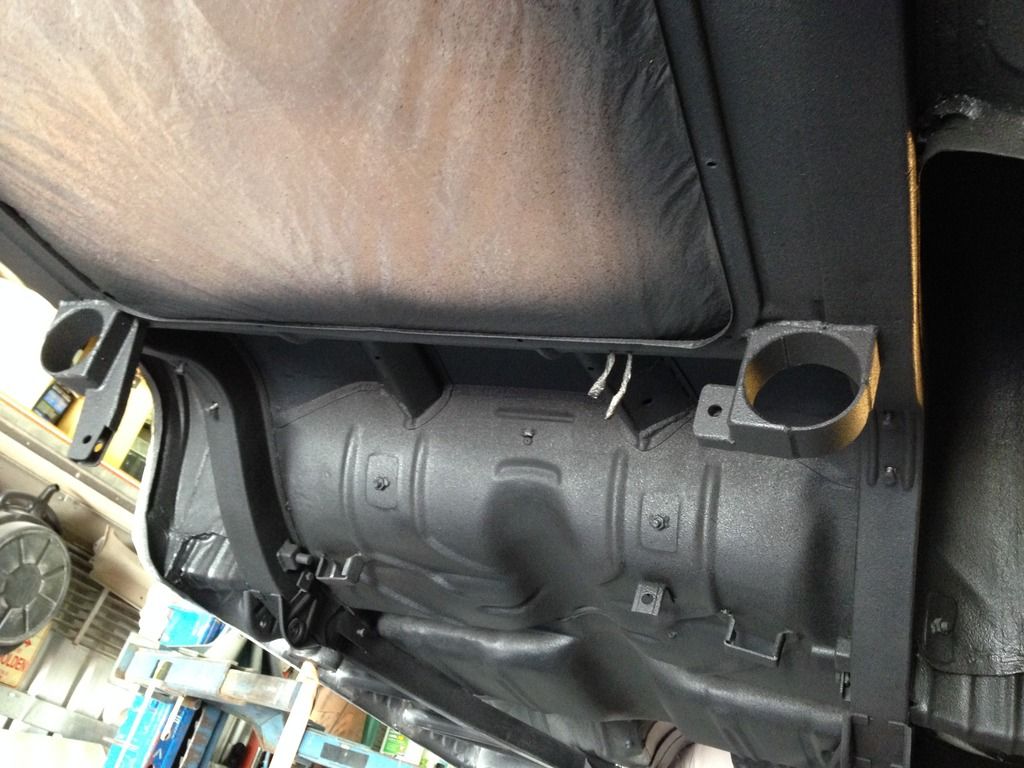
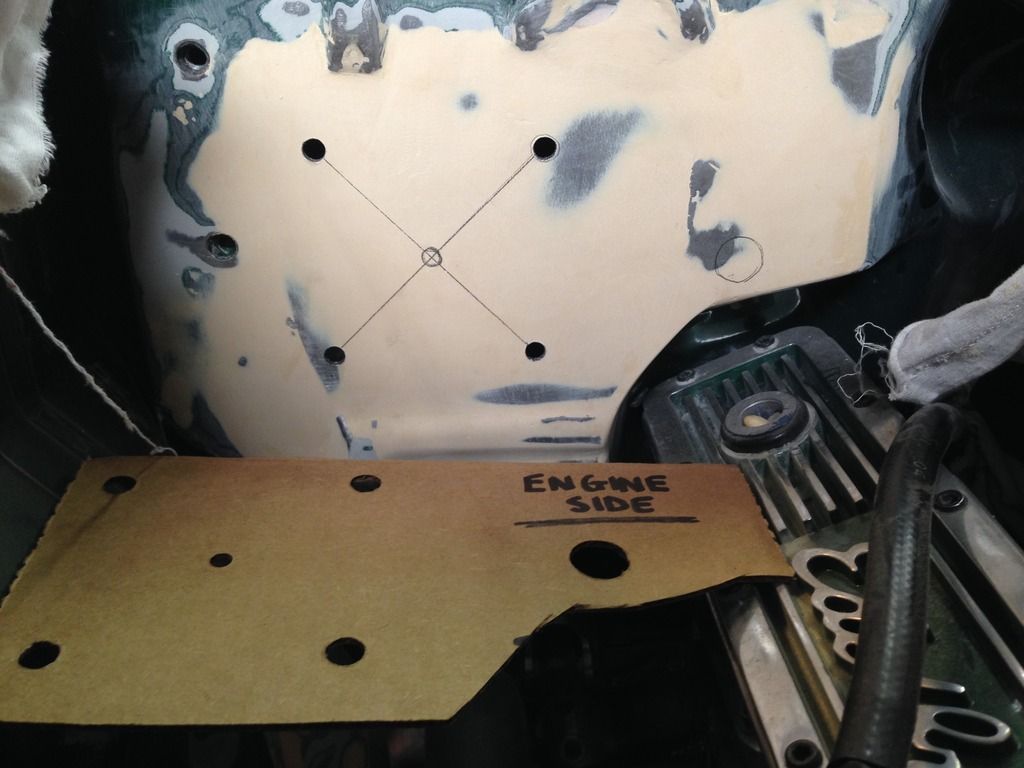
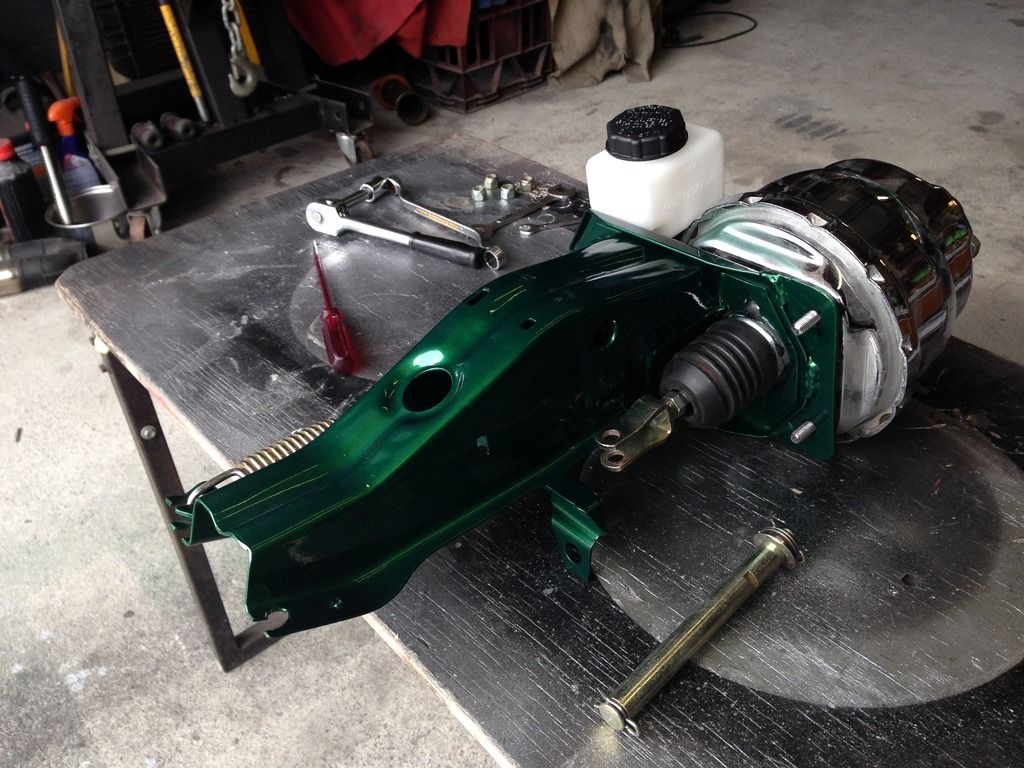
Areas prone to corrosion got a healthy coating of zinc spray then a lick of paint prior to the underside from firewall to back bumper being scuffed back by Boof ready for him to apply the underbody Scholtz .

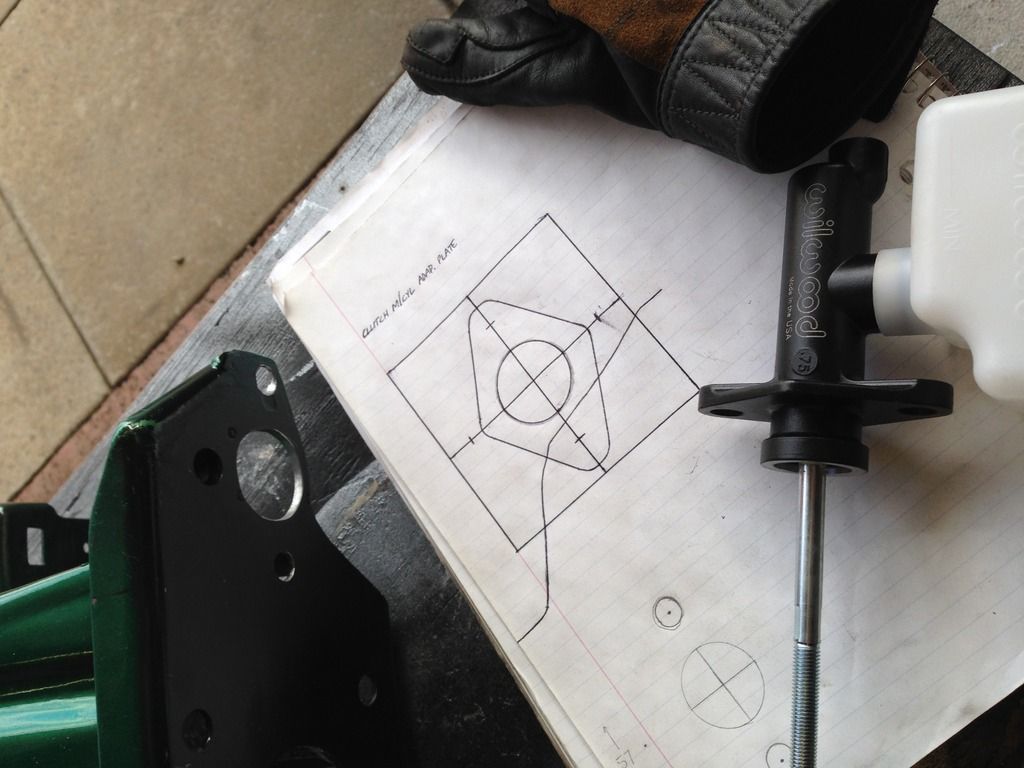
While , from memory , I was prepping the firewall as we had to cut out this section where the pedal box mount's and start again with fresh sheet metal and another pedal box which we modified similar to the way we did with Boofs EK (see Brodies EK in My FB EK section ) . Due to the lack of room at the firewall where it was recessed for the motor , fitment of the clutch master cylinder proved to be a challenge also . Boof fabricated an adapter which accepted the m/cyl and then allowed us to bolt to the firewall where we had some room in the paddock to drill a hole or two . The master and slave cylinder's are McLeod item's that I bought from the States . The whole clutch assy / component's proved to be a headache even after I went direct to the manufacturer's in the States as every avenue I tried in Aust was a dead end with a lack of knowledge and / or attitude .
Quite daunting when you come to realize that you seem to have a better grasp on the situation than the clown's on the phone that are supposed to be the Guru's . I will cover this and the component's I chose later in the thread .
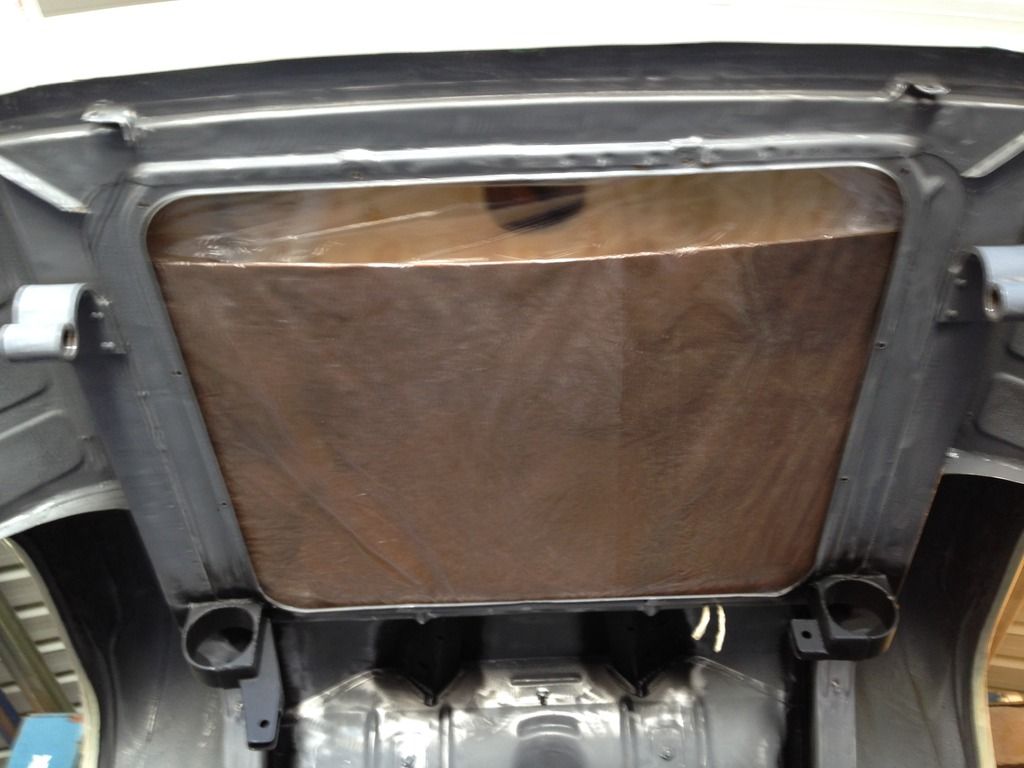
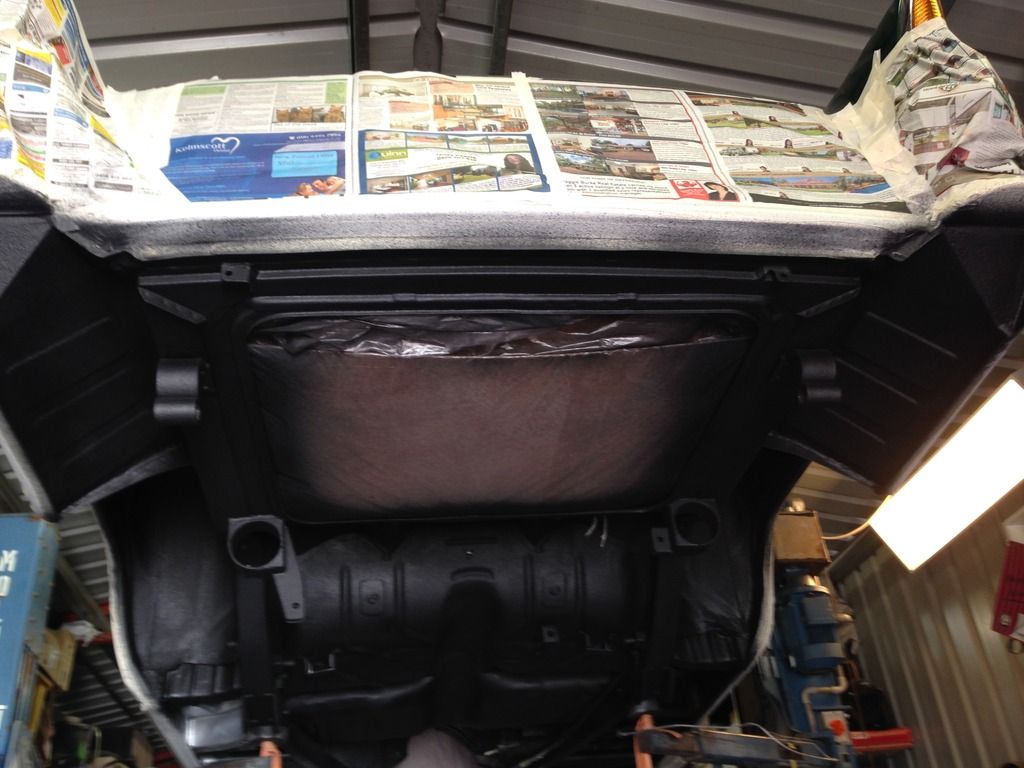
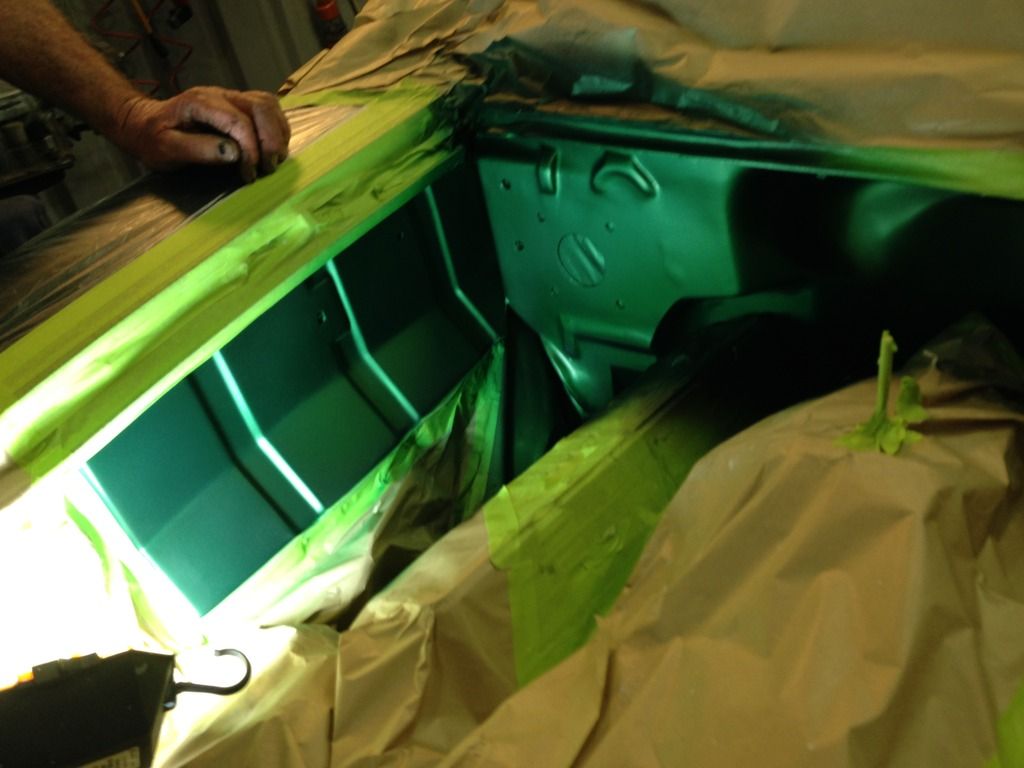
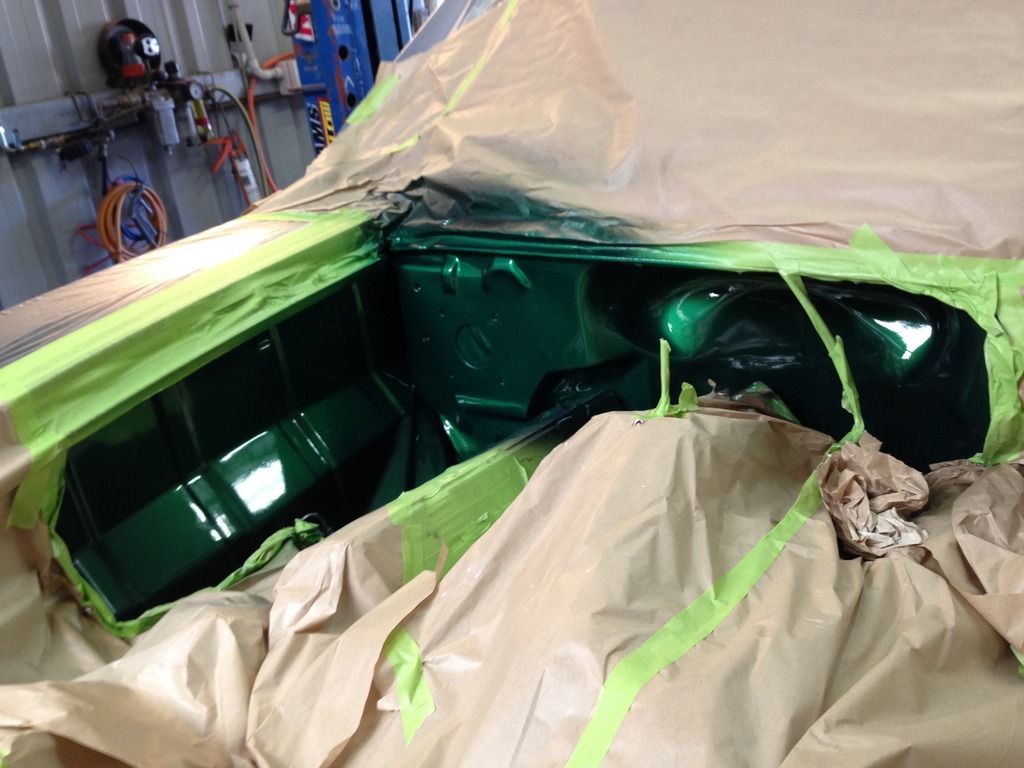
While the paint was being splashed around the firewall we also did the diff housing , another glove box to replace the chromed item the car came with and a couple of other knick - knacks like gauge pod's , pedal box etc . The engine bay will receive a full respray when I pull the front of the car off . Possibly a little less green to start with .
Very refreshing to be rid of most of the grey from under the car . Was not my thing at all . Also replaced the ceramic coated bonnet hinges with a pair of VE Commodore boot lid hinges that Boof modified to suit .Less bulk allowing access for booster , less weight and locates the bonnet so as it doesn't wobble around when you open up ( hence the two chip's on guard edges at bonnet bar ) , still yet to fit some heavy gas strut's .


While , from memory , I was prepping the firewall as we had to cut out this section where the pedal box mount's and start again with fresh sheet metal and another pedal box which we modified similar to the way we did with Boofs EK (see Brodies EK in My FB EK section ) . Due to the lack of room at the firewall where it was recessed for the motor , fitment of the clutch master cylinder proved to be a challenge also . Boof fabricated an adapter which accepted the m/cyl and then allowed us to bolt to the firewall where we had some room in the paddock to drill a hole or two . The master and slave cylinder's are McLeod item's that I bought from the States . The whole clutch assy / component's proved to be a headache even after I went direct to the manufacturer's in the States as every avenue I tried in Aust was a dead end with a lack of knowledge and / or attitude .
Quite daunting when you come to realize that you seem to have a better grasp on the situation than the clown's on the phone that are supposed to be the Guru's . I will cover this and the component's I chose later in the thread .
While the paint was being splashed around the firewall we also did the diff housing , another glove box to replace the chromed item the car came with and a couple of other knick - knacks like gauge pod's , pedal box etc . The engine bay will receive a full respray when I pull the front of the car off . Possibly a little less green to start with .
Very refreshing to be rid of most of the grey from under the car . Was not my thing at all . Also replaced the ceramic coated bonnet hinges with a pair of VE Commodore boot lid hinges that Boof modified to suit .Less bulk allowing access for booster , less weight and locates the bonnet so as it doesn't wobble around when you open up ( hence the two chip's on guard edges at bonnet bar ) , still yet to fit some heavy gas strut's .


I would rather work on a Morris 1100 than use a computer !!!!!!
Re: UBK 061 An Old Farts Last Ride
very nice mate looking mint!
Cheers
Nathan
Cheers
Nathan
FB/EK Holden Car Club of W.A. Inc
Foundation Member
Foundation Member

Re: UBK 061 An Old Farts Last Ride
I don't visit here often, but glad I did today. That looks fantastic!
Craig wrote: Andrew you have a red so I wouldn't race it

-
kelleigh54
- Posts: 242
- Joined: Wed Apr 25, 2007 12:43 am
- State: WA
- Location: PERTH WESTERN AUSTRALIA
- Contact:
Re: UBK 061 An Old Farts Last Ride
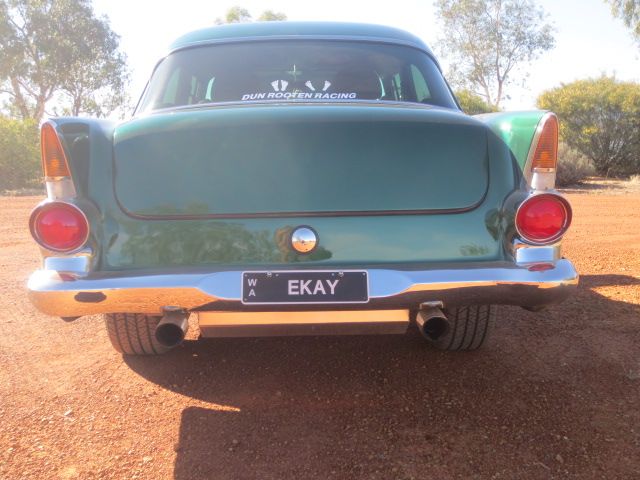
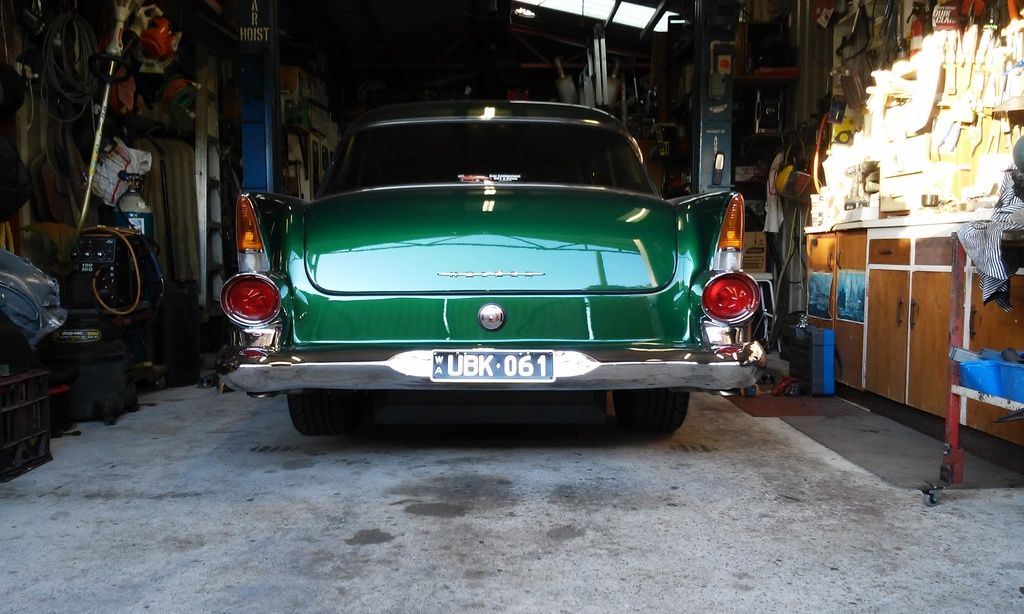
The existing exhaust system was in two and a half inch stainless and with the usual hyd bent bends , not mandrel bent . From the collectors it ran through to the mufflers ( unknown brand/style ) but are free flow . There was no balance tube either . From the mufflers it rose over the diff and then leveled out to run at inside face of spring's and with clearance along side the ally fuel cell through to exit at the bumper with a pair of chrome 3 inch tip's which were a little tacky in my eyes but we all do have different taste's . I am sure there are folk scratching their head's with my preferences .
Overall the sound was bloody noisy and lacked tone so I wanted to incorporate a couple of resonator's at the rear . These had to be small enough to fit tucked up under the rear quarters on the outer side of the spring's for two reason's . Cosmetically I wanted the tail pipes to end as droopies partially hidden under the bumper and directly below the tail light's , secondly , the existing 75 ltr ally cell had to be replaced to allow for clearances with the Watts Link set up and to achieve these clearances a large section at the rear of the cell had to be scalloped in to house the fuel filter , pump and lines . The boot floor had already been modified to take the 75 ltr cell so I took advantage of the overall area and designed the new cell with angled corner's which allowed a greater width and length . Along with an increase in both depth below floor and height above floor into the boot space , I managed a total of 95 ltr's ( which is needed by the thirsty bugger ) even with the massive loss of area from the required recess at the rear . Due to consuming all the floor opening that I could , this left limited space between the sides of cell and inside face of leaf spring's . Not enough for an exhaust .
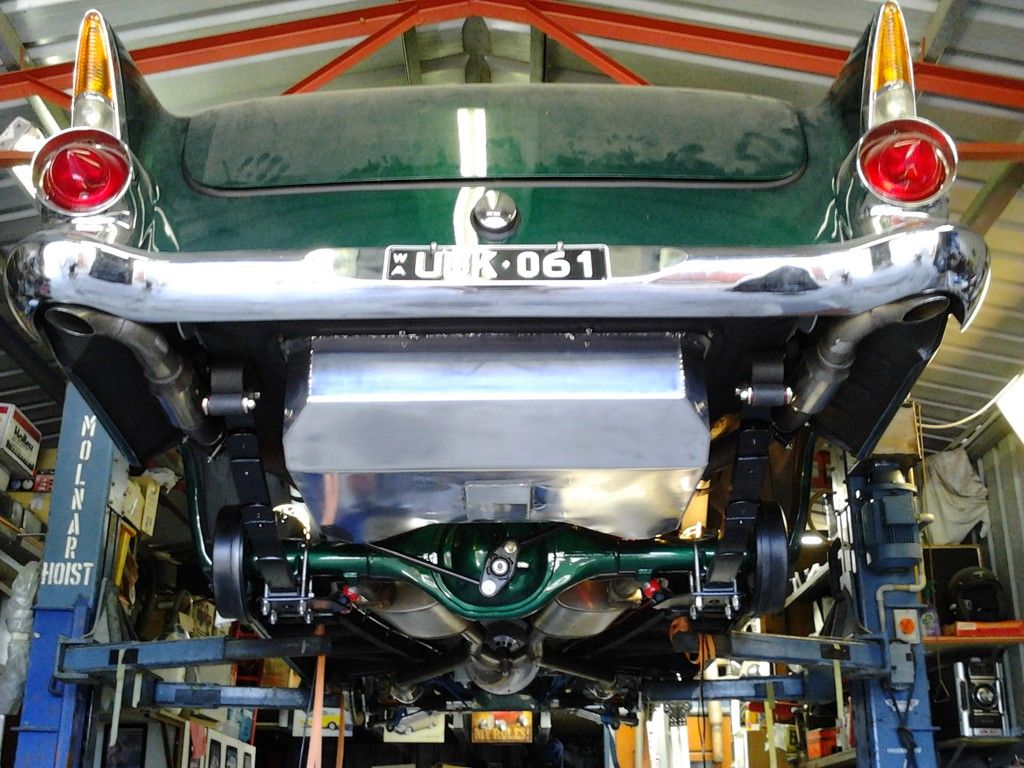
Previously the rear visual of the car with it's bum in the air and a polished ally cell hanging down ( drop tank ) and flanked by a pair of 3 inch exhaust tip's left an illusion of the car being skinnier than it is . By lowering the rear , hiding the exhaust and blacking out the new fuel cell along with the addition of an FB boot badge which is long , thin and placed at a low level on the previously clean lid was , I felt , a means of visually creating some width to the rear of the car .
Before and After below
To rebuild the exhaust with mandrel bend's and in stainless soon becomes expensive , so I made a phone call to a local crowd that specializes in performance packages to Commodores and asked if they would be interested parting with some of their left over systems from upgrades for which they were happy to oblige . So with a total of three full system's which included stainless resonator's for a princely sum of $150 I had more than I needed in bend's and a heap of excess tube which would be put to use on my HR ute and the girl's car's . It is amazing how these blokes with their new SS and HSV's take them straight in and spend an average of what ? 5 to 7 grand on upgrades , leaving their near new and sometimes brand new system's behind . Guess there isn't really a market for them so that is good for me .Would have cost more for a pair of resonator's .


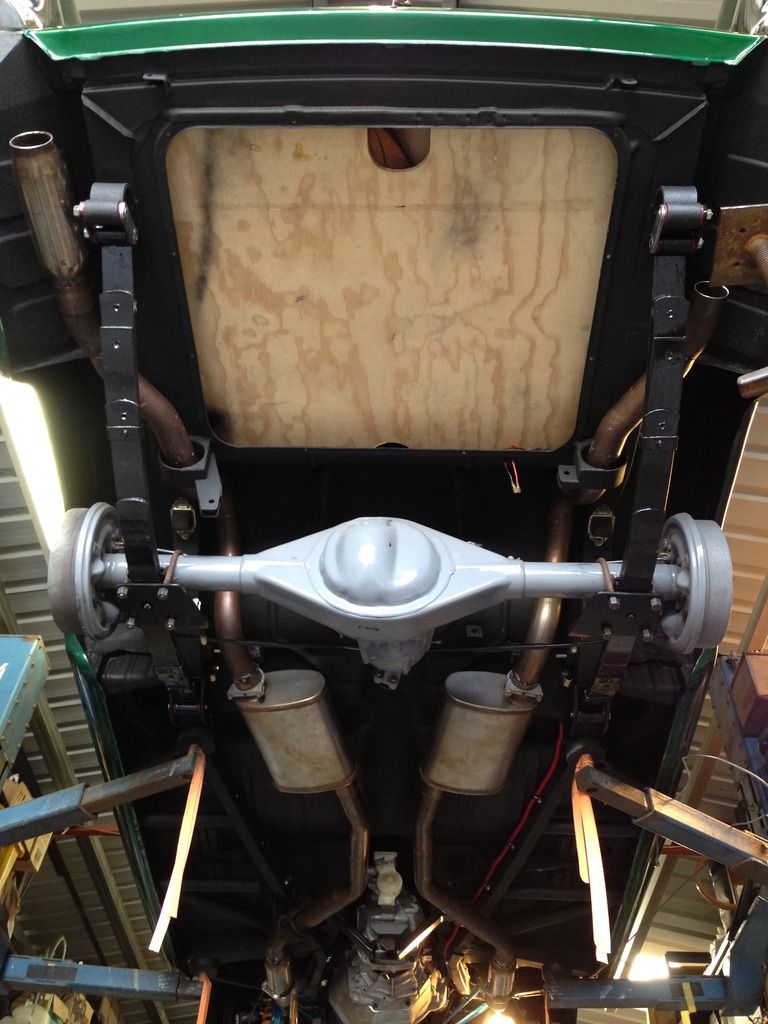
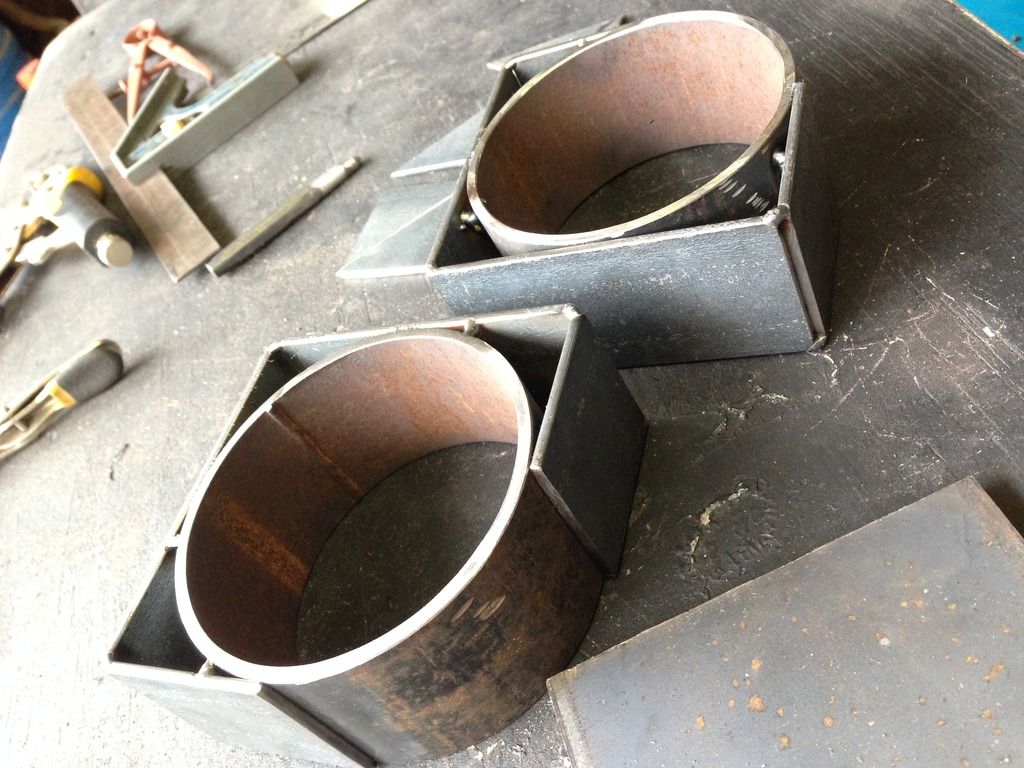
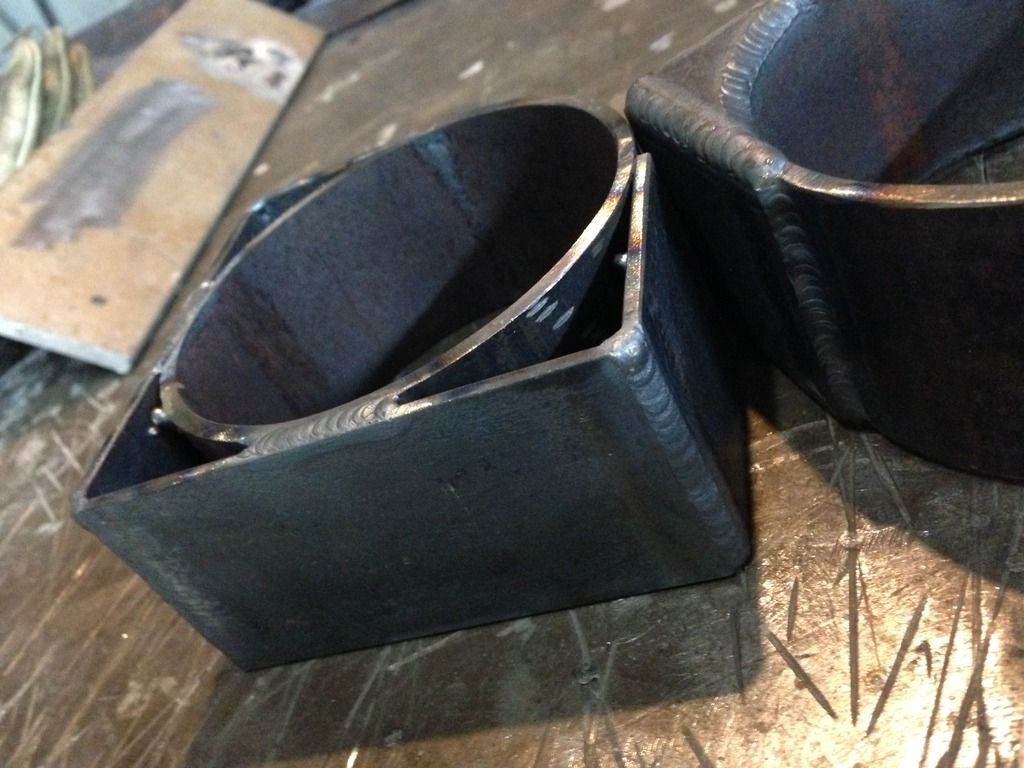
Retained the tubing from collector flanges through to muffler's with changes to include shorten tube and install resonator's at collector flange's and incorporate a balance tube as close as possible to the collector's as practical which placed us at the rear of the gear box and an issue with maintaining clearance for the tail shaft and at the same time a legal 100mm road clearance . With grinding a little off the bottom of the flange I managed 95mm . In hindsight I should have favoured the flange to one side creating a greater clearance . The balance tube needed to be flanged so to allow the removal of each side separately as it is one piece from collector flange all the way through to the rear side of the Watts Link bracket's then another section that takes you to the end of exhaust .
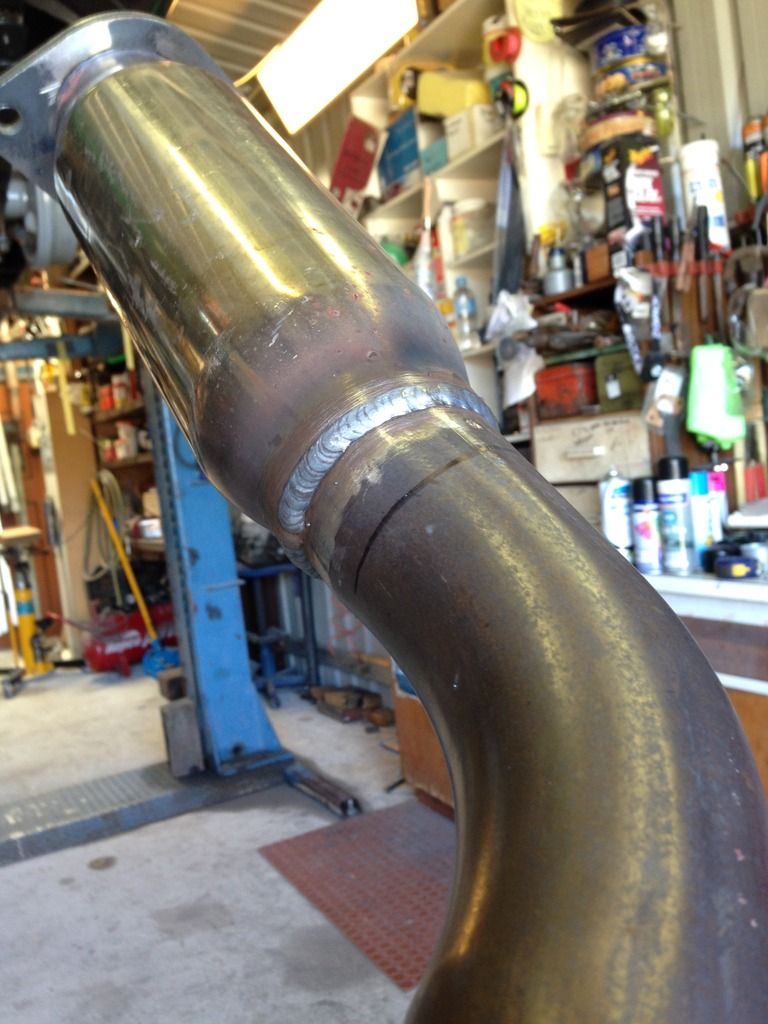
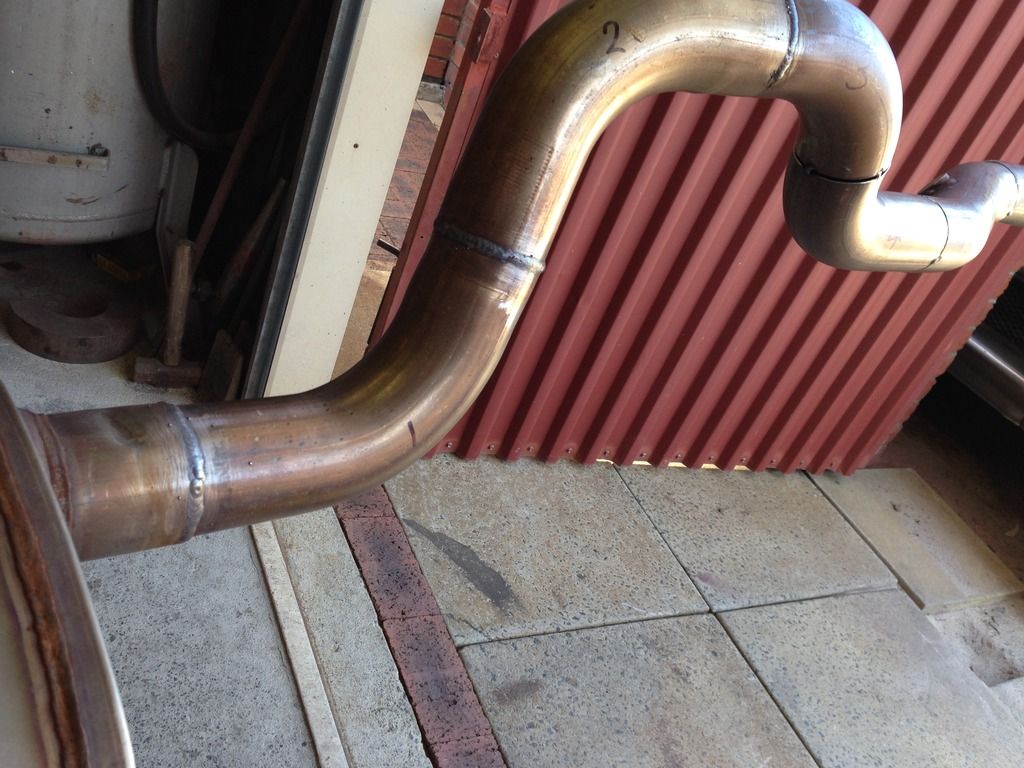
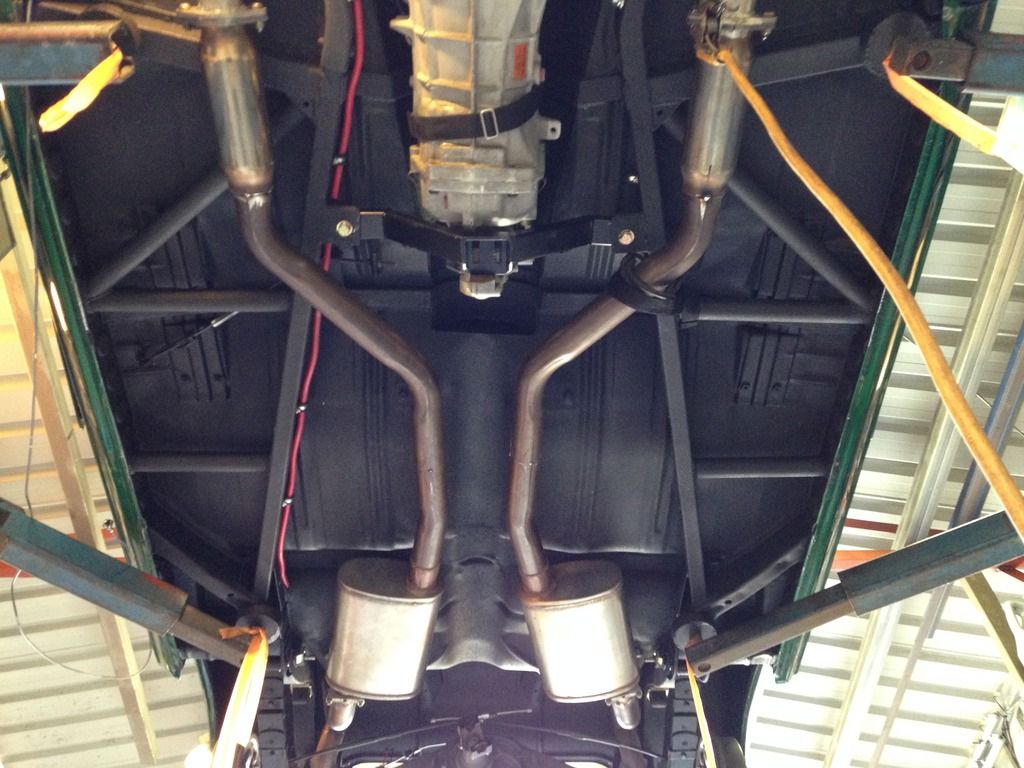
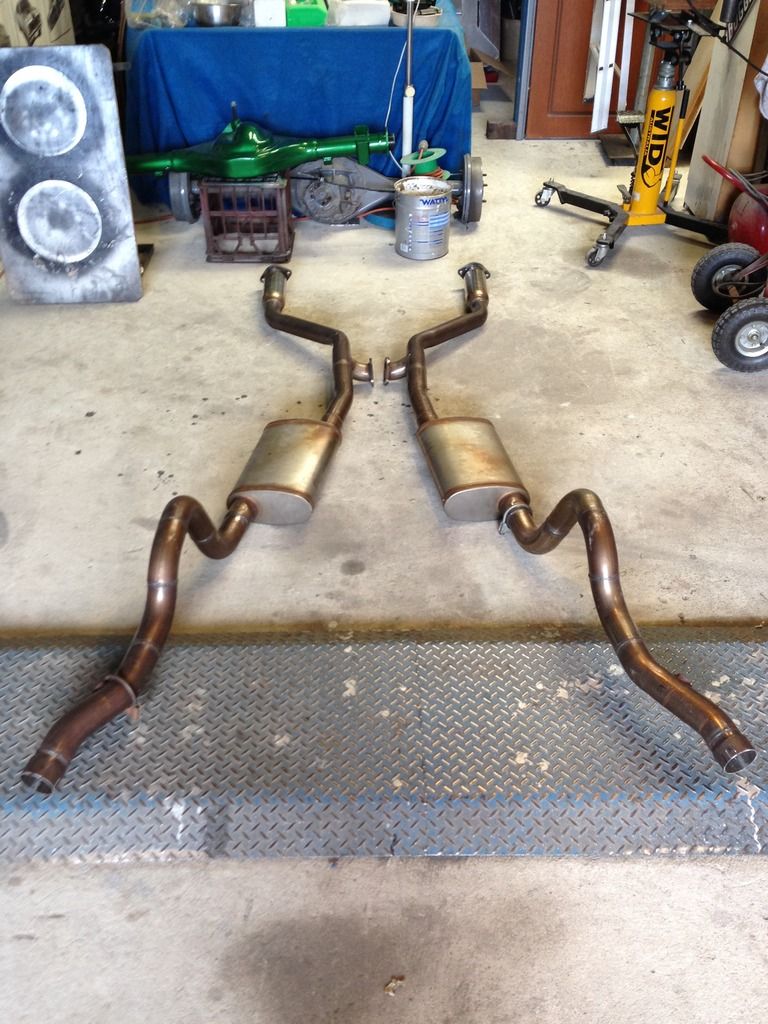
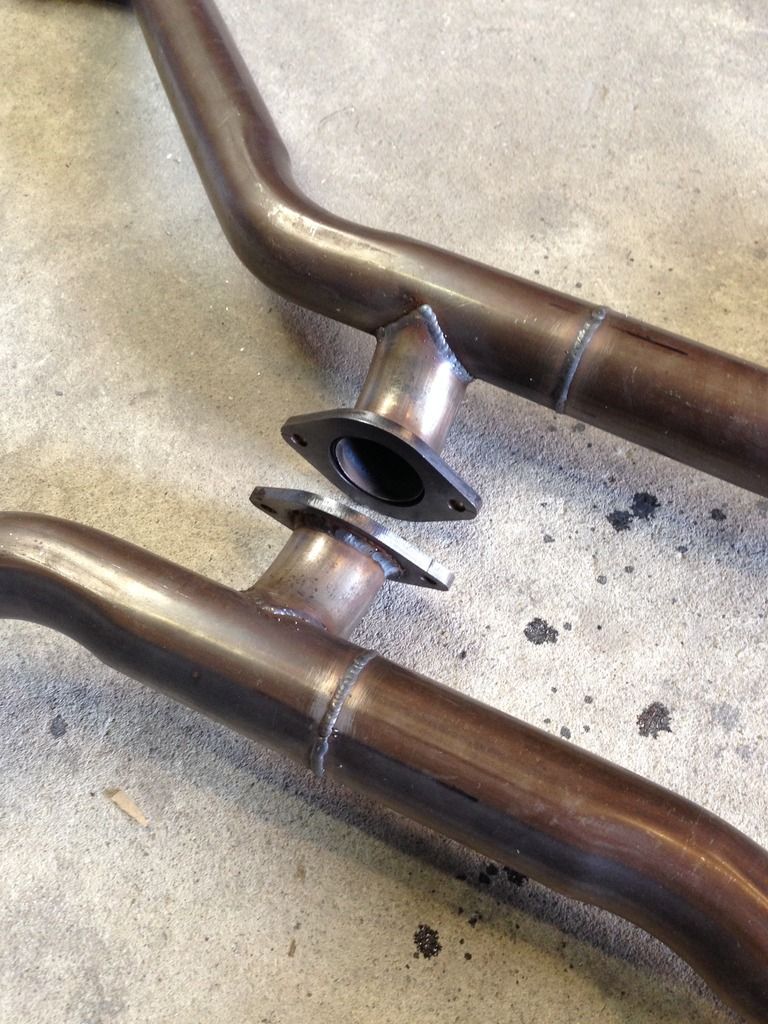
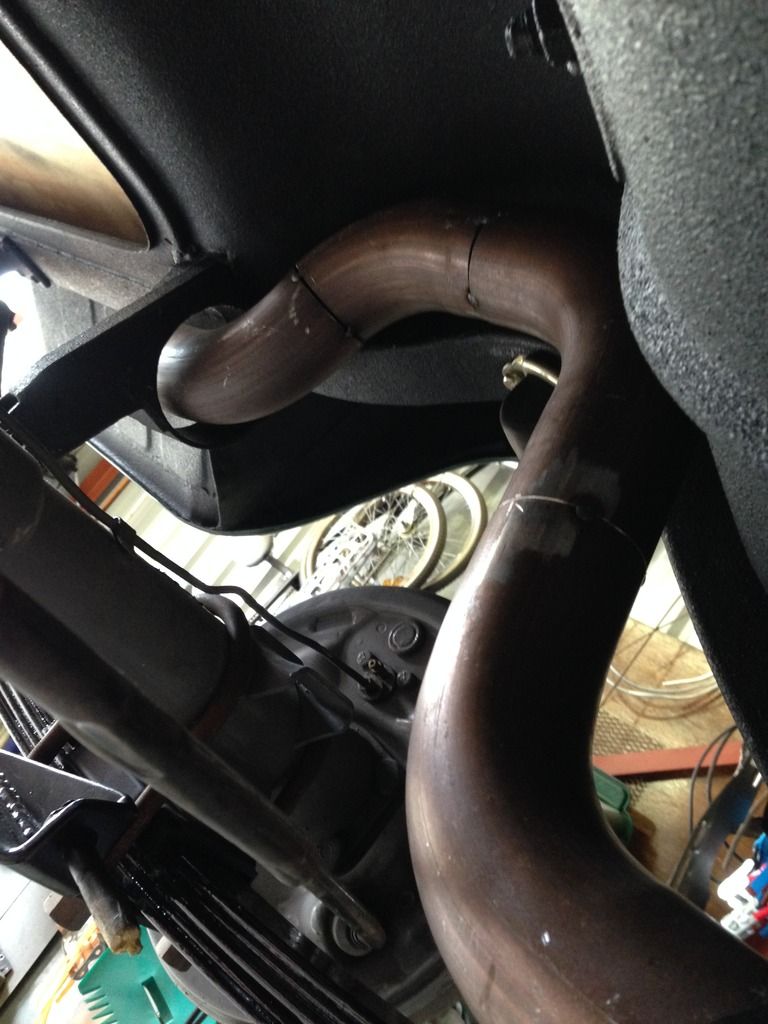
And then there was the finished product , ......... which was brilliant ....... with exception to the fact that there was not enough clearance between the chassi rail and top leaf where it crossed over ( on both sides obviously ) I should have done an assessment in the beginning but I just didn't consider that there would be an issue at that location . Especially with reversed spring eyes which leaves more arch in the spring's than a conventional spring reset . Oh Well ! we live and learn from our mistakes . Problem is , there is no easy fix .
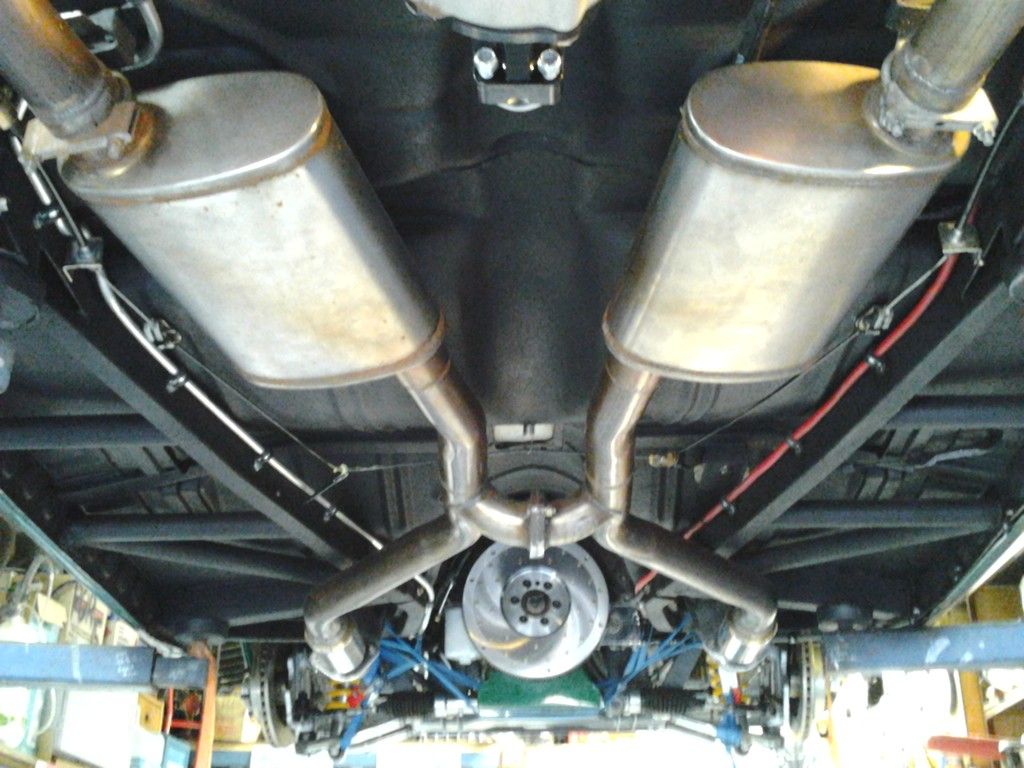
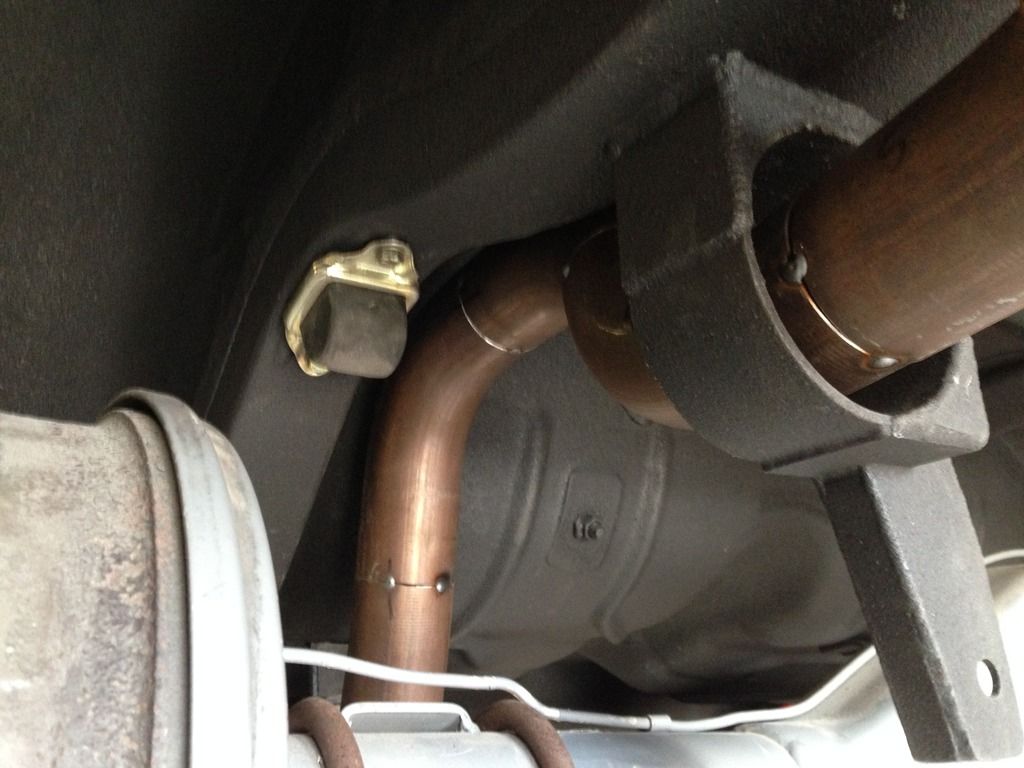
I initially crushed ( ovalized ) the area of pipe effected down to 1 and 3/4 inches which is acceptable without power loss on a 2 and 1/2 inch but as expected it didn't help so next try was standard spring's and 2 inch block's to increase the clearances with a greater spring arch . Problem with that was , I have the rear suspension tied in so well there is little allowance to wander around on the spring's and bushing's , which are the weakest point's and with the block's in place , I assume they increased the loading's due to the block's acting like a fulcrum / leverage point and accentuated that movement in the bushing's allowing the inside of tyres to rub on the inner tub's whist cornering . even though the body roll factor does not change nor the height of tyres in the tub's nor the ability to locate with the Watts Link ,some how the block's and spring's upset the whole balance in the rear . May sound crazy but the change was so great I pulled it all to pieces after about half an hour's driving .
At the moment it is still thumping and banging away at the least of bump's and I am doing my best to ignore it but it drives me crazy. I have had some tubing ovalized by machine and will be lagging these tail pipes so I can squeeze them up between the sides of fuel cell and the spring's / spring hangers . Which I hope will suffice for the time being and give me a little suspension travel back .
Overall the sound was bloody noisy and lacked tone so I wanted to incorporate a couple of resonator's at the rear . These had to be small enough to fit tucked up under the rear quarters on the outer side of the spring's for two reason's . Cosmetically I wanted the tail pipes to end as droopies partially hidden under the bumper and directly below the tail light's , secondly , the existing 75 ltr ally cell had to be replaced to allow for clearances with the Watts Link set up and to achieve these clearances a large section at the rear of the cell had to be scalloped in to house the fuel filter , pump and lines . The boot floor had already been modified to take the 75 ltr cell so I took advantage of the overall area and designed the new cell with angled corner's which allowed a greater width and length . Along with an increase in both depth below floor and height above floor into the boot space , I managed a total of 95 ltr's ( which is needed by the thirsty bugger ) even with the massive loss of area from the required recess at the rear . Due to consuming all the floor opening that I could , this left limited space between the sides of cell and inside face of leaf spring's . Not enough for an exhaust .
Previously the rear visual of the car with it's bum in the air and a polished ally cell hanging down ( drop tank ) and flanked by a pair of 3 inch exhaust tip's left an illusion of the car being skinnier than it is . By lowering the rear , hiding the exhaust and blacking out the new fuel cell along with the addition of an FB boot badge which is long , thin and placed at a low level on the previously clean lid was , I felt , a means of visually creating some width to the rear of the car .
Before and After below


To rebuild the exhaust with mandrel bend's and in stainless soon becomes expensive , so I made a phone call to a local crowd that specializes in performance packages to Commodores and asked if they would be interested parting with some of their left over systems from upgrades for which they were happy to oblige . So with a total of three full system's which included stainless resonator's for a princely sum of $150 I had more than I needed in bend's and a heap of excess tube which would be put to use on my HR ute and the girl's car's . It is amazing how these blokes with their new SS and HSV's take them straight in and spend an average of what ? 5 to 7 grand on upgrades , leaving their near new and sometimes brand new system's behind . Guess there isn't really a market for them so that is good for me .Would have cost more for a pair of resonator's .


Retained the tubing from collector flanges through to muffler's with changes to include shorten tube and install resonator's at collector flange's and incorporate a balance tube as close as possible to the collector's as practical which placed us at the rear of the gear box and an issue with maintaining clearance for the tail shaft and at the same time a legal 100mm road clearance . With grinding a little off the bottom of the flange I managed 95mm . In hindsight I should have favoured the flange to one side creating a greater clearance . The balance tube needed to be flanged so to allow the removal of each side separately as it is one piece from collector flange all the way through to the rear side of the Watts Link bracket's then another section that takes you to the end of exhaust .


And then there was the finished product , ......... which was brilliant ....... with exception to the fact that there was not enough clearance between the chassi rail and top leaf where it crossed over ( on both sides obviously ) I should have done an assessment in the beginning but I just didn't consider that there would be an issue at that location . Especially with reversed spring eyes which leaves more arch in the spring's than a conventional spring reset . Oh Well ! we live and learn from our mistakes . Problem is , there is no easy fix .

I initially crushed ( ovalized ) the area of pipe effected down to 1 and 3/4 inches which is acceptable without power loss on a 2 and 1/2 inch but as expected it didn't help so next try was standard spring's and 2 inch block's to increase the clearances with a greater spring arch . Problem with that was , I have the rear suspension tied in so well there is little allowance to wander around on the spring's and bushing's , which are the weakest point's and with the block's in place , I assume they increased the loading's due to the block's acting like a fulcrum / leverage point and accentuated that movement in the bushing's allowing the inside of tyres to rub on the inner tub's whist cornering . even though the body roll factor does not change nor the height of tyres in the tub's nor the ability to locate with the Watts Link ,some how the block's and spring's upset the whole balance in the rear . May sound crazy but the change was so great I pulled it all to pieces after about half an hour's driving .

At the moment it is still thumping and banging away at the least of bump's and I am doing my best to ignore it but it drives me crazy. I have had some tubing ovalized by machine and will be lagging these tail pipes so I can squeeze them up between the sides of fuel cell and the spring's / spring hangers . Which I hope will suffice for the time being and give me a little suspension travel back .
I would rather work on a Morris 1100 than use a computer !!!!!!

Re: UBK 061 An Old Farts Last Ride
That stance with the hidden exhaust looks great Leigh 
Love seeing the quality of work that comes out of that shed of yours!
Love seeing the quality of work that comes out of that shed of yours!

-
BILLY BLACKARROW
- Posts: 1065
- Joined: Thu Aug 21, 2008 9:22 pm
- State: NSW
- Location: NEWCASTLE MACQUARIE HILLS
Re: UBK 061 An Old Farts Last Ride
I to like the exhaust,  I hope my muffler man can copy it as it cleans up the back of the car nicely.
BILLY
BILLY
BILLY BLACKARROW
MY Father always said do the hard part first --because when you are OVER IT you only have the easy part left to do THINGS I HAVE TRIED TO LIVE BY
MY Father always said do the hard part first --because when you are OVER IT you only have the easy part left to do THINGS I HAVE TRIED TO LIVE BY
Re: UBK 061 An Old Farts Last Ride
Exhaust does look great, is the diff hitting the exhaust or is the exhaust banging on the body somewhere ?
Maybe you could run 2 inch from the mufflers and give it some more room.
I have 2 inch exactly the same run as yours and although I haven't driven it yet I couldn't see it hitting unless it bottomed out totally.
Such a pain especially after the hours of work that's gone into it, keep plugging away I'm sure you'll sort it.
Regards Greg
So many cars so little time!
-
kelleigh54
- Posts: 242
- Joined: Wed Apr 25, 2007 12:43 am
- State: WA
- Location: PERTH WESTERN AUSTRALIA
- Contact:
Re: UBK 061 An Old Farts Last Ride
Thanks Billy and J . Greg the clearance issues are where the exhaust crosses the leaf springs , when in a loaded state the clearance between the main leaf and the frame rail is not enough to allow full spring movement as it rises and flattens out under compression . I have raised the top of tube height to just clear the frame rail and also reduced the tube from 2.5 inches to 1.75 inches and there is still limited spring movement . The area over the diff is sweet , as is the remainder of the system .
Will get back to the remainder of the post next week .
Will get back to the remainder of the post next week .
I would rather work on a Morris 1100 than use a computer !!!!!!
Re: UBK 061 An Old Farts Last Ride
Leigh,
This is a early shot of my exhaust that is 2 inch, I have since reversed the springs eyes and I think they will clear them hopefully !
Mine turn out right behind the wheel then go straight. I think your watts link mounts eat up a bit of space.

Regards Greg
This is a early shot of my exhaust that is 2 inch, I have since reversed the springs eyes and I think they will clear them hopefully !
Mine turn out right behind the wheel then go straight. I think your watts link mounts eat up a bit of space.

Regards Greg
So many cars so little time!
-
kelleigh54
- Posts: 242
- Joined: Wed Apr 25, 2007 12:43 am
- State: WA
- Location: PERTH WESTERN AUSTRALIA
- Contact:
Re: UBK 061 An Old Farts Last Ride
Looks very similar to what we have done , ducked across the spring on an angle to straighten up just behind the wheel . The Watts link brackets don't really impact on it as we still have to get beyond the tyre . I am assuming that you lowered a total of 50mm when reversing the spring eyes . I hope for your sake that it all clears . Have you had it on ground yet to assess if all is good ? Ahh the joys of modification , it is usually the obvious that catches one out , we bury ourselves so far into the what could and how would along with is it going to be serviceable scenario's that we often overlook the stupid little things . Well , I do anyway !
Next time in the shed I will measure from centre of axle to where it starts and finishes crossing the spring .
Last edited by kelleigh54 on Mon Mar 07, 2016 11:57 pm, edited 1 time in total.
I would rather work on a Morris 1100 than use a computer !!!!!!