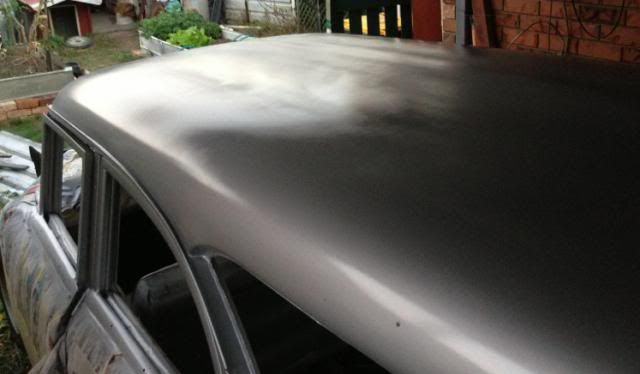
Had a very frustrating day trying to finish putting the gloss on the car.
Doing the roof was the worst, a major challenge.
I not sure what I need to change to get my spray guns putting out gloss.
I tried adjusting as many things as possible, but nothing gave me the gloss I wanted
I just seem to be getting a thin gloss strip and lots of overspray on both sides.
So even if I overlay the thin gloss strip, it just makes a dry strip on both sides, so I still end up with strips.
My gravity feed gun seems to have really limited adjustments.
The air flow at the bottom is so easy to move that as a change hands it can move the screw and changes the air flow.
The side adjustment only has about a quarter turn from the fully in position. anything more and it's too dispursed.
Tried the Suction gun, which was better but I was still getting overspray on both sides.
Also I hate using it on top areas, and hit the roof with the paint pot twice.
I can probably get a shine after sanding it back, but I thing I should be getting a lot better wet off the gun.
Some areas came out OK, but the roof is a real pain.
Any and all ideas welcomed.
HELP................
IT's LIKE WATCHING DRUNK MONKEYS TRYING TO HUMP A FOOTBALL.
I m assuming you are painting acrylic. If you are getting a thin,gloss band with dry spots on either side it sounds like your fan is too wide. I use a suction feed gun for acrylic.
I use premium flow thinners and keep the gun about six inches away from the surface.
You need to overlap by half each pass.
Dont paint in the full sun. If the panel is too hot it will dry before settling. Having,said that if the panel is cold it could shrink or craze.
On something like a wagon roof you will find itll be pretty hard to get full gloss in acrylic.
Using Premium thinners, and 6 inch uniform distance.
Used my suction feed gun also, which I actually prefer. But I keep hitting the roof with eth bottom of the pot.
Which is why I prefer the gavity gun when doing roofs.
I was thinking it's something in the set-up.
Unfortunately when I testing before hand, it's hard to see how much and where it coming out, when you're doing clear.
And the damn gun moves the adjustments so easily (by accident).
Just wonder why I can't get a nice wide (6 inch) wet pattern coming out of the gun.
I have cleaned the tip (soaked overnight) and the shaft, but didn't make any difference.
IT's LIKE WATCHING DRUNK MONKEYS TRYING TO HUMP A FOOTBALL.
I set my fan a lot narrower than six inches.
Put some thinners in them and aim the gun at a scrap panel or flat board. You will see what the fan pattern is doing.
Tim I've finished with the base and it went on fairly well, although being metallic I wasn't following straight lines so I didn't get banding in the flakes.
But I will try it with the lowest pressure and slow speed.
Not sure if that will increase the size of the spray but I'll try.
I was probably looking for a width of about 4 inches.
I've tried watching the pattern and it going straight from narrow (Spot/circle), to wide. with about a quarter of a turn.
But at wide its not producing wet other than about an inch in the middle.
I have lots of spare white so I'm going to practice, using that until I get it right.
The more I look the more I think it could still be a clogged air cap, even though I soaked it in thinners over night.
Maybe its clogged with something else not paint.
IT's LIKE WATCHING DRUNK MONKEYS TRYING TO HUMP A FOOTBALL.
Because I'm reaching up over the top, I'm probable not getting it straight onto the panel, which is leaving a thicker area.
I'll adjust the angle of the cap to suit and try to get it straighter.
Which is also why I probably hit the bottom of the pot of=n the roof when using a suction gun.
Either that Or I'll drop the wheels off the car.
IT's LIKE WATCHING DRUNK MONKEYS TRYING TO HUMP A FOOTBALL.
The wheels on it were 15in, could have tried letting the air out but had 2 flat 13in ones so I swapped the front for them.
Then drop the rear wheels altogether and sat it down of some blocks of wood.
And just to top it all off used the crates and plank.
Cleaned out everything in the gun, played with all the settings, lowered the pressure, raised the pressure, went much slower.
Found that by leaving the gun air flow open and putting the extra gauge on at the gun, I could adjust the pressure much better.
Just found that going slow to get the wet, meant that by the time I got back it had mostly dried out.
But the final outcome was much better, although I still couldn't get a wide and wet spray pattern.
Put another 3 coats on and it came out OK.
Good enough that after a rub back it will come out very nice.
IT's LIKE WATCHING DRUNK MONKEYS TRYING TO HUMP A FOOTBALL.
Hi Finny,
sorry it to me so long to get onto this - we're away on the road again.... can only get on line when we have connection.
Ok - I've been where you are a few times - the first encounter with this was so bad I had to block it all back.
My initial response was to wet it all again with a super hot thinners mixed into the paint... so that it would fuse all the pigment into a wet base - it didn't.. and blocking back was the only option.
What I eventually found was that I was using far too much air, too far away with too a hot thinner. I was spraying on a day which I waited for where the temp was around 25c and the humidity was under 50%.
What was happening, was that the paint was drying before it hit the panel. This was more noticeable at the sides because the fan jets were hitting the paint with more air than around the centre - to spread the paint further from the tip - and, of course was drying it even more so.
Providing all your jets and fan nozzles are clear, you should be able to adjust the pattern to get a flat, even coat.
If you can get that - where there is no more built up of paint in the centre than out towards the edges - that's probably as good as you can adjust your gun to.
A good gun will compensate for any changes in air pressure - in that it will afford you an increase in output at the fan jets as well as the mix within the nozzle tip and tip jets.
The lower down the quality scale you go, the more experience you'll need to determine what to adjust.
It is a bit of a balancing trick to achieve this using the mix of paint you are using, but if you are able to adjust the fan, paint control and pressure to get a flat pattern - you're almost there to achieving a great coat.
The next step is to keep it wet. We can do a few things to achieve this.
I wouldn't play around with the percentage of thinners - especially if metallic or pearlescent - as this will make matching the base very difficult.
There are two distinct differences between suction and gravity fed guns..... a suction gun will need sufficient pressure to lift the paint up - a gravity one won't.
If your paint is to thick - a suction gun will struggle to lift it - applying more pressure to do this will lift it, but at the same time will dry it more as it leaves the gun for the panel.
With a solid color, it's a bit easier - because you can add very slight more thinners to get the viscosity of the paint thinner... with a metalic, you're a bit stuck - because it will have an adverse effect on the depth of the particles in the coat level.. especially metallics - and to a much lesser extent pearlescents...
With this, I might suggest you use a "slower" thinners. Your paint supplier can sell you this - it is developed to keep the paint wetter for longer - and flow out is a lot better. Do NOT use this slow thinner on a coolish or humid day - it will trap humidity within the coat.
As Tim states, don't spray your panel when it is warm to hot. Neither should it be cold. Ideally, I'd suggest the panel be at "room" temperature on a day of around 25 deg C.... or above 20 c at the minimum. Too hot a panel will aid to drying the paint before it can flow out - even worse, fail to fuse into the previous coat - resulting in one coat "sitting" on top of the previous - and will chip if knocked.
With a gravity fed gun, basically - the paint will run as soon as you pull the trigger. Usually, the first stage of trigger action opens the air jets - the second stage then opens the paint tip and the mix begins.
Too much air will atomise the paint better, but it will also dry it faster. Too little air and you'll begin to get "trickling" - where the paint is not atomising properly and it begins to flow outside the gun - the air then picks it up and carries it to the surface.... I can only explain the way I feel the paint is traveling to the panel is by a garden hose effect.... not an air mixed spray.
A mixed spray seems to have a more pronounced sound of the paint with a lot of air "in" it.... the garden hose effect sounds more like a squirt.
Again, as with suction fed gun use - the gravity fed method is to get the paint to lay flat with a level build of paint across the 6 - 8 inch pattern.
Your adjustment of the fan control affords you this. You must also balance this fan spread with pressure - too much and the paint will dry at the edges (like you have) - too little and you struggle to lay paint flatly across the entire pattern and usually end up with a thicker wet build in the centre - more so, you might find that there is a "sand paper" effect which increases towards the edge. If you get that, you have no option but to block back..... don't even think of trying to buff this out - it is really a case of little balls of dried paint with gaps between them. Trying to rub this to a flat finish will result in craters in the finish.
With gravity guns, you must get your paint flow control pretty much right. I can't offer you a specific needle start setting, but needle flow control is certainly more critical with gravity than it is with suction.
Make absolutely certain that the gun triggers air well before the paint needle opens - or you'll shoot a squirt of paint before the air catches up.
I'd probably suggest to set the needle screw towards the full out position to begin. Get your pressure and fan set so that you can lay a pass down where you get at least 6" of coat across the panel. If you get a flat pass but are getting dried paint out at the edges - you will most likely have too much pressure or fan - or both.
If the centre of your coat is built up high and very wet - you either don't have enough fan/pressure.
As I learned to identify what was happening with each of the controls, I eventually came to the conclusion that it was best for me to get the fan and pressure right, then start playing around with the paint needle setting, distance from the panel and speed of the pass.
Screwing the needle in allowed me to work closer to the panel but narrowed the width of the pass. Screwing it out allowed me to move further away and widen it, but I also found I had to slow my pass down - or the paint would dry too quickly as it was laid down a lot thinner.
With both types of gun - if your paint viscosity isn't right - you're going to struggle to get the pass to lay down flat, wet and wide.
Paint viscosity varies with temperature. The colder it is, the thicker the paint will be and vice-versa...
I would suggest having two types of thinner on hand. A "hot" one - and a "slow" one. You can mix the two together, if needed.
The "general purpose" thinner (GP) is somewhere in the middle. It will work quite well in the "normal" temperature range - but will "lag" if used in cold/humid temperatures and will "flash off" too fast in higher/drier ones.
Your thinner guide is - cold weather = superfast thinners, hot weather = slow thinners.
We have mentioned the distance and speed - these are more important when working at the end of the suitable spraying range - or with paint that won't lay down and shine up.
My distance is always about the same - with a large gun, I open up my hand and open my fingers out.... I try to keep the tip of the gun distance from panel to that of what my little finger is from my thumb.
My speed is determined by how much "wet" I get whilst making the pass. I don't look into what I am spraying as it hits the panel - but more at the reflection of something behind me in the wetness of the paint - I like to have very good lighting when spraying - it affords being able to see something in the garage in the wet coat of the paint. I look at this at about 2" behind where I am currently laying the paint down.
It is sometimes a challenge to let this "wet" coat build up and really get shiny without going that one step too slow and having it run..... more so on vertical surfaces.
Finny, you've laid down a fair amount of paint - and have quite a bit of experience to work from. I'd suggest sticking to one gun and mastering it.
Personally, I prefer my large Iwatta suction gun, although I have to admit - it is an industry preferred instrument... or was, in it's time.
As for spraying your roof, I built up a "trestle" on which I could walk along without having to look away from the panel I was spraying.
I suspend the air line from hooks and do my very best to keep the angle of the gun parallel to the surface of the roof - be mindful that your vent hole must be at the rear - good guns have a float valve which prevents paint from running out the vent hole when it reaches the hole, but opens up if there is any relief needed within the pot.
The day before, I took to the floor of the garage with a garden hose. I blew the ceiling of the garage out and tried to get all that loose dust to fall onto the floor. I then open the garage up and try to dry it out for a few hours.
On the day I spray, about an hour before - I "spread" a bucket full of water over the concrete floor.... my shoes then don't bring up dust or dried paint as I move around.
I don't do this too early, or it will create humidity.
Just before I spray, I very lightly run a "tack rag" across the surface to pick up anything which might have settled on the roof whilst I'm mixing paint/compressor is running etc. etc.....
I found the roof the most difficult of all the vehicle to spray - in all aspects. It's in a difficult location (for someone vertically challenged), is prone to getting dust settling on it, everything you wear or carry or use seems to want to get in contact with the fresh paint and finally, being at eye level - any imperfection can be seen as you lay your eyes across reflections in the surface..... especially the flat section across the middle... more so on wagons.
I understand what others suggest about dropping the pressure of tyres/size of wheels etc to lay the roof over.... but, we must realise that we have to move from one side of the car to the other to spray the roof.. and if it is laying over at an angle - it only makes the picking up of the last run from one side to the first of the other (centre of roof) more difficult if it is laying away from you.....this has to be done as quickly as possible or the previous run will dry and the pick-up run will fail to fuse into it...... my thoughts.
Finally, I might just re-visit overlapping of passes.
I like to try to overlap by 1/3 - this is how my gun lays paint down best. The outer third on both sides is a little thinner than the centre 1/3rd.... by overlapping by 1/3 - my overall coating is pretty much a flat and even depth.
If your build at the centre is deeper than this - you might like to overlap by half, but I'd only suggest this if you are trying to force a gun to spray a wider pattern than it is probably good for....
Dry paint finish = wrong thinners for temperature, too much air, too hot/dry conditions, too warm a panel, pass too far from panel, pass too fast, fan too wide/paint too thick/paint needle not open enough.
Dry at edges - fan too wide/needle not open enough/paint too thick, too much pressure, too close to panel/fan too wide..
These are the big ones I can think of at present....
A very detailed response as always, and lots of great ideas.
Just to clarify, the silver was finished, it was the clear that I was struggling with.
It could have been the actual thinners, but I was using the suppliers recommended product.
Whilst I hope the roof is finished, I'm still interested to find out why this was happening.
I'm thinking I'll do a VIDEO and demo the adjustments I make, the settings, the techniques and the results.
That should narrow it down in case I'm missing something.
Thanks again Rosco, and I hope you're enjoying your trip.
IT's LIKE WATCHING DRUNK MONKEYS TRYING TO HUMP A FOOTBALL.
Thanks Finny,
If it was the clear coat, then I believe you might have either had your pressure up too high or your paint flow too low - for the width of fan you were trying to lay down.
Of course, speed and distance are also major factors.... it is critical that these four factors are "balanced" to achieve that flat and wet coat without running.
I forgot to mention previously, that a slow thinner will not penetrate the previous coat as deeply as a "hot" one - I don't know what they change in the mix, but it is my belief it is the acetone/tolulene content.
A super-hot thinner mix will re-activate the coats underneath, but if you have used any plastic filler - you should also be aware that this hot thinner might penetrate so deeply if applied in a heavy coat of paint - that it will show up the plastic filled locations as "wet spots" - and as the paint dries, the plastic ones will remain wet for longer. I have had experience where this was visible after the surface coat had flashed off - and the plastic filled areas were visibly at a higher level than that of heavy primed or puttied areas.
General purpose and slow thinners will not penetrate this deep... I believe this is important information which I neglected to post in the above.
Yes, please do post up a short video - as mentioned, it will be difficult for me to determine what you are doing with reference to the paint as it is being laid down.... my own method is to follow the paint with my eyes - and use something in the garage to get a reflection on - that's how I determine how heavy my coat is going on and the speed I need to travel at to achieve the required result...
I really didn't have any filler under any of those paint areas to worry about, so it should be OK.
I hate wet spots.
I'll get a video using the gravity gun, when I'm next doing some painting.
As with all things to do with cars, it will probably work perfectly when I video it.
Maybe that's what I should have done the first time.
Wrist issues are acting up again so I'll wait until it settles down.
PS Rosco, if your passing Brisbane would love to say hello.
IT's LIKE WATCHING DRUNK MONKEYS TRYING TO HUMP A FOOTBALL.
Thanks Finny,
I do very much hope your wrist comes good soon. I'm glad we have two - or you'd die of thirst in this weather.
No, we won't make it as far north as Brisbane this year - but thank you for your kind invitation.
Plastic fillers are very good for fixing and filling small issues - but there are downsides - wet spots, cracking and breaking away from poorly prepared or contaminated substrates.
Spray or spatula/card applied putties are very good for filling very slight imperfections, but if applied to deeper holes - will shrink in time and form low areas.
They will also re-activate to very wet coats of acrylic - especially with "hotter" thinners mixes.
Some time back, I found a product which seems to isolate both issues - it is called Upol Isolator. It is an alcohol based paint which is sprayed on - and left.
After about 30 minutes for it to set up, normal primer is then applied over this isolator and the normal process continues.
I found this particularly useful when applying acrylic over enamel - or something which acrylic thinners based paints penetrated and freaked out what was underneath.
I would only recommend using this in a normal acrylic process if the above issues arose.
We must remember, that with the acrylic system - it is not only the "keying" of coats together, but the thinners in subsequent coats is meant to also chemically fuse each coat for greater bonding.
I believe this is why acrylic is so good at resisting chips - providing the process has been followed correctly.
It is also very important to "key" any plastic fillers so that the primer will bond strongly with the filler.... or those areas will be the most likely to chip if knocked.
Enamels and 2 packs are are a very much stronger and harder drying finish - but are more susceptible to chipping - and almost impossible to touch up without leaving evidence of the work.
These systems will not "fuse" into each other - and keying between dried coats is very important - or timing between successive process coats must be followed.
Acrylic is a much more forgiving process - and probably the most "workable"... it is fairly labour intensive - compared to others, but for the back-yarder - it would be my preferred suggestion.
Yes, please do post up a short video of your spray technique - I would love to do the same... to support what I post... but my ability with video, MPEG's and uploads is very much in wanting - if not totally consisting of incompetance....
clear coat can be a tricky thing I only just started to master it at tafe this week after working at it for 5 weeks.
One thing I have found applying clear coat is that good overhead lighting helps a lot in setting where you're paint is going and the spread I find it comes down a lot to temperature, air pressure and the paint consistency as the others have said it sounds like your fan setting isn't right and your air setting isn't right.
~Allison
My project:
'60 Holden FB ute
Other family projects:
Mum's '54 FJ Holden Special Sedan
Farm Bedford grain truck