hiding wires, step by step "FINISHED"...
-
mrs ratbox
+ve & -ve are abbreviations for positive & negative, sometimes just marked + & -. '+' & '-' are marked on the top of the coil. From memory the '+' is next to the 'B' in Bosch.mattymartin wrote:
dr terry, mate, i dont know what -ve & +ve is or which is which... is there some way of finding out if i have done it wrong... i just put the wires back where i found them...
which is where the auto electrician put them when he put in the elec' dizzy, that not to say he hasnt made a mistake....
he did have the car for just over 3 weeks....
thanks
matty martin
Just make sure that the pink wire from the dissy is on the '+', along with the 12V supply wire & your radio suppressor, that's NOT how it is wired currently. The only 2 wires that should be on the '-' are the green from the dissy & your tacho wire.
Dr Terry
-
mattymartin
- Posts: 841
- Joined: Fri Oct 06, 2006 12:49 pm
- State: NOT ENTERED
- Location: sydney
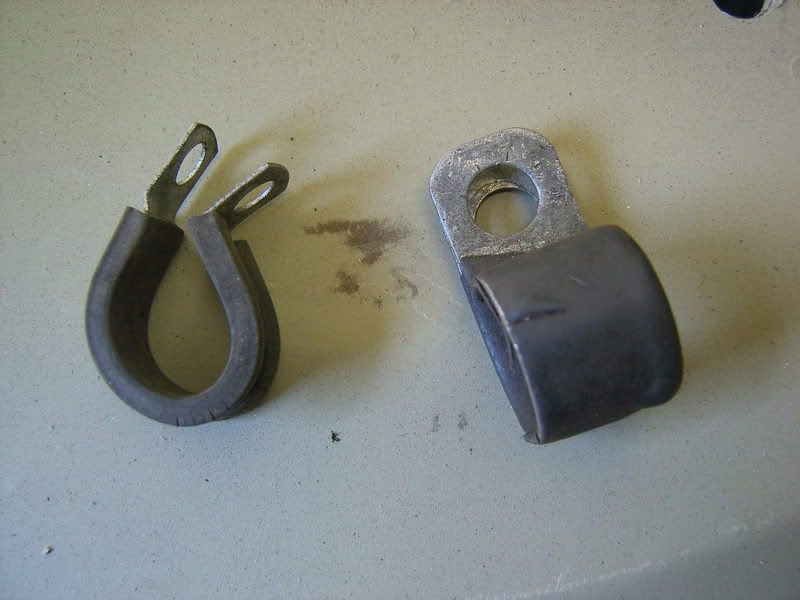
clips
hey terry
thanks for the info... i'll let the mechanic know as the engine gets taken out next monday & the car gets sent off to the panel shop for repairs & paint...
hey what are those clips called & where do i get them... can i see some pics of them on your car...
matty martin
thanks for the info... i'll let the mechanic know as the engine gets taken out next monday & the car gets sent off to the panel shop for repairs & paint...
hey what are those clips called & where do i get them... can i see some pics of them on your car...
matty martin
go the wagons....
-
mattymartin
- Posts: 841
- Joined: Fri Oct 06, 2006 12:49 pm
- State: NOT ENTERED
- Location: sydney
-
ipg
http://gallery.oldholden.com/ReaperHR/H ... ?g2_page=1
this will explain what Dr Terry was talking about
this will explain what Dr Terry was talking about
-
RedWhiteFB
- Posts: 79
- Joined: Mon May 31, 2004 11:44 am
- State: NOT ENTERED
- Location: Melbourne, Australia
Matty,
Thanks for the inspiration to finally do it myself. I've been meaning to re-run the cabling for years now; and this post gave me the kick in the butt I needed to get moving. On Tuesday (Cup Day) I photographed and labelled everything and then pulled all the cabling through into the cabin. Next I'll start drilling holes and working out necessary cable lengths. I'll post some pics once I've finished. Well done (again) on the great post.
Cheers,
Aaron.
-
RedWhiteFB
- Posts: 79
- Joined: Mon May 31, 2004 11:44 am
- State: NOT ENTERED
- Location: Melbourne, Australia
cable specs
I'm about to extend the cables for headlights, etc. Can anyone please tell me what amperage cable I should be using?
Cheers,
Aaron.
Cheers,
Aaron.
-
RedWhiteFB
- Posts: 79
- Joined: Mon May 31, 2004 11:44 am
- State: NOT ENTERED
- Location: Melbourne, Australia
Top job Matty. 
Haven't done it before myself, but I was looking to clean up my engine bay also.
Not sure if I'll go that far, but your documented process, will certainly come in handy. And thanks to all the others that offered advice.
PS, I think someone stole your Clutch master cylinder, did you leave it outside unattended.

Didn't see it in the pics, but I assume your brake booster is also under the drivers side guard ?
Again, top job.
Haven't done it before myself, but I was looking to clean up my engine bay also.
Not sure if I'll go that far, but your documented process, will certainly come in handy. And thanks to all the others that offered advice.
PS, I think someone stole your Clutch master cylinder, did you leave it outside unattended.
Didn't see it in the pics, but I assume your brake booster is also under the drivers side guard ?
Again, top job.

IT's LIKE WATCHING DRUNK MONKEYS TRYING TO HUMP A FOOTBALL.
-
RedWhiteFB
- Posts: 79
- Joined: Mon May 31, 2004 11:44 am
- State: NOT ENTERED
- Location: Melbourne, Australia
Finally!!!
Quick update - I've finally got the wiring out and started reconnecting it all. As you can see, I've also managed to get the engine out. It's at the mechanics being rebuilt. It's happening slowly... but finally it's happening!!!
Cheers,
Aaron.

Cheers,
Aaron.
-
RedWhiteFB
- Posts: 79
- Joined: Mon May 31, 2004 11:44 am
- State: NOT ENTERED
- Location: Melbourne, Australia
I've run the wires through the guards and run ducting/flexible conduit to protect it. I used the P-Clips as mentioned above to hold the cable in place - worked a treat. I used some longer bolts (which hold the guard in place) to allow a nut to fit on the end - which holds the P-Clip in place. They ain't going nowhere! Thanks for that tip.
Cheers,
Aaron.
Cheers,
Aaron.