V8EK4us- 383 SBC,4 link,Torana f/e - 12 months on...

Post photos of your pride and joy, or updates on your rebuild!

Moderators: reidy, Blacky

User avatar
V8EK4us
Posts: 1541
Joined: Sat Feb 09, 2008 12:12 am
State: NOT ENTERED
Location: Mildura - Vic

Post by V8EK4us »

Here is the update on the dash mod...... I used aluminium, 4mm plate and 63.5mm x 6.5mm alloy tube (cut to 40mm lengths). Firstly I marked and drilled the holes in the 4mm plate the cut and welded the 40mm lengths of tube in place prior to cutting the plate to shape, this helps reduce twist and buckling in the alloy plate as aluminium has a bit of a mind of its own. Very happy with the way it polished up, used the Jabsco buff and the "green" polish stick.

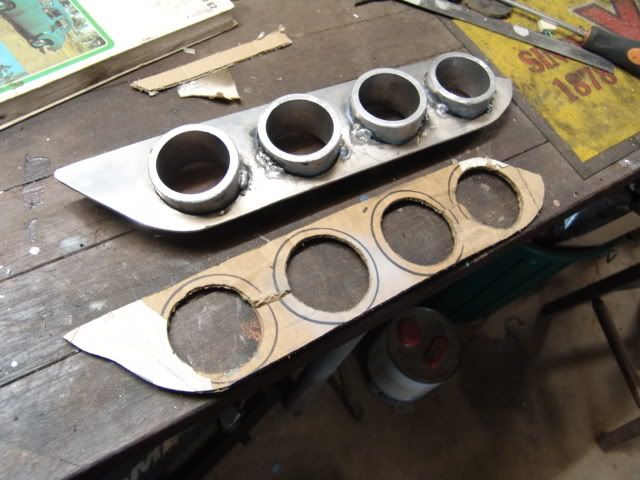
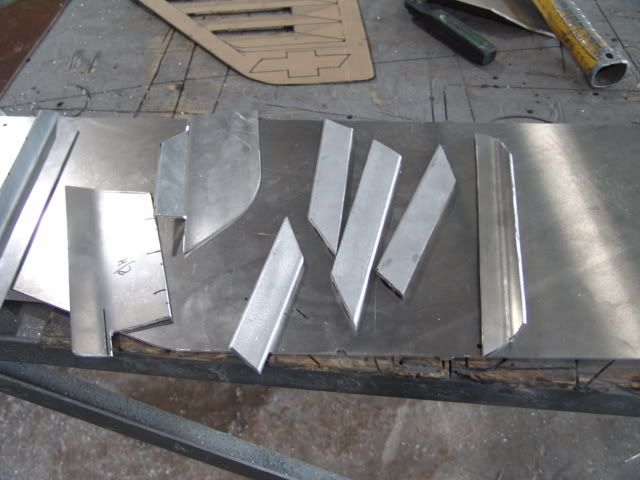
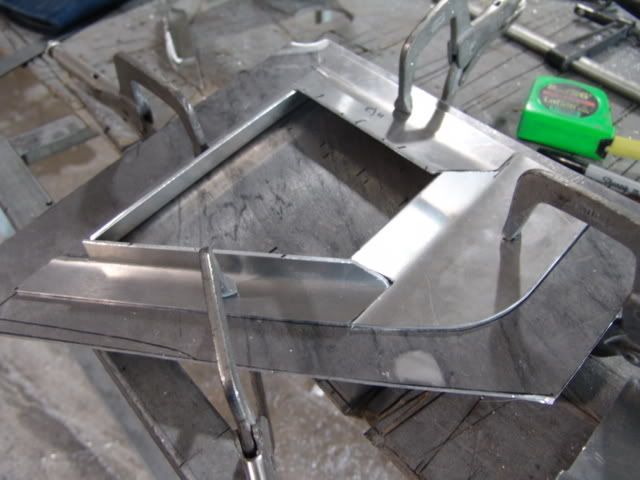
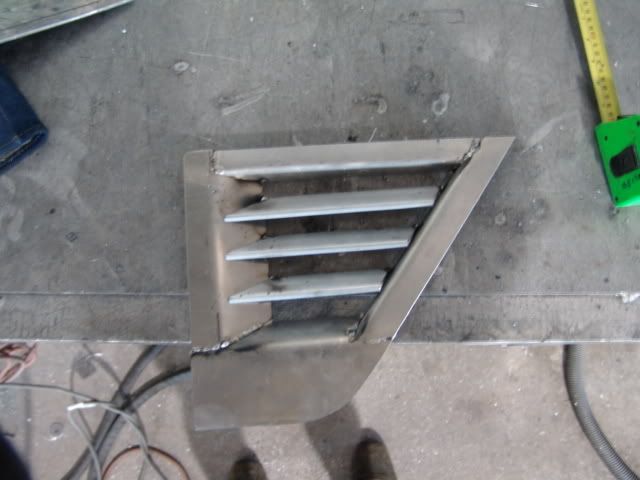
Tubes tacked in place.
Image

Image

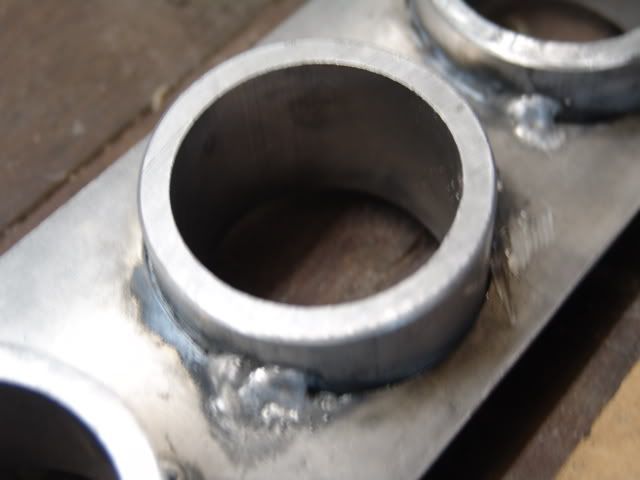
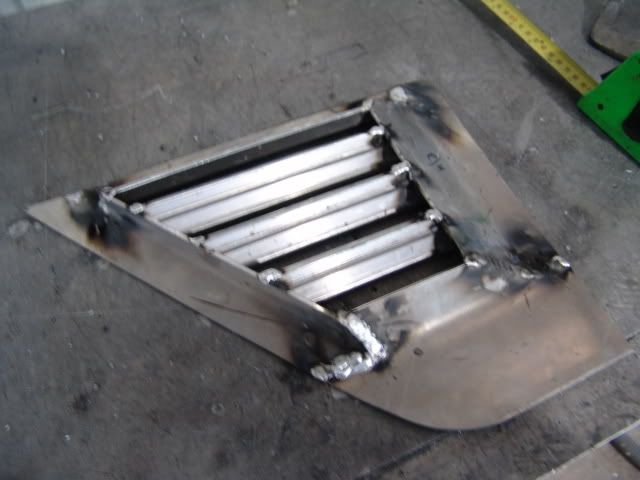
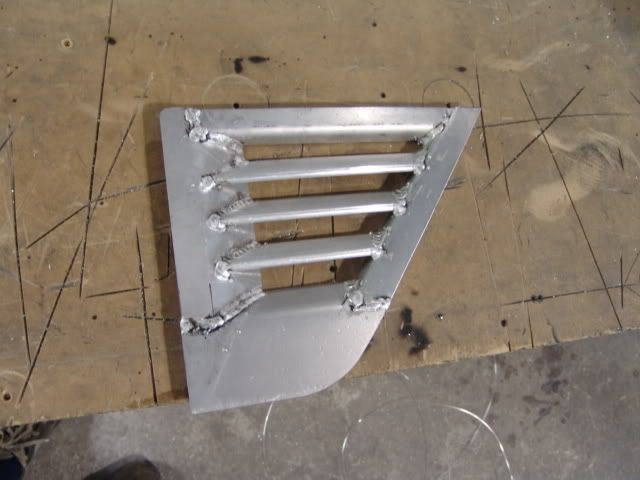
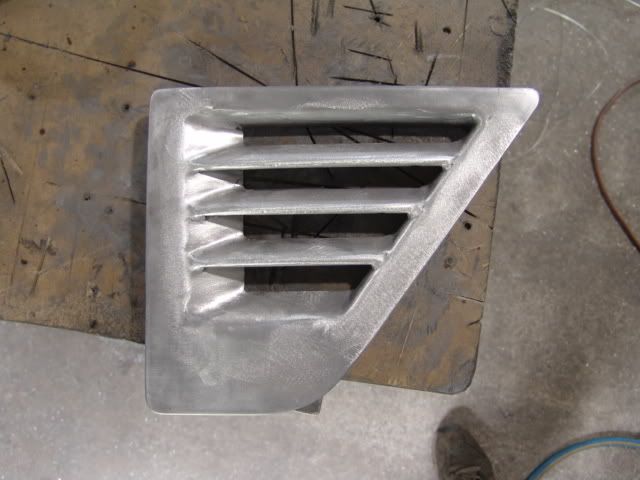
Fully welded and polished.
Image

Image

Image

Image

Image


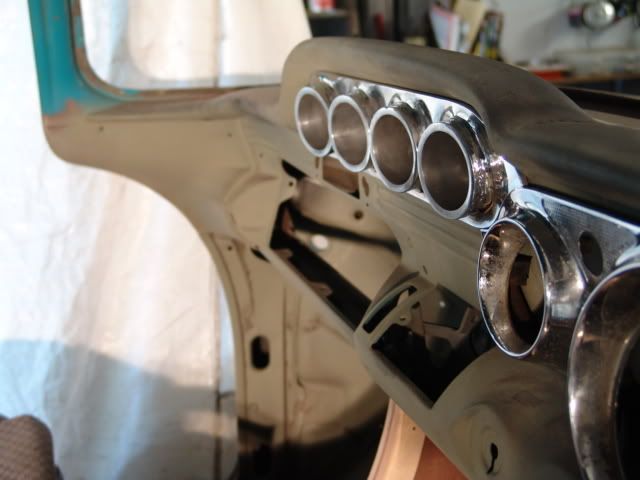
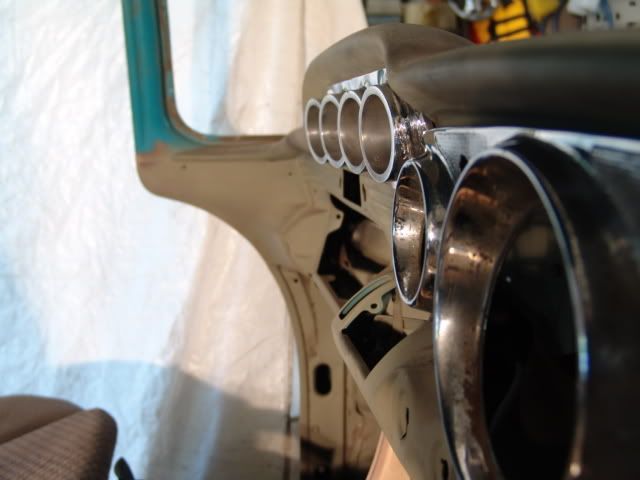
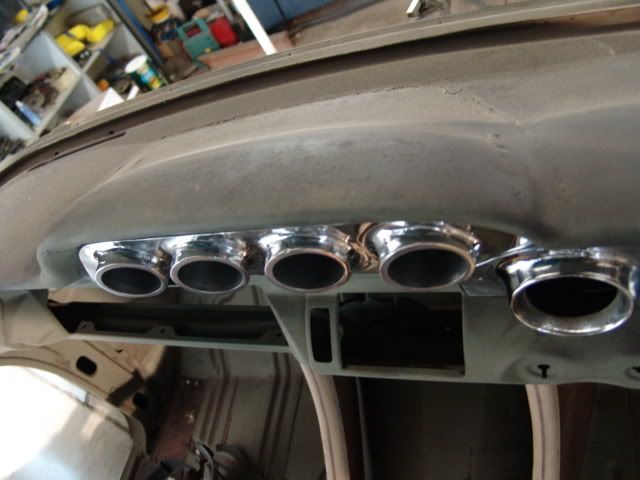
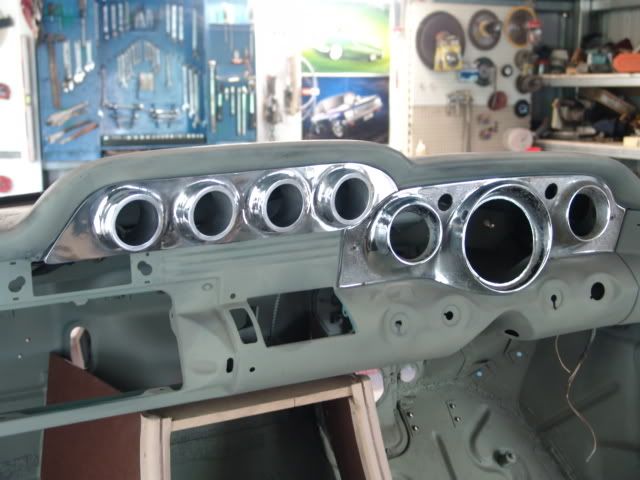
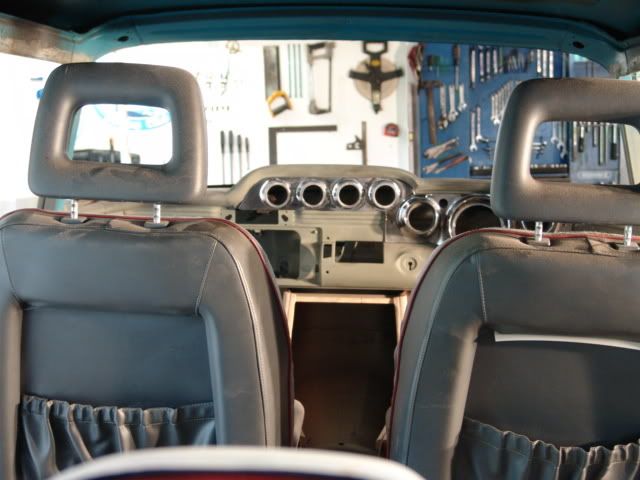
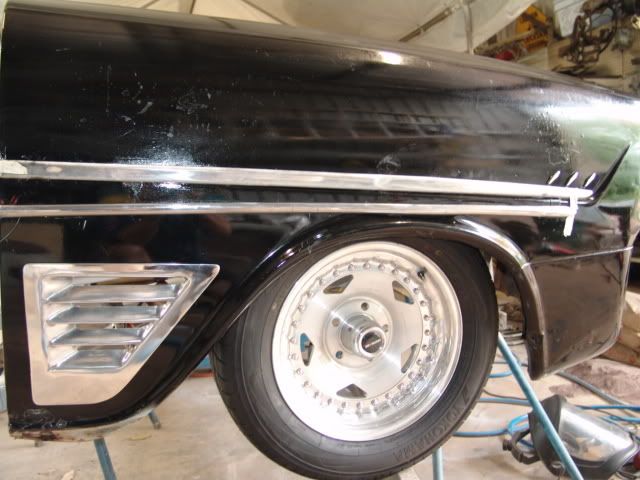
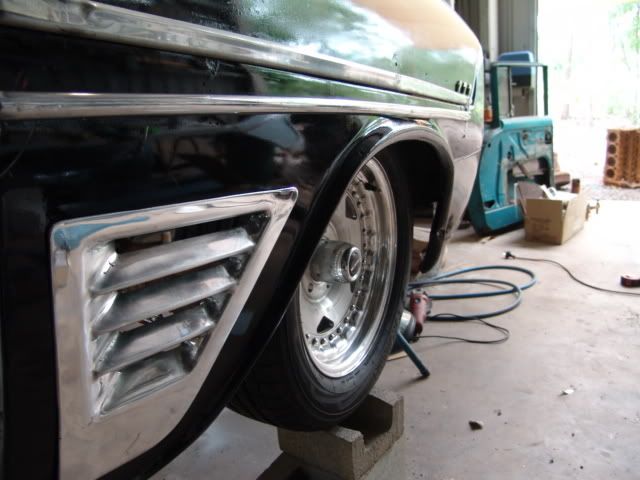
I tried to make it look "original fitment", pretty happy with the way it turned out ...... needs a bit more polishing as there are still some marks in it that don't show up in the photos.
Last edited by V8EK4us on Wed Dec 31, 2008 11:26 am, edited 2 times in total.
FB MAD
Posts: 2725
Joined: Thu Jun 30, 2005 7:59 pm
State: NOT ENTERED
Location: Upper Hunter N.S.W

Post by FB MAD »

:roll: 8) 8) 8) 8) 8) :roll:

Looks good!! 8) 8) 8)
I can't think what to write here so this will do.
User avatar
ekdave1962
Posts: 413
Joined: Tue Oct 30, 2007 8:06 pm
State: NOT ENTERED
Location: Geelong Vic

Post by ekdave1962 »

what can i say wow .,, im loving watch this build just as i did mel's .
hmm since my 1 st project is nearing its end maybe time to thing about the next 1 .,, some thing a little more wild ,

maybe a convertable ,, lol ,

hmm mind you i still want build a 4 door gts hq like i had when i was a kid
User avatar
stinky
Posts: 902
Joined: Tue Oct 11, 2005 10:06 pm
State: SA
Location: Willaston, South Australia

Post by stinky »

:roll: Bloody Show-Off! :wink: Looks good though.
User avatar
V8EK4us
Posts: 1541
Joined: Sat Feb 09, 2008 12:12 am
State: NOT ENTERED
Location: Mildura - Vic

Post by V8EK4us »

Going to have a go at making the guard flutes out of aluminium to be different..... I will make sure I take more pics this time as I do it :roll: :roll: Got too excited with the guage pod and finished it without taking heaps of progress pics :oops: :oops: .
DNA
Posts: 363
Joined: Mon Apr 21, 2008 12:03 pm
State: NOT ENTERED
Location: Sydney

Post by DNA »

that looks the goods.........

Would be sweet if you could "knurl" a pattern similar to the dash on the plate......

wish I had half your skills.........cant wait to see it the update pics in a weeks time......simply amazing!
User avatar
V8EK4us
Posts: 1541
Joined: Sat Feb 09, 2008 12:12 am
State: NOT ENTERED
Location: Mildura - Vic

Post by V8EK4us »

Had a go at the alloy guard flutes, still some finishing touches ie; trimming edges and final polish to do.

Did a rough mock up of it in the guard (spray can black paint :lol: ).

Cardboard template:
Image

Parts cut and bent from 3mm plate
Image

Clamped down to pre-curved 5mm plate to match the curve in the guard then tacked together:
Image

Image

Fit and tack weld angled flutes:
Image

Turned over to check what it will look like :)
Image

Fully weld:
Image

Grind, sand, sand, grind and sand again and again:
Image

Polished and fitted into very rough mock up guard :oops:
Image

Image

HAPPY NEW YEAR EVERYONE!!
User avatar
(AUST)Mod
Posts: 2272
Joined: Sun May 07, 2006 11:16 pm
State: WA
Location: Perth

Post by (AUST)Mod »

Bloody great new years present!
Craig wrote: Andrew you have a red so I wouldn't race it :wink:

Image
EKSPCL
Posts: 794
Joined: Sat Mar 15, 2008 11:36 pm
State: NOT ENTERED
Location: Langwarrin, Victoria

Post by EKSPCL »

Looking great V8EK4us 8)

I have been watching, but having problems with the computer(won't show me any pics)!
Finally saw the pics of the trims etc.
This is what I'm hoping to do, the $$$ are holding me back at the moment.
What type of material did you use under the fibreglass?
Obviously something stretchy, but what is it called?
Keep these posts coming.....
My 6yr old daughter said
"Dad your car's looking great! Which end is the front?"
User avatar
J
Posts: 1692
Joined: Wed Mar 05, 2008 8:42 pm
State: WA
Location: Perth
Contact:

Post by J »

oh mah gawd!
im loving the regular updates - keep me inspired!!!!
dont slow downnnn
Image
User avatar
V8EK4us
Posts: 1541
Joined: Sat Feb 09, 2008 12:12 am
State: NOT ENTERED
Location: Mildura - Vic

Post by V8EK4us »

Hope everyone had a great new year (I did ..... still got the headache to remind me, no grinding or hammering today :roll: ).

EKSPCL the material is called fleece, the stuff we used is what they make kids pajamas out of (If you look at the pics of the door panels closely you can see the little Lions, Giraffes etc... :lol: :lol: :lol: it's about $6/m) Sue got it from a store called "Spotlight", this is their website http://www.spotlight.com.au/store_locator . It is surprisingly easy to do, just staple under one side then streatch it over to form the contours required and staple all around the back of the panel. Mix up fibreglass resin and brush it on so it soaks through the fleece, we did 4 - 5 coats then sanded back with an orbital sander. Hardest bit is making the panels and frames to support the fleece in the desired shape. We have designed ours to use the original s/s door trimmings (curved one at the top and the one that runs through the middle. We also added arm rest on the rear doors and shortened the middle trim so it stops at the end of the arm rest like the front one does.
EK JAY
Posts: 1888
Joined: Sat Mar 17, 2007 8:25 pm
State: NSW
Location: Sawtell

Post by EK JAY »

looking really TUFF mate you've chose the right color
with all the changes there could be no other color then
Back in BLACK :twisted: :twisted:
Jay :)
EK JAY SINCE 1990
EKSPCL
Posts: 794
Joined: Sat Mar 15, 2008 11:36 pm
State: NOT ENTERED
Location: Langwarrin, Victoria

Post by EKSPCL »

Thanks V8EK4us.
We have about 5 or 6 Spotlights within 20min of here :shock:
I'll let you know what animals I end end up with on my trims :lol:
My 6yr old daughter said
"Dad your car's looking great! Which end is the front?"
axeman
Posts: 117
Joined: Wed Nov 08, 2006 9:50 pm
State: SA
Location: adelaide

Post by axeman »

man i was a bit worried when you said ally flutes . but after seeing them finished and in the guards, id have to say they set of the guards very nicely are you still putting in the bowtie at the bottom?

Keep up the good work. looking forward to watching this project progress


Cheers Axeman
IF ITS NOT OVER POWERED ITS NO FUN

PRAISE THE LOWERED
User avatar
V8EK4us
Posts: 1541
Joined: Sat Feb 09, 2008 12:12 am
State: NOT ENTERED
Location: Mildura - Vic

Post by V8EK4us »

J, I don't have time to slow down :shock: 6 months to the Nats!! :lol: :lol:

EK JAY, Back in Black would be a great song to play on her first cruise 8) 8)

EKSPCL, your welcome, looking forward to seeing your doors done (maybe you will get little elephants :lol: :lol: .
axeman wrote:man i was a bit worried when you said ally flutes . but after seeing them finished and in the guards, id have to say they set of the guards very nicely are you still putting in the bowtie at the bottom?

Cheers Axeman
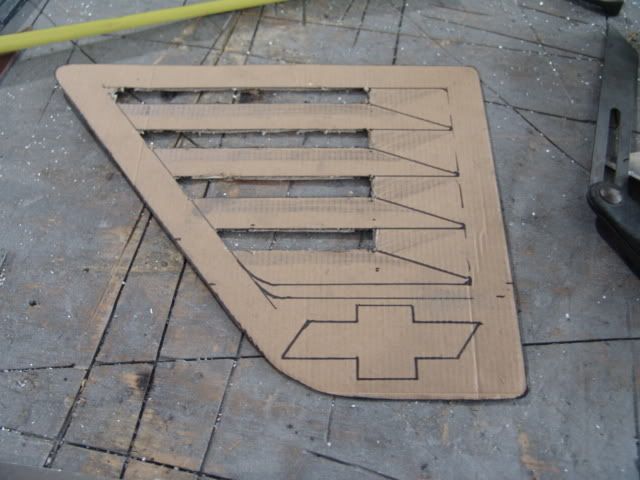
Thanks Axeman, yes to the bowtie, just not decided on which way to do it .... my thoughts are:
1/ Bowtie badge in Black, red or gold.
2/ Bowtie Billet badge
3/ Bowtie engraved into flute and painted in the engraved area to match the car colour.

Originally was going to get "HOLDEN" engraved at the bottom and paint it.

Any other ideas/comments welcome.

4 Link turned up and looks good (McDonald Bros Racing parallel bar), I will get it together and take some pics tomorrow.
Post Reply