Electrolytic Rust Removal

Includes sheet metal, rubbers, bumpers, badges and rust repairs.

Moderators: reidy, Blacky

Post Reply
parisian62
Posts: 3997
Joined: Wed May 11, 2005 2:19 pm
State: NSW
Location: Sydney
Contact:

Electrolytic Rust Removal

Post by parisian62 »

G'day everyone,

This is a really easy method of rust removal. I have used it a lot and it works very well. I'll try and post some before and after pics over the next few days. :D

Regards
Stewart

Electrolytic Rust Removal
The process will remove rust, grease and paint from steel or cast iron parts. The process is extremely effective if the points below are followed. This process is self-limiting and will only remove rust.

Safety First
The bath must be inaccessible to children.
If using caustic soda, the solution must not touch your skin.
If using caustic soda, the bath should not be inside or in a closed area.

Container
Any type of container is suitable provided it will remain watertight during use. Steel containers should have a plastic sheet inserted before filling. Plastic containers must be strong (ie plastic rubbish bins tend to split). Obviously, the container size limits the size of the part to be cleaned. Large parts may be cleaned one half at a time.

Solution
Carefully and slowly add caustic soda flakes into warm water and stir until dissolved. You will need approximately two kilograms of caustic soda for 20 gallons (91 litres) of water. For smaller amounts mix one tablespoon per 1 gallon (4.5 litres) of water. Another solution that is less harmful, non-polluting and biodegradable is washing soda available at the supermaket or hardware store. (Not the same as laundry detergent)

The caustic soda or washing soda may be dissolved in cold water but allow 24 hours for your bath to start working effectively.

Electrodes
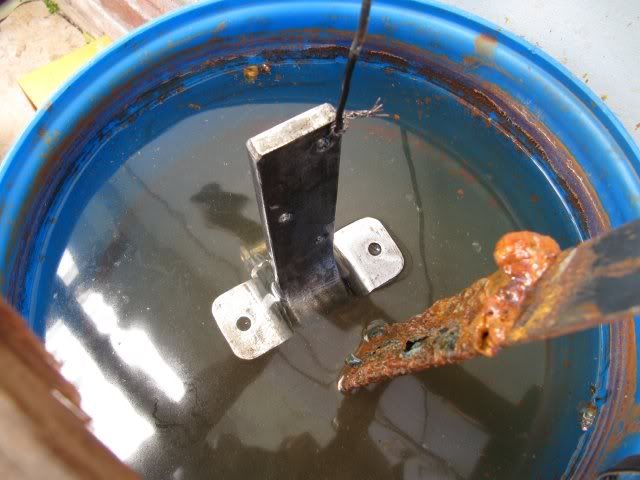
The part to be cleaned is connected to the battery charger negative. Battery charger positive is connected to a piece of steel about 3”x3” when using a 44 gallon drum. If using a steel containing make sure you line it with plastic. You virtually have to use a battery charger with an ammeter (or amps indicator) as the current flow is controlled mainly by the size of the piece of steel (positive electrode). The best method of controlling the battery charger is to initially leave the positive electrode out of the solution, turn the charger on, then carefully lower the positive electrode whilst watching the ammeter. When the ammeter shows a reasonable reading (to suit the rating of your charger) support the electrode to suit.

If you wish to clean only one or two small parts and elect to use a 2 gallon plastic garbage bin (9 litre bucket) a smaller piece of steel or large 3” nail would suffice for the positive electrode.

It is important that for both electrodes a good electrical connection is required. From time to time you will need to clean electrode connected to the battery charge positive. After a few uses it will probably need to be replaced.

Electrode Support
At least one of the electrodes should be supported from a piece of wood so that electrodes do not touch.

On completion
Parts can be left for 24 hours. Rusted areas converted by electrolysis will be black in colour. Rub down with wet and dry or wire brush. Parts will be now be very prone to rust again unless treated immediately, spray with WD-40 or paint parts.

Image
Feelin free in a '61 FB.
Member of FB-EK Holden Car Club Of NSW Inc.
Check out the Rebuild of Old Timer
fat62ek
Posts: 43
Joined: Mon Apr 03, 2006 8:43 pm
State: NOT ENTERED
Location: central coast nsw

Post by fat62ek »

pretty interesting info thanks i like the battery idea. another suggestion is to use pool acid you can buyit at any pool supplies or kmart. add this to water in a strong concentration. ive used it on a model &*#@ parts and it works excellent. i used i container 3kg about $15 in about 200 litres of water took a couple of days to get all the rust off .plus it deosnt smell so bad or rip your skin off so much .but you have to neutralize the metal straight away when you take it out or it will start to rust again.
own the car paying off the fuel
parisian62
Posts: 3997
Joined: Wed May 11, 2005 2:19 pm
State: NSW
Location: Sydney
Contact:

Re: Electrolytic Rust Removal

Post by parisian62 »

Dragged up this old thread as I've been using it a lot lately.

I'm using soda crystals now instead of the caustic soda. Takes a bit longer but is more 'green' and not as dangerous. Cheap too - about $3.50 for a kilo.

Recapping the first post...most pople will have a battery charger, scrap steel for your electrode, plastic drum, water and soda crystals - buy these from Franklins or Woolies in the washing aisle. Golden rule is negative to the part. Positive to electrode. If you do it the other way around...bye bye part...I know... :oops:

Make sure you have scraped, washed, cleaned the part as best you can to get rid of all traces of gunk and grease. You don't want oil in your solution. Good old oven cleaner is good for that. I wire the part up with some spare wire so I dont need to drop the battery charger clamps into the solution. Make sure the part and the electrode are not touching before you turn the battery charger on... :P After about a minute you should see some tiny bubbles coming from the part. Bubbles are good...

Keep an eye on it for a day or so. Give the part a jiggle to keep things moving. You will find that the top of the bath will become covered in a brown rust sludge which you will want to remove. Once the bubbles have slowed right down its ready.

The only downside is that rust is removed by line of sight so you might have to move the part around to keep things happening. Once you're happy with it give it a good blast and rinse with the hose and quick scrub down with a kitchen stainless wool and get ready for paint. Or cover it with kero until you're ready to paint a batch.

Soda crystals...relief for tired feet, weary and aching limbs...and RUST! :mrgreen:
Image

this pic show one part. My new and advanced version allows for 2 parts to be done at the same time...patent is pending... :lol: :wink:
Image

Heres a hinge after a day or so. Notice the electrode is covered in rust....clean the electrode after every part or as often as you like to keep the 'electrolysis' working.

Image

before and afters...
Image

Image

Image

Image

Image

HAPPY de-rusting...
Feelin free in a '61 FB.
Member of FB-EK Holden Car Club Of NSW Inc.
Check out the Rebuild of Old Timer
Post Reply