Just started the paint system learning curve up again............
Went to my supplier today to buy some POR (paint over rust) 15.
Some will know of it, some have used it but to those who are un-enlightened - this one is worth the read.
You'll need to mortgage the house - it's not cheap! $80 per litre.......
Have spent this afternoon reading the promo booklet on numerous products in the range - looking forward to "playing" with some of them.
A couple of them have good prospects for coating alloys and non-ferrous metals with hammer resistant protection.
My "cause" was to paint something on (other than body deadener) to the wheel arches which would withstand stone chipping and abrasion.
I had heard of this product some time ago as being extremely resilient to wear and abuse.
If it follows what it claims - I may very well have to re-think my strategy on coating the underside of the vehicle.
I witnessed the sales person strike a treated (painted) piece of pipe with a hammer - no chip, crack or even scratch!
Promo states will however flex to hold adhesion if component is dented/bent/twisted etc...............
Have "primed" test section with special "Tie Coat" and will undergo application tomorrow of POR 15.
WARNING~!!! was told not to get any on skin - remove immediately with solvent or thinners as is not removable by any chemical - must "rot" out on the skin it is cured to.
Have posted previous pic titled "alloy head" - may soon be posting "leopard spots" to add to album....................
frats,
Rosco
ps - interested to hear of any experiences - understand process must be followed very closely to procedure or will fail....................
PPC - POR system
Hi Rosco I have used a product called Xtroll.
http://www.corrosion-tech.com.au/Xtroll/xtroll.html
It is excellent over rust. All you need is to remove any flaking rust. Pricing is around $33 per litre. It is a bit like water and goes a long way. I brush it on thinly and find no brush marks for smaller parts. It can be sprayed also. The surface appears as tough as all get out. About the only disadvantage I can see, and this may be me, is if you spray a lacquer base product over it you get a very minor amount bubbling. I have only used enamel or household paints over it until yesterday without any problems. I emailed the company before and hopefully receive a reply on Monday
You probably need some kind of coat between the Xtroll and the lacquer if such a product exists. Do you know of anything? Its a bit like lacquer based paint over enamel paint.
When my car is finished I intend spraying Xtroll inside any crevices, inside the bottoms of the doors and all places where rust can develop or continue. I have used it outdoors on metal post where rust was starting. 15 years later still no rust.
Keith
Rosco have just bought the POR 15 fuel tank kit. Not really the way i want to go, but $900 with gst and freight for a new stainless tank, have chosen to give it a go. My tanks has no holes, but many years of being open to the elements has created lots a surface/scale rust. Spent a fair bit a time flushing it out (pouring all my nuts/bolts in and rotating etc) at build time.
Its now 7 months on the road, and still throwing fuel filters at it. The kit cost $130, and is a 3 part process. General flush, rust converter, and then the seal coat. Just have to get the wife to give the car up for a few days, as its a four day process according to the instructions. Will let you all know if it works.
Its now 7 months on the road, and still throwing fuel filters at it. The kit cost $130, and is a 3 part process. General flush, rust converter, and then the seal coat. Just have to get the wife to give the car up for a few days, as its a four day process according to the instructions. Will let you all know if it works.
I have just received an email from the Xtroll people with regards to applying a lacquer based paint over the Xtroll.
"Xtroll (Rust Conqueror) is a white spirits-based product (ie like turps).
Applying paints with a solvent base stronger than turps can sometimes cause
the Xtroll coating to crinkle. The issue is not the paint itself but the
stronger solvents - such as thinners used in fast dry paints, and toluene
and Xylene as used in automotive and other paints- which sit on the surface
and start dissolving it.
You can deal with the problem in one of two ways:
Apply the top coat product by spray, as a mist coat/dust coat/dry coat. This
means the solvents have virtually flashed off by the time it is on the
surface. The spray is so thin that there is little solvent there to sit and
start eating at the coating. Let the mist coat dry. You may choose to do a
few more mist coats. The thin dust coating will form a barrier between the
Xtroll coating and a heavier/normal coating of the top coat.
The other solution is to apply a compatible barrier coat over the Xtroll
coating. The Xtroll Primer will do this. Then apply the top coat normally
over this.
I hope this solves your problem."
That should resolve any problems.
Keithj
Thanks Keith and Ben,
Keith, your info is well noted, I do not have any knowledge/experience of xtrol........... it is the first I have heard of it.
Ben, until yesterday I was of the opinion that POR15 was a product not a company.............. my supplier handed me a copy of their catalogue and told me to do some research - they were of the opinion I would be impressed and would return - I did, less than 45 minutes later to purchase some companion products.
Rather than post my comments or scan and pic a document, here is the website..................
www.por15.com.au
there are three further products I will be investing in when the time comes to address the components I will to use them on.........
frats,
Rosco
Hi John (and others),
I haven't opened the POR 15 as yet - I am deeply regretting having fishoiled, primed and multi top-coated the entire underside and luggage compartment after scraping and sanding it back to bare shiny steel - this stuff is meant to go on bare steel - it prefers rusted metal (how strange is that!) and from all reports I have been given, is almost in-destuctible (angle grinder excepted).
I am using another of the POR 15 range called Tie Coat - it requires that I now break up that hammered metal finish on the entire underside of the car so that POR 15 can be applied.
I witnessed the salesperson strike two pipes together which were painted with this POR 15 product - the pipes dented but the paint wasn't even scratched..........
One thing about POR 15 John, is that it is not UV proof - UV won't make one jot of difference to the durability, but the finish will cloud......... it can be top-coated with one of three other products in the range if it is to be exposed to UV.............. keep you posted on that............
One I am very interested in is a clear coat of the same strength, which can be applied over alloy, copper, brass etc - I think that will attract a lot of attention when I do my report ..................
So John, for the time being - I am again on my back under the car - and "keying" the hammered metal epoxy in prep for "Tie Coat" then a two/three coats of POR 15 - will post more pix if you would like to follow my progress......................

pity, this was looking "finished".............
frats,
Rosco
I haven't opened the POR 15 as yet - I am deeply regretting having fishoiled, primed and multi top-coated the entire underside and luggage compartment after scraping and sanding it back to bare shiny steel - this stuff is meant to go on bare steel - it prefers rusted metal (how strange is that!) and from all reports I have been given, is almost in-destuctible (angle grinder excepted).
I am using another of the POR 15 range called Tie Coat - it requires that I now break up that hammered metal finish on the entire underside of the car so that POR 15 can be applied.
I witnessed the salesperson strike two pipes together which were painted with this POR 15 product - the pipes dented but the paint wasn't even scratched..........
One thing about POR 15 John, is that it is not UV proof - UV won't make one jot of difference to the durability, but the finish will cloud......... it can be top-coated with one of three other products in the range if it is to be exposed to UV.............. keep you posted on that............
One I am very interested in is a clear coat of the same strength, which can be applied over alloy, copper, brass etc - I think that will attract a lot of attention when I do my report ..................
So John, for the time being - I am again on my back under the car - and "keying" the hammered metal epoxy in prep for "Tie Coat" then a two/three coats of POR 15 - will post more pix if you would like to follow my progress......................
pity, this was looking "finished".............
frats,
Rosco
gday rosco/guys
have used por15 on my bus, on the undercarriage
Y frames, inner gaurds, fuel tank etc, etc
what sold it for me was - the do it right the first time! notion
when i initially inquired about the product, down at paint supplies - www.paintsupplies.com.au
the owner:gary, took me out the back and showed off a freshly painted shortened 9 inch for his f#*d Anglia drag car
the finish looked a lot like black powdercoat, but with a better "finish"
but as rosco says, its not cheap payed about $180 for 4 litres of black(prev. coating), and $50 odd a piece for the Marine clean & Metal ready - and that was a few years ago now
basically, i stripped all grease, paint, deadener, crap that had accumullated over the last 40 or so years - on the areas to be painted
then hit it with the Marine clean/Metal ready
Marine clean : cleans rust/corroded metal, removes dirt, grease, wax & other contaminents that could interfere with the restoration, rinses off with water
Metal ready : a rust remover/preprimer - will neutralise rust, etch metal for better adhesion, & coat the metal with zinc phosphate to encourage deep chemical bonding of POR15 to the base metal & rust - leave for 10 mins - rinse off with water
POR15 : seals rusty/corroded metal and bonds to rusty/corroded metal
it forms an unbelievably tough, almost "ceramic like" finish that wont crack, chip or peel.....2 coats does the job - its pretty thick
after this process (this much trouble) i wont be laying under the "ol girl" in years to come - scraping body deadener etc off & doin rust repairs etc
like they say"its permenant"
anyway roscoe, I think if you use these 3 products - you cant go wrong
not bad for 3 products to do all that stuff
good luck with it all!
will post some pics of my tank etc - to see how its held up over the 7 or so years since painting.....when time permits
P.S. shit! thats officially my longest post......a few brews helped out
cheers ray
have used por15 on my bus, on the undercarriage
Y frames, inner gaurds, fuel tank etc, etc
what sold it for me was - the do it right the first time! notion
when i initially inquired about the product, down at paint supplies - www.paintsupplies.com.au
the owner:gary, took me out the back and showed off a freshly painted shortened 9 inch for his f#*d Anglia drag car
the finish looked a lot like black powdercoat, but with a better "finish"
but as rosco says, its not cheap
basically, i stripped all grease, paint, deadener, crap that had accumullated over the last 40 or so years - on the areas to be painted
then hit it with the Marine clean/Metal ready
Marine clean : cleans rust/corroded metal, removes dirt, grease, wax & other contaminents that could interfere with the restoration, rinses off with water
Metal ready : a rust remover/preprimer - will neutralise rust, etch metal for better adhesion, & coat the metal with zinc phosphate to encourage deep chemical bonding of POR15 to the base metal & rust - leave for 10 mins - rinse off with water
POR15 : seals rusty/corroded metal and bonds to rusty/corroded metal
it forms an unbelievably tough, almost "ceramic like" finish that wont crack, chip or peel.....2 coats does the job - its pretty thick
after this process (this much trouble) i wont be laying under the "ol girl" in years to come - scraping body deadener etc off & doin rust repairs etc
like they say"its permenant"
anyway roscoe, I think if you use these 3 products - you cant go wrong
not bad for 3 products to do all that stuff
good luck with it all!
will post some pics of my tank etc - to see how its held up over the 7 or so years since painting.....when time permits
P.S. shit! thats officially my longest post......a few brews helped out
cheers ray
INVEST IN PRECIOUS METAL
gday rosco
heres a couple of images of my fuel tank, the underside of it(pictured)-took it back to bare metal in preparation for the por15 process
then hit it with the marine clean & metal ready before painting

by no means did i clean it for the photos what you see is what you get
(15 days straight at + 35deg ...they really were just quick snaps 40.5deg today)
its been on there for roughly 7 years, although I dont drive the EK every day, the tanks copped a bit of punishment over the years
including, a leaking fuel tank sender - fuel didnt dull or deteriorate the paint finish in any way....and it wore a fair few litres
ive driven on a few unsealed roads, and clocked up quite a few highway miles - one thing I couldnt find was a stone chip

the other areas i painted are really dirty atm so wouldnt present well
hope the info, together with the images fill in a few of the blanks rosco
good luck with it all
cheers ray
heres a couple of images of my fuel tank, the underside of it(pictured)-took it back to bare metal in preparation for the por15 process
then hit it with the marine clean & metal ready before painting
by no means did i clean it for the photos what you see is what you get
(15 days straight at + 35deg
its been on there for roughly 7 years, although I dont drive the EK every day, the tanks copped a bit of punishment over the years
including, a leaking fuel tank sender - fuel didnt dull or deteriorate the paint finish in any way....and it wore a fair few litres
ive driven on a few unsealed roads, and clocked up quite a few highway miles - one thing I couldnt find was a stone chip
the other areas i painted are really dirty atm so wouldnt present well
hope the info, together with the images fill in a few of the blanks rosco
good luck with it all
cheers ray
INVEST IN PRECIOUS METAL
Thanks Ray,
just one question - did you spray yours on?
I have done a bit more work in research and spent more coupons which may save a bit of grief with members on this forum.
I have a litre of the POR15 and it now seems I won't be using much of it.
I have posted off a few questions to the manufacturers and await response before continuing with overcoating what I have spent years building up.
Today however is the first "taste" I have had with POR 15 and am very, very impressed.
On this occasion, I have followed the instructions for a "bare metal"
application - I brushed it on and tried to get it on with minimal brush strokes - it has come up a treat - but not to the mirror finish you have - this is why I ask if you have sprayed.........
I have also purchased some "Black Cote" - this is the one which is used over the top of POR 15 to protect the finish from UV light - it is not as resilient as POR 15 but apparently is still hammer tough..............
Take a seat when I tell yo the price - at trade and given an additional "special" sweetener it still cost me $91 for the litre.............
There are some things people need to know when using it - don't get it on you and above all don't try to "wash" it off or the solvent you use to remove it with water - this stuff hardens with humidity (water!) I have two very "dirty" hands where the thinners seeped into my pores and the water/soap has truly "stained" my skin......................
If you intend to overcoat it with black cote - you must do this within 12 hours or you will need to "key" it with wet/dry...............
Each coat must be applied after a minimum of 3 - 5 hours or the CO2 will bubble through the finish...............
This is indeed very strange paint - I now understand why professionals have more problems using it - if you follow the instructions - you'll get the result Ray has in the above pix.
More to come.....
frats,
Rosco
gday mate
yes sprayed it on, it seems to go on very thick....2 coats 1 after the other
also thinned it down slightly, i even used the por15 thinners
pretty much used a $30 doller super cheap spray gun, and a hobby compressor
and your right it does go along way ive still got at least 2 litres left(out of 4) still got the diff to do though.....1 day
i pretty much did what you plan to do - followed it by the book
cant go wrong right
also... in case you were wondering, the dings in the tank were there before i sprayed it
they're not due to me testing it for durability
again...good luck with it
anything else that comes to mind - dont hesitate
regards ray
INVEST IN PRECIOUS METAL
Thanks Ray,
I am very relieved to hear you sprayed yours - I can't get that finish with a brush.
Just one word of warning - they stipulate the use of an organic respirator if spraying - it sounds to me as if this stuff is more harmful than normal acrylic if it gets into your lungs/eyes etc.
I have applied three coats to the small toe-board section I have stripped to bare metal - the result is very satisfying.
I also applied it to the accelerator pivot shaft and brackets - warning don't get any under the brackets - I managed to just "save" mine before the stuff went rock hard - think I may have bent the brackets if I'd left it any longer.
Amazing paint - just about to go block back some more of the hammered metal for overcoating with Tie Coat then Black Cote.
Haven't opened the Black Cote yet - it isn't as tough as POR 15, but I'm not stripping all that work back to bare steel again - won't hesitate to use POR 15 on any further stripped parts.
I will also now use it as etch primer under external panels when they come up as I continue with my refurb of the vehicle.
Next week, I plan to get some PC Glisten - I am looking forward to coating bare metal (brass, stainless, alloy, zinc plated - will have a play with chrome) with this product - I am led to believe it is nearly as hard as POR 15.
Will report.
bye the way - when you get some on you, get it off straight away with thinners, thinners and more thinners - don't do what I did and wipe it off with thinners then wash with soap and water - water actually hardens and dried the paint - after it has nicely been driven well into your pores by the thinners - I have very dark "stained" hands at present - just can't get them clean no matter how many times I wash with aggressive cleaners/solvents etc............
frats,
Rosco
This is a copy of a post on Cams paint project - I am about to use POR 15 on some slightly rusted metal which cannot be easily cut out and welded........... I will keep a very close eye on it over the next few years and make this area of the car available for viewing at displays etc for those who want to view its progress..............
In the pic below, you'll see today's effort - only 11 hours to get to this.
It clearly shows how fishoil works - if you look into the two side supports you'll see where "high tide" used to be when the boot seal leaked and let water in................
I drilled a hole in each base and sanded the rusted surface - finally coating it with fishoil before plastering that dreaded body deadener over it later on.
You'll notice the rust had not progressed, but still existed under the fishoil
You will also see where I blanked the hole made where the trailer socket was fitted - it's now fitted to a welded plate to the tow bar.
This hole was blanked with a stainless plate, re-enforced filler sandwiched the plate to the end panel - it has served well and I see no reason to make change............
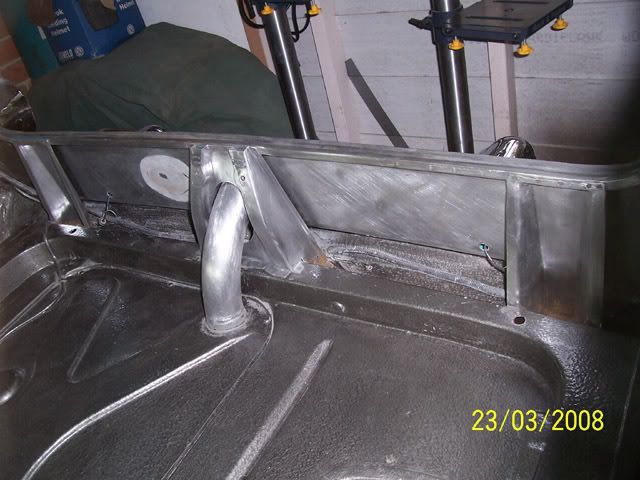
The plan for the rear end panel and supports it to use POR 15 - I nearly had it ready tonight, but being the first time, decided to start fresh on it tomorrow.
There will be a few pix tomorrow night - one of each process and the final....
frats,
Rosco
In the pic below, you'll see today's effort - only 11 hours to get to this.
It clearly shows how fishoil works - if you look into the two side supports you'll see where "high tide" used to be when the boot seal leaked and let water in................
I drilled a hole in each base and sanded the rusted surface - finally coating it with fishoil before plastering that dreaded body deadener over it later on.
You'll notice the rust had not progressed, but still existed under the fishoil
You will also see where I blanked the hole made where the trailer socket was fitted - it's now fitted to a welded plate to the tow bar.
This hole was blanked with a stainless plate, re-enforced filler sandwiched the plate to the end panel - it has served well and I see no reason to make change............
The plan for the rear end panel and supports it to use POR 15 - I nearly had it ready tonight, but being the first time, decided to start fresh on it tomorrow.
There will be a few pix tomorrow night - one of each process and the final....
frats,
Rosco
Here we go - as promised...........
for those who have some experience with spraying - please read the instructions very carefully and don't be tempted to stray - not one jot! - I did.
Set about doing this right and used the suggested preps..................
Step 1
first pic is after mixing up Marine Clean at 10:1 with warm water.
Wiped it down, left it for about ten minutes then rinsed it of a number of times before drying it to parched................
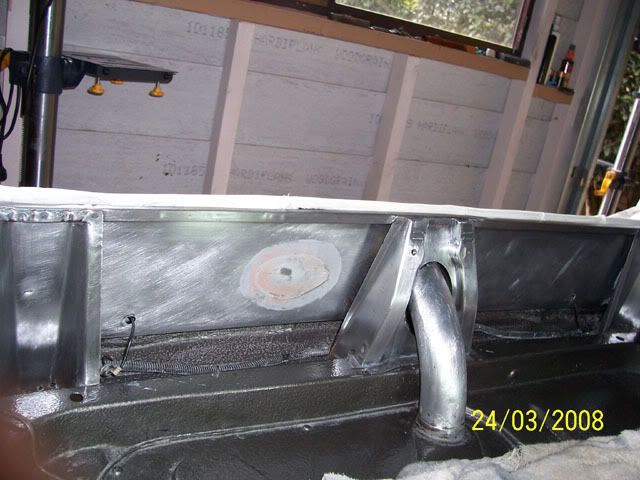
Step 2
Poured some Metal Ready into a plastic cup and brushed it on, keeping it wet - anything that "bubbled" got another stroke or two.
Left it on for about 15 minutes then again rinsed a number of times and dried it off - it left a "salt and peppered" finish - grey in some parts and almost rust like in others........ cannot tell you why.
Again dried and dried and dried it all - used a heat gun on any rusted areas to ensure it was again parched...............
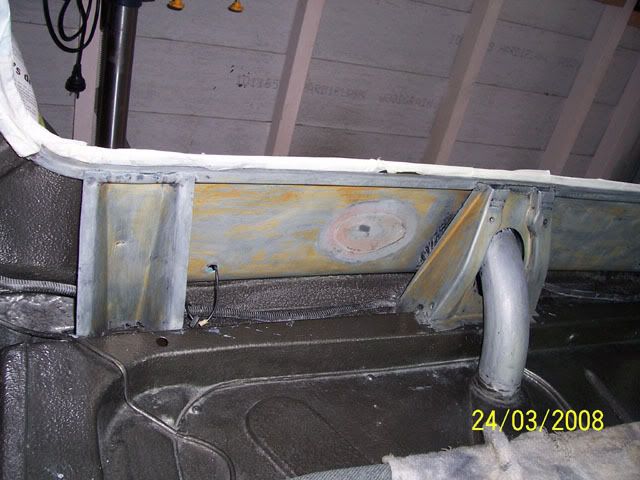
Step 3
Latex gloves on, safety gear laid out, windows open, lights on...........
Very carefully stirred the POR 15 in its can trying not to "whip" any air into the paint. Decanted around 75 ml into a small glass jar and then cleaned the lip of the POR can, placed glad wrap over it and got that lid back on presto - this stuff will "go off" if you leave the lid off for any time - it goes off on humidity.
Set up the gun, adjusted the air to 35 psi and gave the worksite an air dusting.
Mixed about 10 mil POR thinners (max recommended 15%) into the mix and stirred it thoroughly - again without bubbles.
Strained the mix into the cup of the "toy" gun and set myself up inside the boot ready to go.
Good look around, mask on, sleeves down,
Hit a sheet of cardboard and found the stuff so blasted thick it wouldn't "flow" - opened the needle right out, pressure to full (35 psi @ regulator) and hit the cardboard again - still like spraying vegemite..............
Held the gun in a bit closer and slowed the pass right down - found first coat "puttered" onto the surface - but kept going until all areas got a spattering - closed the pattern down a bit and applied second coat - getting a much better result (this is where I made my big mistake - read the instructions, stupid!!!! - one coat only then wait 3-5 hours minimum before second) - result is that the surface tension of this paint won't allow CO2 to escape, trapping bubbles of it in the surface - damn, damn, damn.......
Next problem - cleaning up the gun, jars etc - gotta warn you all - look out - this stuff will stick to you like tar to fur - I had gone to extremes to cover myself - it still got onto me - believe it or not but by pulling off my glasses and putting them back on - now got two "black eyes" - didn't know until I went in for a coffee whilst the first coats "went off" - too late this stuff had already got into the pores of skin around my eyes - I look like I've been severely beaten - rocky raccoon..............or should I say, rosco raccoon.....
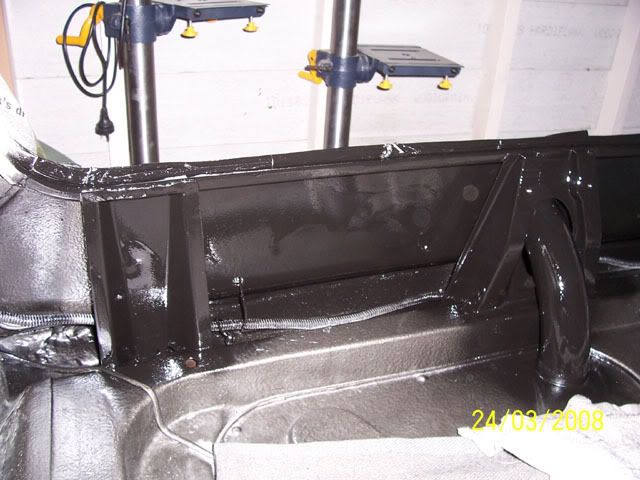
Four hours later set the whole show up again and ran another single coat - much better result, but you will notice small "bubbles" in the finish...........
May end up keying it down and running another in a few days..............
So, dear readers - my first "joy" of spraying this stuff is has been with with divided success.......... I love the way it sticks but will have a play around with some on scrap before applying it to a target..............
frats,
Rosco (raccoon).............
for those who have some experience with spraying - please read the instructions very carefully and don't be tempted to stray - not one jot! - I did.
Set about doing this right and used the suggested preps..................
Step 1
first pic is after mixing up Marine Clean at 10:1 with warm water.
Wiped it down, left it for about ten minutes then rinsed it of a number of times before drying it to parched................
Step 2
Poured some Metal Ready into a plastic cup and brushed it on, keeping it wet - anything that "bubbled" got another stroke or two.
Left it on for about 15 minutes then again rinsed a number of times and dried it off - it left a "salt and peppered" finish - grey in some parts and almost rust like in others........ cannot tell you why.
Again dried and dried and dried it all - used a heat gun on any rusted areas to ensure it was again parched...............
Step 3
Latex gloves on, safety gear laid out, windows open, lights on...........
Very carefully stirred the POR 15 in its can trying not to "whip" any air into the paint. Decanted around 75 ml into a small glass jar and then cleaned the lip of the POR can, placed glad wrap over it and got that lid back on presto - this stuff will "go off" if you leave the lid off for any time - it goes off on humidity.
Set up the gun, adjusted the air to 35 psi and gave the worksite an air dusting.
Mixed about 10 mil POR thinners (max recommended 15%) into the mix and stirred it thoroughly - again without bubbles.
Strained the mix into the cup of the "toy" gun and set myself up inside the boot ready to go.
Good look around, mask on, sleeves down,
Hit a sheet of cardboard and found the stuff so blasted thick it wouldn't "flow" - opened the needle right out, pressure to full (35 psi @ regulator) and hit the cardboard again - still like spraying vegemite..............
Held the gun in a bit closer and slowed the pass right down - found first coat "puttered" onto the surface - but kept going until all areas got a spattering - closed the pattern down a bit and applied second coat - getting a much better result (this is where I made my big mistake - read the instructions, stupid!!!! - one coat only then wait 3-5 hours minimum before second) - result is that the surface tension of this paint won't allow CO2 to escape, trapping bubbles of it in the surface - damn, damn, damn.......
Next problem - cleaning up the gun, jars etc - gotta warn you all - look out - this stuff will stick to you like tar to fur - I had gone to extremes to cover myself - it still got onto me - believe it or not but by pulling off my glasses and putting them back on - now got two "black eyes" - didn't know until I went in for a coffee whilst the first coats "went off" - too late this stuff had already got into the pores of skin around my eyes - I look like I've been severely beaten - rocky raccoon..............or should I say, rosco raccoon.....
Four hours later set the whole show up again and ran another single coat - much better result, but you will notice small "bubbles" in the finish...........
May end up keying it down and running another in a few days..............
So, dear readers - my first "joy" of spraying this stuff is has been with with divided success.......... I love the way it sticks but will have a play around with some on scrap before applying it to a target..............
frats,
Rosco (raccoon).............