Wilma FB project

Re: Wilma FB project
Yes Adelaide body Clay. Will have a play with colours over weekend. Couple of warmish days ahead.
Sucker for a rusty bomb
Re: Wilma FB project
My spray painter had a good hack for interior - he mixed the gloss clear with the colour rather than layering up - gives a great result in half the coats so less chance of delamination later
Sent from my iPhone using Tapatalk Pro
Sent from my iPhone using Tapatalk Pro
You will find me lost somewhere!
Re: Wilma FB project
Hi Wally, Thanks, I've not heard that before. For me, I've not been planning on using much clear if any. Getting a good finish just with gloss acrylic gives a real depth and 'softness' which is what I'm aiming for. For interior, will just use a wet coat to finish off, and same on outside. Its one of the reasons waiting patiently for the warm days has been necessary. In the cold, wet coats are too risky for amateur's like me

Sucker for a rusty bomb
Re: Wilma FB project
Wasn't happy with rear quarter rust repair. Cut it out and did it again.
Bit of filler and a bit of TLC and should be right. .

Bit of filler and a bit of TLC and should be right. .

Sucker for a rusty bomb
Re: Wilma FB project
Bit of progress on passenger side. Not quite right yet but closer.
Sent from my SM-T865 using Tapatalk

Sent from my SM-T865 using Tapatalk
Sucker for a rusty bomb
Re: Wilma FB project
Getting close to finishing the rust repairs on the passenger side. Still got a shallow dent the size of a five cents on the quarter panel trim line to smooth out, but pillar repairs, sill, dogleg and rear quarter are now pretty right. A bit of paintable seam sealer to apply to the panel joins and the sill/dogleg gap and then the repairs for that side will be done.
Getting to know this part of the car really well now . Looking forward to having all this done so I can move on to doors and boot lid and bonnet- but still a way off that yet.

Sent from my SM-G975F using Tapatalk
Getting to know this part of the car really well now
. Looking forward to having all this done so I can move on to doors and boot lid and bonnet- but still a way off that yet. 

Sent from my SM-G975F using Tapatalk
Sucker for a rusty bomb

Re: Wilma FB project
Gets a bit intimate after a while don't it Brett? Keep at it 
Sent from my SM-G973F using Tapatalk
Sent from my SM-G973F using Tapatalk
getting my FB ute on the road
EK van on rotisserie
EK van on rotisserie
Re: Wilma FB project
Spent a week with little to show for it. Discovered that I had 3 tins of paint which were all slightly different colours so spent an hour or two with my paint peeps (Canberra Auto Paint Fyshwick) getting it the right colour, homogonised and then decanted into 3 tins so that all paint is now the same (as long as I stir it properly).
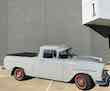
Finally got base coat of colour on all of the body yesterday and apart from a few minor tweaks to fix, happy with the shape of things. Dog legs and rear guard wheel arch lips have proven to be most testing. Hope to finalise the interior paint and redo the dash to satin black this week. Doors next. Number plates are ready to pick up but not quite ready for them. Photo shows last of the rust repairs now painted.
Sent from my SM-G975F using Tapatalk
and then decanted into 3 tins so that all paint is now the same (as long as I stir it properly). Finally got base coat of colour on all of the body yesterday and apart from a few minor tweaks to fix, happy with the shape of things. Dog legs and rear guard wheel arch lips have proven to be most testing. Hope to finalise the interior paint and redo the dash to satin black this week. Doors next. Number plates are ready to pick up but not quite ready for them. Photo shows last of the rust repairs now painted.

Sent from my SM-G975F using Tapatalk
Sucker for a rusty bomb
Re: Wilma FB project
Been wondering myself about this as I used four litres on the shell and tailgate then bought another. I may end up having to do a few costs uber all when it is assembled.
Shell in paint!
Sent from my SM-G973F using Tapatalk
Shell in paint!
Sent from my SM-G973F using Tapatalk
getting my FB ute on the road
EK van on rotisserie
EK van on rotisserie
Re: Wilma FB project
It turned out that each of the 3 four litre tins were slightly different, so the paint peeps made up what they called 'the standard' and then adjusted the other tins to match it. Then the whole lot was mixed up in a 20 litre drum and then decanted back into 4 litre tins: thus 'homogenised'. This has never happened to me before, but in the past I have mixed half tins with new tins as I went. This yellow has a tiny amount of green tint in it and it was the green colour that was causing me grief. The paint peeps reckon it was their original weighing of the 60gms of green tint in 4000gms of paint that was out a few grams in the batches they had made. Anyway should be right to the finish now- as long as I mix thoroughly as I go. Last thing I want is for the inside of the shell not to match the doors, or firewall not to match the under bonnet etc. etc.


Sucker for a rusty bomb
Re: Wilma FB project
Joy and bliss Stripping Wilma's doors over the last few days. They have turned out better than you could expect given the state of the floors and pillars. A little bit of rust around the windscreen end of front doors and bottom corner, and rust on the bottom of passenger doors, each one a bit worse than the other. I have a rust free EK rear door on hand to replace the worst passenger door, but will have a crack at fixing Wilma's first.
Have used paint stripper for all my paint removal on Wilma, with the brand in the picture proving to be the most effective of the ones I've used. I also wire brush the wet stripper off on contoured areas, having found this to be much easier and more effective compared to scraping. Followed up with 80 grit on orbital sander, then a wire brush on die grinder gizmo to finish off the tight bits.
Used a heat gun to assist with scraping off the tar on the inside of the doors. Lots of rust developing behind this tar so it has to come off.
After rust repairs, the plan is to rust treat and then POR15 the door internals, and apply paintable sound deadener.


Sent from my SM-G975F using Tapatalk
Stripping Wilma's doors over the last few days. They have turned out better than you could expect given the state of the floors and pillars. A little bit of rust around the windscreen end of front doors and bottom corner, and rust on the bottom of passenger doors, each one a bit worse than the other. I have a rust free EK rear door on hand to replace the worst passenger door, but will have a crack at fixing Wilma's first.Have used paint stripper for all my paint removal on Wilma, with the brand in the picture proving to be the most effective of the ones I've used. I also wire brush the wet stripper off on contoured areas, having found this to be much easier and more effective compared to scraping. Followed up with 80 grit on orbital sander, then a wire brush on die grinder gizmo to finish off the tight bits.
Used a heat gun to assist with scraping off the tar on the inside of the doors. Lots of rust developing behind this tar so it has to come off.
After rust repairs, the plan is to rust treat and then POR15 the door internals, and apply paintable sound deadener.


Sent from my SM-G975F using Tapatalk
Sucker for a rusty bomb
Re: Wilma FB project
Another day, another door. This is the 2nd worst for rust so not too bad. 
Sent from my SM-G975F using Tapatalk

Sent from my SM-G975F using Tapatalk
Sucker for a rusty bomb
Re: Wilma FB project
Good work Brett,
Yes the doors take a bit of time.
I tried all sorts of stuff to get the old paint off, orbital sander with 80 grit, paint stripper and even considered hiring a soda blaster.
In the end I used a wood chisel and just scrapped away. The chisel would basically chip the paint off as i pushed it along. Still time consuming but not messy. I then used a DA sander and wire wheels to get into all the nooks and crannies.
That door is ok a couple of new pieces and good as new.
Greg
So many cars so little time!
Re: Wilma FB project
Thanks Greg.
Another one (and last) exposed this morning. Some interesting previous repairs uncovered: that will all have to go.

Sent from my SM-G975F using Tapatalk
Another one (and last) exposed this morning. Some interesting previous repairs uncovered: that will all have to go.


Sent from my SM-G975F using Tapatalk
Sucker for a rusty bomb