ta chaps. Any pics or other advice would be a great help.
Need to fit a bigger transmission hump
Need to fit a bigger transmission hump
Howdy guys, I need to fit a bigger trans hump in a mates FB wagon, whats the best fit ???  the transmission is a traumatic.
ta chaps. Any pics or other advice would be a great help.
ta chaps. Any pics or other advice would be a great help.
I like modern cars before the "old cars" but...
(my modern car is a HR :) )
(my modern car is a HR :) )
I welded in a Hadfield (CRS) trans hump to mine - fit was fairly close -
but had to remove the lateral support where it crosses over the trans - ended up fabricating an "arch" from 2" x 1" box tube - cut it every 1", ground out a section then bent and weld, repeat, repeat etc........
The hump itself wasn't a great issue - think it was $75 about 6 years back.
Had to do a bit of banging, bending etc but found that by self tapping it down as I beat the floor/hump mating surfaces to get a good fit.
Seam welded the cabin side and stitch welded the exterior.
removed the self tapps one at a time and migged each hole.
Ground everything back and cold gal'd the joints. finished off with primer and top coats............ have pix if you want.
frats,
Rosco
Last edited by rosco on Fri Jan 25, 2008 8:36 am, edited 1 time in total.
Also used a CRS for the sedan and have another for the van.
Heres the link Yogie to download the catalogue and price list
http://www.rodshop.com.au/catalogues/index.htm
Heres the link Yogie to download the catalogue and price list
http://www.rodshop.com.au/catalogues/index.htm
[b] Member of FB-EK Holden Car Club Of NSW Inc. [/b]
-
captainbill
- Posts: 264
- Joined: Tue Jul 03, 2007 10:44 pm
- State: NOT ENTERED
- Location: Adelaide.sa
pix
Hi Yogie,
not sure this will work, new to pix..............
I am not a welder, this is one of my life-long failures but I get by with a lot of welding and grinding.............just takes a long time for me to get anything done.
I made a poor effort of the cut and patch job in 1983 when I fitted the red/4 sp and decided after joining our club to correct as much of it as possible.
The club pointed me to a CRS (Hadfield) cover and I bought a MIG and did a TAFE course (basic).
Cut the old stuff out and these are some of the pix when fitting the CRS cover.
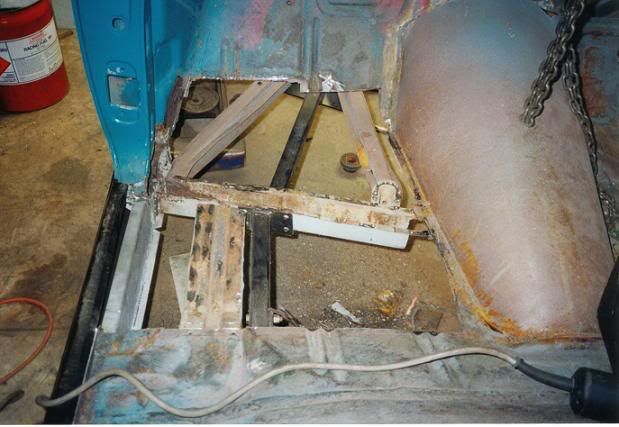
First one is of the arch fitted - think Blacky's version is a lot better, but this is what I did. It is welded into the laterals and also forms part of the bracing for the (as was the usual) rear trans mount (hence the bolts).....
(Ignore the black r/h bottom of the arch - it was painted accidentally whilst underneath - just looks like it is missing in the pic.....)
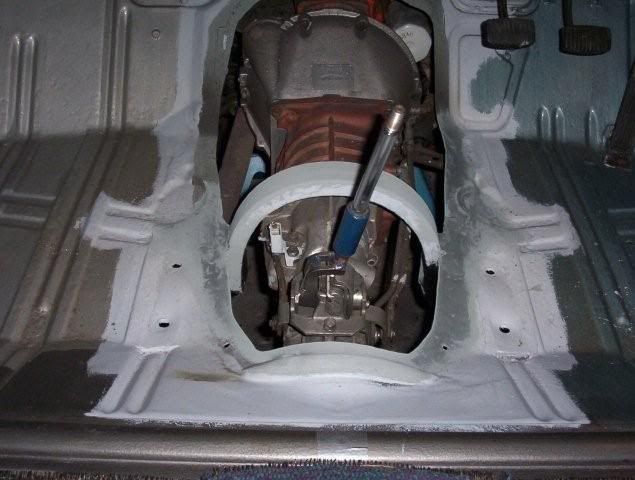
The next one is with the cover and floor beated together and held down with self taps - these were later removed once the seam and stitch welding was done - I welded in the holes after removing the tappers (one at time),,,,,,,,

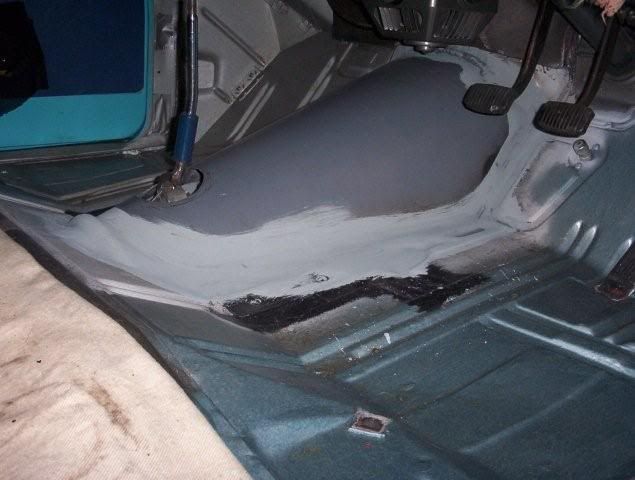
Third pic is of the grinded completion - the grey paint is cold gal which was applied to the bare metal joint - to prevent electrolosis....I used an SLS etch over that and then the normal primer before top coats........
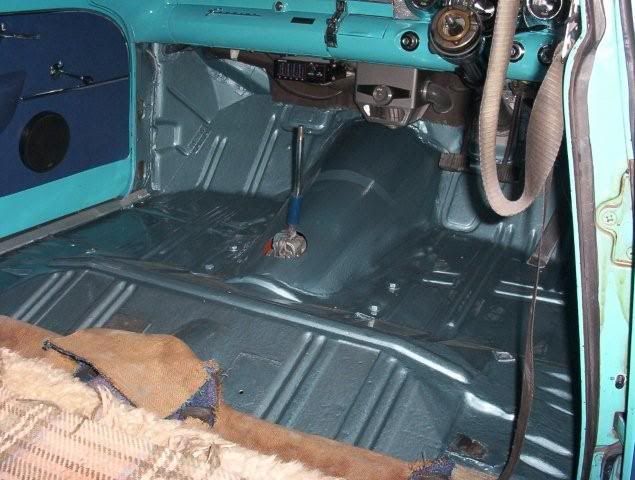
Final pic is of the painted floor - I use an epoxy hammered metal - blue for interior, charcoal for exterior...........
As mentioned, I have a lot of problems with welding ...... getting better, but I just plod along quietly - don't know what I would do without the angle grinder - my ratio is around 10:50 = 10 min weld, 50 min grinding........
just hopeless....
frats,
Rosco
not sure this will work, new to pix..............
I am not a welder, this is one of my life-long failures but I get by with a lot of welding and grinding.............just takes a long time for me to get anything done.
I made a poor effort of the cut and patch job in 1983 when I fitted the red/4 sp and decided after joining our club to correct as much of it as possible.
The club pointed me to a CRS (Hadfield) cover and I bought a MIG and did a TAFE course (basic).
Cut the old stuff out and these are some of the pix when fitting the CRS cover.
First one is of the arch fitted - think Blacky's version is a lot better, but this is what I did. It is welded into the laterals and also forms part of the bracing for the (as was the usual) rear trans mount (hence the bolts).....
(Ignore the black r/h bottom of the arch - it was painted accidentally whilst underneath - just looks like it is missing in the pic.....)
The next one is with the cover and floor beated together and held down with self taps - these were later removed once the seam and stitch welding was done - I welded in the holes after removing the tappers (one at time),,,,,,,,
Third pic is of the grinded completion - the grey paint is cold gal which was applied to the bare metal joint - to prevent electrolosis....I used an SLS etch over that and then the normal primer before top coats........
Final pic is of the painted floor - I use an epoxy hammered metal - blue for interior, charcoal for exterior...........
As mentioned, I have a lot of problems with welding ...... getting better, but I just plod along quietly - don't know what I would do without the angle grinder - my ratio is around 10:50 = 10 min weld, 50 min grinding........
just hopeless....
frats,
Rosco
Last edited by rosco on Fri Jan 25, 2008 5:09 pm, edited 1 time in total.

Thanks Theo and DR - will do carpet when I start work on the interior - just getting the outside done at present - still at it after ten years.
Theo - yes ALL my welding takes a lot of time - or more to the point - GRINDING.......
You'll notice that the lower section of the arch is bent inwards to the angle of the laterals - that was the hardest part to get right - also welded in some "plugs" at 45 deg angle to base of arch - removable lower brace is bolted through lateral - it has the handbrake frame welded to it........
Pix are very generous - good to have proper carpet on it - one day.
frats,
Rosco