Rosco's EK 225 manual

Rosco's EK 225 manual
Good stuff Rosco - glad you are back online and continuing the story!

Re: Rosco's EK 225 manual
Takes me back to when I did the same Rosco. Babes in the woods we were. I used hydramatic tailshaft. M20 202 Stock diff, HT rear crossmember. Didn't know I needed to enlarge the tunnel. Calipers were upside down so wouldn't bleed. My first association with Power Brakes SA.
Sent from my SM-G973F using Tapatalk
Sent from my SM-G973F using Tapatalk
getting my FB ute on the road
EK van on rotisserie
EK van on rotisserie
Re: Rosco's EK 225 manual
Thanks folk,
I'll add a bit more each day from now on if time permits.. lots going on here with upgrades to house - tradies hit the place next week.. so much to do before they get here..
Ok - a few things to add before I continue with the build.
I was in trouble with front seats... I really wanted HR prem ones, but my measurements convinced me they wouldn't allow the gear lever of the M-20 to move far enough left and right.
Finding EH or EJ prem ones was even harder to locate... the EH had well and truly established itself at this time as the most desirable collectable.... the poor EJ, which I still love - took a back seat ride to the EH and I suspect there were many EJ prem seats fitted to EH's... hence the scarcity.
I looked at Torana seats and didn't like the hard feel of them. My wife and I spent quite some time in wrecking yards trying to find seats that could both be fitted easily and were also comfortable.. the best we found which suited our needs were from a Mitsubishi Sigma... I finally got them from White Street in Mordialloc for $125 the pair.... they were easily fitted, the rear outer fitted perfectly in place over the rear bench hole. the inner rear was simply a holed drilled through the floor with a steel plate placed on both sides to support it.
At the front, I made up two 5/16" steel extension arms and angled them forwards at a rake to suit where holes could be drilled, plates fitted and everything taken up.. I really couldn't risk driving the old bus using blankets on the floor again.
I vowed that I'd revisit the mounts and position of the two seats at some time in the future - but have simply not found the need to. We may sit a little lower down in the car in these seats - but neither of us want to raise them at all... I don't know what it is, but we both find the position quite appropriate - rather than sitting up at the previous bench seat height...
Brakes -
As previously mentioned, I had decided earlier on to use Dow Corning silicone brake fluid - it is still in the brake system today... but is as expensive as all get-out to purchase. The main reason for choice was that it is not hygro-scopic... it requires a partial flush from time to time, but not a complete flush and refill to drain out contaminants... there simply aren't any.
For some time, I believed that it was the Girlock booster which may have suffered contamination of the silicone fluid to what had been previously used in it... straight everyday brake fluid.... I was warned that mixing the two, or indeed - using rubber components which had previously been exposed to ordinary brake fluid would "marshmallow" them with silicone fluid.
This, I believed - may have contributed to why the brakes would sometimes remain applied... application of the hydraulic brakes was always exacting, but with an occasional failure to release for a second or two... a weird feeling to drive with - I lived with this for some 7 months before I finally found out that it was not the booster... we'll get to that bit when "that" one of the "nail head" problems comes to up..
I had a lot of issues with the handbrake cable... the HR one was too long and the EH one too short. The EK one simply didn't fit.
I decided on the EH and made up my own "intermediate" cable to join the front EK original one to the new EH rear one... using a wire rope cable with cable joiners allowed me to marry the two and get a satisfactory handbrake.. this was all effected before that first run in the previous post.
However - the rear brake assemblies and drums I purchased from AA wreckers in Montrose (which is now Pick-a-Part) had issues - for one, when I tried to get them off the HR sedan - they wouldn't budge... I could not release the auto adjustment mechanism on either side and it took me an awful long time to finally get them off.. I may have damaged some of the components in the process, but from what I could see - I hadn't... the drums were pretty clean faced and not scoured. I needed the shoes.. they are a special shoe made for the much smaller 9/16" bore "button head" wheel cylinders.... I had them relined.
First attempt to apply the handbrake resulted in immediate lock up ... this was another "nail" which didn't get resolved for a number of years.
The auto adjust mech didn't work - I read and read about it, got a full understanding on how it worked and tried and tried many times to correct it failing to adjust up when the gap opened sufficiently on application to allow the lever to engage with the ratchet wheel.. it simply wouldn't on both sides and I gave up - removing them altogether and deciding to simply do a "manual" take up at intervals... this has been the case for some 37 years now.... but we'll get to that "nail" when I finally found what was causing the lockup later...
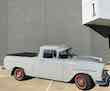
Just to add a couple of final pix to the build.... we arrive at 13 Nov, '82... the day the car was fully re-assembled and ready for the road.
Here is the last pic taken of the assembly in the garage where this dastardly deed was done....
And finally, here is a pic taken from the same kitchen window of our little cottage - in comparison to the one taken with the grey motor in it earlier in this thread..
There is about 10 years of frustration issues to come yet.... I did not have any access to anyone who had a vehicle where I could compare.
The entire build was completed by advice and workshop manuals.. plus the supply of parts by serial number from varying GM dealer spare parts counters.. and a number of wrecking yards, where there were still many early Holdens in supply... we can't go back, if any of us could now - we'd fill our garages with so many spare parts you'd struggle to access them... hindsight, eh? - marvelous...
Until next,
frats,
Rosco
I'll add a bit more each day from now on if time permits.. lots going on here with upgrades to house - tradies hit the place next week.. so much to do before they get here..
Ok - a few things to add before I continue with the build.
I was in trouble with front seats... I really wanted HR prem ones, but my measurements convinced me they wouldn't allow the gear lever of the M-20 to move far enough left and right.
Finding EH or EJ prem ones was even harder to locate... the EH had well and truly established itself at this time as the most desirable collectable.... the poor EJ, which I still love - took a back seat ride to the EH and I suspect there were many EJ prem seats fitted to EH's... hence the scarcity.
I looked at Torana seats and didn't like the hard feel of them. My wife and I spent quite some time in wrecking yards trying to find seats that could both be fitted easily and were also comfortable.. the best we found which suited our needs were from a Mitsubishi Sigma... I finally got them from White Street in Mordialloc for $125 the pair.... they were easily fitted, the rear outer fitted perfectly in place over the rear bench hole. the inner rear was simply a holed drilled through the floor with a steel plate placed on both sides to support it.
At the front, I made up two 5/16" steel extension arms and angled them forwards at a rake to suit where holes could be drilled, plates fitted and everything taken up.. I really couldn't risk driving the old bus using blankets on the floor again.
I vowed that I'd revisit the mounts and position of the two seats at some time in the future - but have simply not found the need to. We may sit a little lower down in the car in these seats - but neither of us want to raise them at all... I don't know what it is, but we both find the position quite appropriate - rather than sitting up at the previous bench seat height...
Brakes -
As previously mentioned, I had decided earlier on to use Dow Corning silicone brake fluid - it is still in the brake system today... but is as expensive as all get-out to purchase. The main reason for choice was that it is not hygro-scopic... it requires a partial flush from time to time, but not a complete flush and refill to drain out contaminants... there simply aren't any.
For some time, I believed that it was the Girlock booster which may have suffered contamination of the silicone fluid to what had been previously used in it... straight everyday brake fluid.... I was warned that mixing the two, or indeed - using rubber components which had previously been exposed to ordinary brake fluid would "marshmallow" them with silicone fluid.
This, I believed - may have contributed to why the brakes would sometimes remain applied... application of the hydraulic brakes was always exacting, but with an occasional failure to release for a second or two... a weird feeling to drive with - I lived with this for some 7 months before I finally found out that it was not the booster... we'll get to that bit when "that" one of the "nail head" problems comes to up..
I had a lot of issues with the handbrake cable... the HR one was too long and the EH one too short. The EK one simply didn't fit.
I decided on the EH and made up my own "intermediate" cable to join the front EK original one to the new EH rear one... using a wire rope cable with cable joiners allowed me to marry the two and get a satisfactory handbrake.. this was all effected before that first run in the previous post.
However - the rear brake assemblies and drums I purchased from AA wreckers in Montrose (which is now Pick-a-Part) had issues - for one, when I tried to get them off the HR sedan - they wouldn't budge... I could not release the auto adjustment mechanism on either side and it took me an awful long time to finally get them off.. I may have damaged some of the components in the process, but from what I could see - I hadn't... the drums were pretty clean faced and not scoured. I needed the shoes.. they are a special shoe made for the much smaller 9/16" bore "button head" wheel cylinders.... I had them relined.
First attempt to apply the handbrake resulted in immediate lock up ... this was another "nail" which didn't get resolved for a number of years.
The auto adjust mech didn't work - I read and read about it, got a full understanding on how it worked and tried and tried many times to correct it failing to adjust up when the gap opened sufficiently on application to allow the lever to engage with the ratchet wheel.. it simply wouldn't on both sides and I gave up - removing them altogether and deciding to simply do a "manual" take up at intervals... this has been the case for some 37 years now.... but we'll get to that "nail" when I finally found what was causing the lockup later...
Just to add a couple of final pix to the build.... we arrive at 13 Nov, '82... the day the car was fully re-assembled and ready for the road.
Here is the last pic taken of the assembly in the garage where this dastardly deed was done....
- 83feb09 mail.jpg (202.36 KiB) Viewed 929 times
And finally, here is a pic taken from the same kitchen window of our little cottage - in comparison to the one taken with the grey motor in it earlier in this thread..
- 83feb10 mail.jpg (242.93 KiB) Viewed 929 times
There is about 10 years of frustration issues to come yet.... I did not have any access to anyone who had a vehicle where I could compare.
The entire build was completed by advice and workshop manuals.. plus the supply of parts by serial number from varying GM dealer spare parts counters.. and a number of wrecking yards, where there were still many early Holdens in supply... we can't go back, if any of us could now - we'd fill our garages with so many spare parts you'd struggle to access them... hindsight, eh? - marvelous...
Until next,
frats,
Rosco
Re: Rosco's EK 225 manual
Rosco,
Great part of the story !!
You know when I think of it my car was never finished when I did the 186 conversion, like yours took me a lot of time mucking around with all the "bits"
that goes with such a modification.
Greg
Great part of the story !!
You know when I think of it my car was never finished when I did the 186 conversion, like yours took me a lot of time mucking around with all the "bits"
that goes with such a modification.
Greg
So many cars so little time!
Re: Rosco's EK 225 manual
Definitely, Greg....
When I was in the planning stage of this modification, my mentors told me it was a straight forward job... a weekend, indeed!... never - it was months, just getting it all together.
I had trouble with the clutch slave cylinder.. finding someone who would make up a mount for the grey slave cylinder to the Aussie box.
As you would know, both the Aussie and three speed all synchro models had a mechanical clutch... it did my head in trying to work out how to fit one of those into my build...
As it turned out, Bill Patterson spare parts found the answer to that one for me - for left hand drive cars, they used the grey motor slave cylinder... and there was a mount bracket made to fit the cylinder... took a while for it to come in, but they came up with the goods for me....
Tailshaft was another - I couldn't make any measurements until the motor/gearbox was actually in the car - my guess was pretty close, but I needed correct measurements... I dreaded having to get one cut, welded and balanced... I went with the shortest one I could find in any books - LJ Torana auto (which would also have been the same for the 4 speed Aussie.... and tracked one of those down - as it turned out, it fitted almost perfectly to length...
Speedo cable was another - Ringwood Speedometer came up with that... I used a length of string to determine the length of the cable.. told them what was on each end - and they made it up for me...
I had special front brake hoses made up by Don Alford Brakes, in Ringwood.... the HR ones caused me concern that they would not be long enough to go from the sub-frame mount posts to the calipers.. so, I had them made...
Throttle linkage to carby. As we all know, the red motor carby fitted to later model cars used a rod with a 90 deg end on it.. this passed through a hole and slot in a plate on the throttle shaft of the carby... I struggled to work out how to fit that to what was standard in the EK... ended up making a rod up which mimicked that of the grey setup.. but had huge issues with it failing to go fully back to idle... my return spring simply didn't have the power to pull the throttle shaft up hard enough. I had a play with fitting an additional small spring from the top of the float chamber body to the underside of the throttle arm... it helped, but not by much... if anything, it wore out the throttle shaft body quicker..... and was removed many years later when I discovered why the carby body was leaking air... I haven't finished with that re-visit yet.. my current opinion is to make up a stainless rod to suit and TIG plates to it... it will be the latter 90 deg bent arm, but will fit into a bearing fitted to the original firewall bracket... lots of work to do there... most would take the easy route, and just fit a cable throttle - I don't work like that..
I put up with the generator/regulator set-up for some time... the regulator burned out and I made a decision to fit a Bosch BX-1 40 amp alternator - with built in regulator... had to study what wiring was involved and removed some of that not needed for the regulator.
What I did not know, was that body "earth" for factory purposes ran through the braided fuel pump hose.. that scared the daylights out of me. I had removed that braided hose and fitted a rubber one... hence losing battery earth to the body in a direct format.. it got there, but through other means.
I had issues with getting power to the body ... it was intermittent at times. No-one told me I'd have to run a lead from the battery negative to body earth... once that was found - that little nail was hammered down permanently.
We are now getting into the first few weeks of having the old bus back on the road... it's had a couple of tanks of fuel through it by now.
The dreaded "death throe" shut down was still happening.. I found that by "stalling" it, was the most kind way of making for a faster shut-down... looked pretty ordinary to onlookers...
Next up - the plod..... I had to get the replacement engine made legal for the registration branch.
As most would know, the 179 HP block did not have any engine size casting... just HP.
My engine number started with 163...
I was very nervous and had pre-armed myself with what info to reveal when I went to Ringwood Police station to have the new motor number registered to the vehicle...
Fortunately, a young Plod came out to inspect the car... I kept my mouth shut and answered only what I was asked...
He asked me how big the motor was - I told him I was not sure, there was no size marked on it.. his answer stunned me "I'll show you how to tell...." He opened up the bonnet and took a look at the engine number... "163" were the first three digits... "there you go - it's a 163"... I did not make any comment but shrugged my shoulders and put a look of amazement on my face....
He then looked under the car to see the driveline angle of the tailshaft..."you know, we get a lot of young blokes come down here and think they can fool us".... "they think they can simply bolt in a red motor and a 4 speed box and get away with it"...... "we have been told to look at the angle of the gearbox and motor and it should line up pretty much with a straight line to the diff"... "we send a lot away to have this fixed".... "I can see you have done this job right...."
We went back inside, and he sent off the paperwork to the Motor Registration Branch.... I now had a legal 179 motor in the car... I was relieved when the paperwork came back with the new engine number.. took many pix of it.. and a pic of the new registration label every year afterwards to show continuity...
Back then, there wasn't any need for engineering.. you simply got the engine number viewed and the installation approved by the Plods... they sent off the paper-work... job done.
Next - insurance.... I had been with AAMI for 10 years ... third party fire and theft only (bomb insurance). I knew I'd have to tell them about the modification or risk not having insurance... I listed all the major mods... red motor, disc brakes, 4 speed box, EH diff .... the wrote back and told me that they could no longer cover my insurance.. the vehicle was now in a "modified" state and they did not accept risk... end of story...
I was shocked.. I went down to RACV in Ringwood to try and find out what I'd have to go through to get cover... they asked me what I had done to the vehicle... told them all the modifications..... "Ok, have you changed the wheels?"... I told them that I had changed from EK 13x4.5 to HR 13x4.5 but was looking around for better wheels.... going out to 13 x 6"..... the young chap went off to find out if they'd cover risk......
He came back, and again I my jaw dropped..... "we can cover all your modifications, but won't accept the 6" wide rims".... I was stunned - motor, gearbox, front end, diff... etc. etc..... and all they had to chew over was the width of the wheels.... I signed up there and then.... and had cover for many years before I finally went to Shannons to get full comprehensive cover... which I still have.
Shannons - all the modifications are listed with Shannons, each year on renewal- I tell them of further work/additions to be included in the agreed value of the vehicle - they have not questioned anything... In fact, at one of our club meetings - I took a Shannons guest speaker aside and put the cold hard steel of fact to him.... he told me that everything I had done was in order... the vehicle was registered with the red motor, and all modifications had been accepted by a previous insurer... he had no qualm with continuing cover..... providing there was nothing which would make the vehicle unroadworthy by it failing component failure.... tyres, brake linings etc. etc.... that was a huge sigh of relief.
I checked with them about fitting the larger Dragway wheels... told them that "my" engineer would agree to go out to 7 inch by 14, but no larger unless larger brakes were fitted... they were happy with this and added this into my policy... as far as I know, the vehicle is fully legal.... well, there is a tiny bit we'll get to later... which in the last 12 months or so - I have found will fail an engineer's test if it is ever subjected to one... the bottom line relates to rear speakers.... later, much much later in this thread - the sound system - we are going to spend some time on that one.. the evolution from the factory AWA radio - to the current system... I am a self-confessed audiophile... having a sound system in my car that suited my personal demand took a high priority once these "nails" started to dwindle down in number... we'll get to this in time - but for now, there's lots more to tell you about the first couple of weeks of having the old bus back on the road...
Ok, 'til next...
frats,
Rosco
Re: Rosco's EK 225 manual
Rod Hadfield supplied me a slave cylinder adaptor. Used an alternator and mounted solid state reg in place of the old genny reg. That's going in the ute now. Hydramatic shaft fitted and I was happy with the brake fit up. The rear axle was changed later for the disc wheel cylinders but highly prone to lock up in the mean time.
One Friday lunch time driving up King William St, veering left to round Victoria Square a pedestrian stepped out in front of me. This is the busiest part of little old Adelaide or was in 1986. Rear brakes locked up and I came to a screeching halt sideways, in the middle of the pedestrian crossing facing the recalcitrant j-walker. Uttering profuse apologies, he looked like he had pooed his pants and I was in a similar state. Quickly I jammed it in gear and screached off before plod turned up. My passenger and I were chuckling by now.
Sent from my SM-G973F using Tapatalk
getting my FB ute on the road
EK van on rotisserie
EK van on rotisserie
Re: Rosco's EK 225 manual
I was put onto the rear lock up issue if using front drum compatible rear wheel cylinders... I managed to get the tiny 9/16" bore ones new from Don Alford Brakes, Ringwood... they were looking after me for my brake bits.
I went back to them with the brakes occasionally remaining applied after release - their opinion was that it was more than likely the front caliper pistons... if I'd listened to them back then, it would have saved me a lot of $'s and a lot of grief.
My reason for not following up on the calipers being worn was that the old chap who sold me the front end told me the calipers had only recently been "done".... I later found this out not to be true... but it was a few years later...
I was also told I could fit a proportioning valve if using the drum brake rear cylinders - but was also told it would almost render the back useless...
I went with what GMH engineers had fitted to the HD/HR... it worked properly and as far as hydraulic braking is concerned - it has been almost without flaw - aside from the remaining applied issue.....but, as time went on - other issues started to appear... later, we'll get to those later.
Next, we come to the front discs.... they were in their last turn of the dice.... goodness only knows how many times they'd been machined down.
My measurements had them at - Disc thickness: left: 9.85 mm right: 9.40 mm
They were badly scored and pitted. The outermost circumference showed that the inside face was making contact, the outside was uneven...
At this time, I was not aware that I could replace the rotors - my understanding then was that the entire disc/hub was the serviceable unit - I was not ready to fund this.... they were working, I could lock them up quite easily with enough foot pedal pressure - they were not pulling to either side and did not appear to be getting hot, even when towing our boat....
Hindsight is a wonderful thing - it was not for many years to come that I was aware that I could just replace the rotors - and they were available.... pity, it would have saved a lot of grief.... as we will read in five year's time or so.....
Back to running the motor in....
On 14th November, I took the car out on its first longish run... it was a warm day, around the 28C mark.... we went to Yarra Glen, Kinglake and back home again via Christmas Hills.... the motor got hot... very hot - it mainly ran up around the 180F mark.. but occasionally got to 210, where I pulled off the road and allowed it to cool out.
I was told that when running in, it was likely that it would run hot for a little while until the motor free'd up.... I was not happy with the 210's.... and it would have gone higher if I had not pulled over.
I still had issues with the death throes... and struggled with getting a solid idle out of it..
The upside, was the huge amount of power this motor had.... with the little 3:55 diff - it would probably have climbed a brick wall if it could have got traction... it was simply amazing.
Fuel consumption - shocking... something wasn't right - I have always been a watcher on both fuel and oil consumption... oil was good, it wasn't using a skeric of it.. but it was "slurping" up fuel.
The best I could get out of it on local and some short country runs was around the 22 mpg mark.... I needed to find out what was causing this... with the little diff, and when being lightly driven with short shifts - I should have been able to do a lot better than 22... the grey would do better than that - and it was worn out..
I checked and re-checked the timing and dwell angles... I could not set the timing on the harmonic balancer mark, because advanced that far - the motor would "ping" at the slightest touch of the throttle... I made my own ignition mark on the balancer...
I was taught by an old timer that the best method to time the ignition was on a "hill" test.... basically, top gear - lowish rpms and plant the foot.... set the timing so that it "just" pings occasionally... and this is what I had done... taking it up any further advanced caused the motor to ping on any load at all... even on high octane... and with additives - the timing simply had to be left slightly retarded.... I learned later on why this was so....
Some parts of it are now becoming a little clearer - I was putting a "picture" together on the related issues and symptoms... heat, pinging and death throes....
The replacement radiator finally came on 18th November, I hated it from the start - but if it worked, I'd be happy... and wouldn't have to look at it unless I opened the bonnet.... it was ugly... damned ugly. Big semi-round tank on the top of it... hammered in to nestle behind the upper baffle cross-member.... ugly as all get-out....
Fitted up and seemingly to have resolved some of the cooling issues... we did a road trip to Albury, NSW and back on 5th December... over 600 km's of it on the one day..... I wanted to get this motor to sort itself out and bed in...
The outbound run was quite enjoyable... I kept speeds at differing levels.... 50, 55, 60 mph then back down to 50 for a short spell... 10 miles or so and change the target again.. I did this all the way to Albury and filled the tank....
Coolant temps went from a steady 170F up to 175 and to a max of 185 the further north we went. On filling the tank, the consumption was 29.622 mpg.. I was happy......
The return trip doing much the same speed patterns resulted in temps of 175, 165 and 170...... with the same ambients.... it suggested that the motor had finally began to settle in... I knew GEM engines fitted "cored rings"... I knew little about them, but was of the firm belief that they would take more settling down into the bores... perhaps this was starting to now happen.... fuel consumption on the return leg was 28.291 mpg.. but I gave it some "spirited" squirts in the mountain ranges coming over the "divide"... to which it felt like I was driving a sports car.... using 2nd and 3rd gears - I was "leaping" out of hair-pins on uphill climbs... it was really enjoyable to have this power on tap...
The next issue began to rear its ugly head..... lifter noise... I thoroughly enjoyed not having to listen to tappets with the red motor... just the whir of the alternator making current.
After the trip from Albury, I noted some of the lifters were beginning to "rattle"...
I took off the rocker cover and adjusted them up according to the manual... this did nothing to quieten down the lifters.... clack, clack, clack then quiet as they were wound down 1/2 turn after the clacking stopped..... less than a minute later... they would sporadically rattle...
I found that the main offenders were numbers 12, 11 and 9.... all up towards the rear of the motor...
I phoned Noel Belford of RAM automotive, who sold me the motor.... nearly 12 months back by now... told him what was going on - and about the death throes stop each time ......... he told me something was wrong and asked if I had a compression gauge - which I did.
Asked me to warm the motor up and test all 6 compressions. which I did... and was shocked beyond belief!... the "penny" was now starting to drop...
I had compressions of well over 240 psi on most... up to 255 on two of them... numbers 5 and 6 cylinders...
Many will know, that the early alloy intake manifold fitted to red motors had a tapping between number 5 and 6 for the PCV valve connection....
This was later moved to the tapping below the carburettor... it was the HQ "silver anniversary" model which suffered most for this... they ran lean on number 5 and 6... some of them burned the crowns of the pistons... I had my PCV fitted to this tapping, and the brake booster fitted to the underside of the carby... wrong - no-one told me.... it's just what I did... and I was wrong...
I called Noel back and told him... his immediate response was that he would order a replacement head.... without any further questioning... the head was simply "wrong".... He asked if I could bring the car down to Dandenong and they would change the head over... it was clear to him that the machining of the head I had was wrong... it was for a smaller red motor.. possibly a 149 HC... no wonder this motor would climb a brick wall..... and this is why it rattled itself to death when trying to stop it....
Two days later, and I'm down there watching him undo all my good work - he spotted where I had fitted the brake and PCV booster connections and immediately told me to swap them over... it was then that I learned of issues with the burning out of numbers 5 and 6 in HQ's....
I looked at both heads when they were laid side by side... the recess in the replacement was a lot deeper than that of the one which I had been supplied...
Everything went back together.. and he started the motor... it was now "declawed".... I told him that I had set the ignition retarded and he set that back onto the notch in the balancer... checked the dwell and set the mixture... we went for a test run - it wasn't the same car... it had lost just so much of the power it had... I was a little disappointed, to say the least..... but, turn the key to off - and it stopped.... no rolling on or rattling.
He had a listen to the lifters... and also picked up on numbers 12 11 and 9... replaced them and set them again.... they still rattled, but were quieter.... he then went out back and came back with a full set of the 12 and gave them to me.... told me that when engines are reconditioned, there is nothing they can do to take up the clearances around the lifter bores... in time, they wear... and this was more than likely the cause of these few making noise... the motor ran, there was no issue of it failing warranty - again, I was not happy..... my lovely "red" motor was going backwards.. well, the appeal was....
Driving it back home, I got used to not having that "thrust" under my foot.... it was still good, very good in fact - but nothing like the acceleration it had previous....
I noted that coolant temperatures were now a lot lower... it was settling in nicely around the thermostat opening temp when moving... climbing up much more slowly in traffic when stationary... it was perhaps a trade-off for that lost power and torque...
The next issue I wanted to correct was the exhaust... it was a slip-shod attempt at fitting "off the rack" parts that would fit when I re-built the car... the HR front pipe hung down very low.. there were adapter "bends" and U bolts in it all along the front section to get around the frame and gearbox... I tired of all this and booked it in to have a custom front pipe made up... it was all cosmetic.. but it was the next step in the build...
It made not one jot of difference to how the car ran, or sounded... but, it had a tidy exhaust now and I ticked that off the long list of follow-ups.
Points..... dwell angles... for the life of me, I could not explain this.... the dwell angle dropped on a weekly basis... they were burning..
I replaced the condenser quite a number of times and went through a number of sets of points... it was frustrating... another week, and I'd lose another degree... I had no answer for this.
I bought a new distributor - fitted it, set the dwell.... a week later - the number had dropped again - had to be something in the ignition wiring or coil.
Replaced the coil with a "resistor" one... I knew nothing of these.. my belief at the time was that there was a "resistor" inside the coil... I did not know that it was in fact a 9v coil which used a resistor to drop the 12v down to 9v when the ignition was in "run"... yet would pump the full 12v into it on "start" - to equalise the drop in voltage from the starter motor....
I fitted this coil and started the motor.... just a couple of minutes later and I could "smell" heat... burning electrical heat.... I touched the coil and it it was extremely hot..... stopped the motor and then went and read up in the workshop manuals.... and realised I'd wasted my money...
Fitted the original and went and bought a 12v replacement... fitted that.... set the dwell... a week later - another degree gone from the angle...
I was getting pretty cross with it by now.... called my known contacts who could offer no suggestion or reason....
I called into a number of tuning specialists and all they could suggest was to look at my primary wiring... it had to be Low Tension causing it...
At the time, I had run the LT lead from the distributor to the coil through a hidden toggle switch... effectively breaking the points open electrically... what I didn't know, was that I had "induced" a back-feed in the LT... I was very hesitant to tel anyone of this "kill" switch... if I had - I'm certain they would have chimed in and told me this was the cause for the points burning...
Before I understood this, I found that I could fit an electronic ignition system. An old chap from where I worked was a back yard mechanic... he told me of this amazing product and I chased it up.... Lumenition - made in Britain.... still available today.. in fact, I have one fitted to both the old bus and my lovely little 1977 Toyota Corona... this ignition system is simply amazing....
I contacted Lumenition at 66 Crown St, Richmond and we went through how the system worked, what was involved in fitting it and costs....
On 27 Jan, '83 at mileage 155,350.6... the ignition system was fitted at their factory.... we "hid" the ignition module up under the dash and incorporated a number of intercepting features which would totally immobilise the ignition.... these, good folk - I'll keep to myself, if you don't mind.
The system works by "optronics"... there is an infra-red emitter and receptor.. and a six bladed "chopper" fan which breaks the beam (4 blades for 4 cylinders).... I was told that the unit was accurate to within 1% at up to 10,000 rpms... much of this dependent on the advance of both mechanical and vacuum in the distributor.. but the chopper arrangement itself held this accuracy.
I was further told that it would allow the coil to "throw" greater currents to the plugs.. and their general recommendation was to set the plugs out to .040 thou.... which I did. The spark would throw nearly an inch with a solid blue arc... white spotting on contact...
The system was not affected by any electrical interference or moisture, unless it was muddy... it was an "optical" system, not an electronic one.... the electrics were contained within the module.. and that was inside the passenger compartment.
I have to tell you here and now - this is the best ever modification I have made to this dear old bus... it has not ever missed a beat... well, I am wrong - it did, but it was all my fault..... we'll get to the Tenterfield nationals later... departure day - what a trip to remember...
I set the ignition on the harmonic balancer that day - and it has not moved once...ever... except for the two times I've had the distributor out when doing refurbs and disassembly of the engine to find "more" rattles in later life.... the ignition - simply magic.
Fuel consumption.... at 157,010 miles, I did a run up through the hills to Belgrave, out through Emerald and the back blocks to Warburton and the Upper Yarra Dam across to Marysville and back through Healesville and Yarra Glen... I was not particularly scrimping on fuel - but not wasting it either..... I was keen to learn what the new head and ignition would return... I put off doing this for quite some time, just filling the tank up and recording the numbers.. not working out figures for fear that I'd be disappointed.... I was not going to subject myself to any further disappointment for a little while... but, the car seemed to be using reasonable fuel for what I was doing... nothing exceptional, but nothing concerning either...
This little trip above... it was time to find out what it was doing...
There was quite a bit of mountain climbing in this one... and some slow curve work up in the hills....
From full to re-fill to full...... 24.74 litres.... with a return of 29.22 mpg.... "we" were now within range of this being a "30 mpg" car... which I what a large part of my intention to fit the 179 motor was from the outset.... EH's were good for 30 mpg if driven sedately... I had that motor, and the 3:55 diff.... body weight was in the ball park - I was very disappointed with the low 20 and 22 figures... I now had my goal and was within reach of the 30... the motor was running sweetly now.. those lifters were still making some rattle, but nothing like the old grey... for the first time in the build, I began to relax and enjoy running the modification...
So, we have now got some of the gremlins sorted.. some of them are now well and truly nailed down... but, in the next chapter - we'll see others start to appear... we are now only two months into re-building the modification.. we have nearly another 10 years to go yet before I was convinced I had made all of it bullet-proof.....
frats,
Rosco
Re: Rosco's EK 225 manual
Oh and the speedo cable, HKTG all synchro trimatic, just a bit short but routed through trans tunnel using the HKTG grommet.
Sent from my SM-G973F using Tapatalk
Sent from my SM-G973F using Tapatalk
getting my FB ute on the road
EK van on rotisserie
EK van on rotisserie
Re: Rosco's EK 225 manual
I went the other way, Clay - had one made up. At the time, no-one could tell me what would fit... I could have ended up with a box full of differing new ones... bit the bullet and had a speedo company make one up... it was probably 6" too short... if ever I need another made, it will be longer.
With the 3:55 diff, I used the yellow driven gear in the M-20.... when I later went to the 3:08.. I fitted the green one.. think that had 24 teeth vs 21 teeth for the :55... the part number was 7430972... it cost $1.65 from Preston Motors Nunawading.
have to check, wrote them all down in the back of my logbook (the first of two hand written ones which were each 1" thick).
Red was for 3:36 23 teeth, and I think Blue was for 2:78 26 teeth... all from memory at the time, from what I recall - the taller the diff, the more teeth = turned the cable slower
Have to check my book if anyone wants correct details.
frats,
Rosco
Re: Rosco's EK 225 manual
Ok - addenda to the above... it didn't sound right when I posted it...
The taller the diff ratio, the smaller the number of teeth on the driven gear of the speedo.... slower tailshaft speed has to generate faster turning of the speedo head.... so, we need less teeth to turn the gear faster.... not more.
frats,
Rosco
The taller the diff ratio, the smaller the number of teeth on the driven gear of the speedo.... slower tailshaft speed has to generate faster turning of the speedo head.... so, we need less teeth to turn the gear faster.... not more.
frats,
Rosco
Re: Rosco's EK 225 manual
Follow up from engine registration...
In the earlier days of "decal" registration stickers here in Vic, the engine number was recorded on the label.
When we went to the stick on type, the engine number was not displayed.
It was not until 2001 that this practice was resumed.
In the pic below, we can see that the red "163" (sic) motor has been officially updated and on display for vehicle checking.....
I might further add, the old bus turned 40 the day that this label was "affixed"
I have kept all my registration paperwork since owning this vehicle, and have pix of all the labels... strange? - yes, but it befits who I am...
By golly, there have been some labels fitted to this quarter glass..... no more, we no longer have to perform the annual "scrape and affix" registration labels... personally, I was deprived on one of the little annual joys in owning the old bus....
frats,
Rosco
In the earlier days of "decal" registration stickers here in Vic, the engine number was recorded on the label.
When we went to the stick on type, the engine number was not displayed.
It was not until 2001 that this practice was resumed.
In the pic below, we can see that the red "163" (sic) motor has been officially updated and on display for vehicle checking.....
I might further add, the old bus turned 40 the day that this label was "affixed"
- 2002 reg label mail.jpg (142.45 KiB) Viewed 828 times
I have kept all my registration paperwork since owning this vehicle, and have pix of all the labels... strange? - yes, but it befits who I am...
By golly, there have been some labels fitted to this quarter glass..... no more, we no longer have to perform the annual "scrape and affix" registration labels... personally, I was deprived on one of the little annual joys in owning the old bus....
frats,
Rosco
Re: Rosco's EK 225 manual
Hi folk,
computer problems again... won't be posting up anything further until I get this blasted machine sorted out again.
Invalid Attach Attempt issues coming up with windows 10... keeps shutting the machine down. Once running (after five or six restarts) - it seems ok for an unspecified period (minutes).. then, for no reason - shuts down without warning.... grrrrrr - I am seriously considering a Mac.. I'm done with this Windows crap.
frats,
Rosco
Re: Rosco's EK 225 manual
Had Macs for 15 years now - never had a problem - beats me why people are so attached to windows - cost me a fortune in tech fees getting them fixed all the time - good luck with it Rosco - the dark side will welcome you LOL
rosco wrote: Sun Mar 15, 2020 9:17 am Hi folk,
computer problems again... won't be posting up anything further until I get this blasted machine sorted out again.
Invalid Attach Attempt issues coming up with windows 10... keeps shutting the machine down. Once running (after five or six restarts) - it seems ok for an unspecified period (minutes).. then, for no reason - shuts down without warning.... grrrrrr - I am seriously considering a Mac.. I'm done with this Windows crap.
frats,
Rosco
You will find me lost somewhere!
Re: Rosco's EK 225 manual
Thanks FJW..... the "gremlin" is asleep at present - won't be long before it wakes up and shuts me down...
Yes, I'm really on the cusp of changing colors... "the force" is winning me over...
frats,
Rosco
Yes, I'm really on the cusp of changing colors... "the force" is winning me over...
frats,
Rosco
Re: Rosco's EK 225 manual
Ok folk,
today is a good day in this machine... the gremlin seems to have taken the day off (for now).
Let's pick it up again and add some more.....
I didn't take any pix of the "hump" at the time, but did so when I pulled it all apart to weld in a replacement "arch" and transmission cover many, many years later.
In the pix below, you can see what eventuated - it was "rough" - but rock solid. It served the vehicle well for some 15 years, including a lot of heavy lifting towing the boat, and at one stage - a 2 tonne digger on a trailer. None of the gaps in the doors widened and when I did finally get to remove this ugly eyesore - it took a bit of cutting out.
I made the angled "brace" up from 3 mm steel.... cut it to shape and welded it together - then welded it into the vertical braces which I had previously welded to the open floor frame.
The transmission mount was even heavier - from Rare's.... obviously, they engineered this heavy unit to add strength to the floor when the centre section was removed. The four large high-tensile bolts brought the lower unit and upper plates together to "sandwich" everything tightly together... it worked... but was damned ugly and my brace was a bug-bear for all the time it was in the vehicle - carpet simply couldn't cover that huge framework... a console from a Volvo did most of that, but I tired of the blasted thing getting nudged by the gearlever when pushing it into the top left corner for reverse... I ended up cutting away the rear section of that console - and then removed almost all of it - only leaving the small front section to house the tacho...
The actual trans cover was made from a 5 gallon "Castrol" oil drum... and some thin metal sheet... all self tapped together and coated with numerous lashings of body deadener... again, this all worked - but it looked a lot better under what remained of the carpet than uncovered...
Pix of floor brace and trans cover....
And finally, this is a pic of what it looked like 15 years later when cut all of it away prior to fabricating and welding in "the arch".... which we will get to in about 15 years' time as the thread catches up....
For those who ponder on how much of an Aussie box sticks out up through the floor without any covering - this pic tells it all....
Until next,
frats,
Rosco
today is a good day in this machine... the gremlin seems to have taken the day off (for now).
Let's pick it up again and add some more.....
I didn't take any pix of the "hump" at the time, but did so when I pulled it all apart to weld in a replacement "arch" and transmission cover many, many years later.
In the pix below, you can see what eventuated - it was "rough" - but rock solid. It served the vehicle well for some 15 years, including a lot of heavy lifting towing the boat, and at one stage - a 2 tonne digger on a trailer. None of the gaps in the doors widened and when I did finally get to remove this ugly eyesore - it took a bit of cutting out.
I made the angled "brace" up from 3 mm steel.... cut it to shape and welded it together - then welded it into the vertical braces which I had previously welded to the open floor frame.
The transmission mount was even heavier - from Rare's.... obviously, they engineered this heavy unit to add strength to the floor when the centre section was removed. The four large high-tensile bolts brought the lower unit and upper plates together to "sandwich" everything tightly together... it worked... but was damned ugly and my brace was a bug-bear for all the time it was in the vehicle - carpet simply couldn't cover that huge framework... a console from a Volvo did most of that, but I tired of the blasted thing getting nudged by the gearlever when pushing it into the top left corner for reverse... I ended up cutting away the rear section of that console - and then removed almost all of it - only leaving the small front section to house the tacho...
The actual trans cover was made from a 5 gallon "Castrol" oil drum... and some thin metal sheet... all self tapped together and coated with numerous lashings of body deadener... again, this all worked - but it looked a lot better under what remained of the carpet than uncovered...
Pix of floor brace and trans cover....
- 001 old trans hump mail.jpg (167.21 KiB) Viewed 754 times
- 002 old trans hump mail.jpg (168.91 KiB) Viewed 754 times
- 003 old trans hump mail.jpg (116.71 KiB) Viewed 754 times
And finally, this is a pic of what it looked like 15 years later when cut all of it away prior to fabricating and welding in "the arch".... which we will get to in about 15 years' time as the thread catches up....
For those who ponder on how much of an Aussie box sticks out up through the floor without any covering - this pic tells it all....
- 004 old hump and brace removed mail.jpg (145.13 KiB) Viewed 754 times
Until next,
frats,
Rosco