Page 1 of 2

Panel Repairs tips.

Posted: Sun Mar 30, 2008 9:23 pm
by oldnek
Hey Guys,
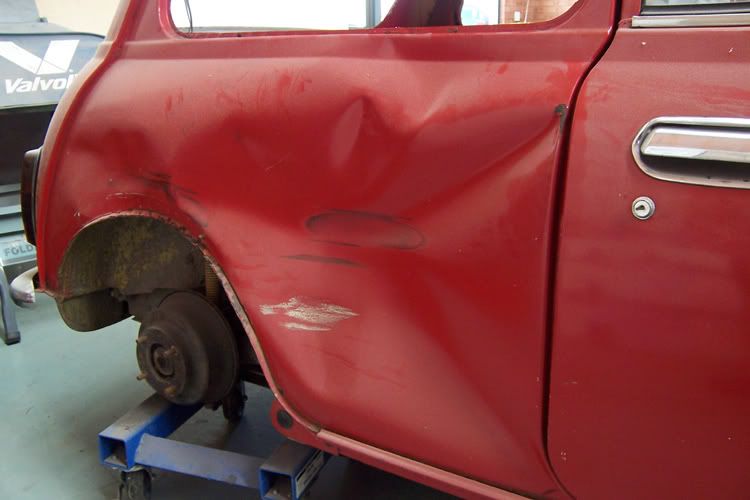
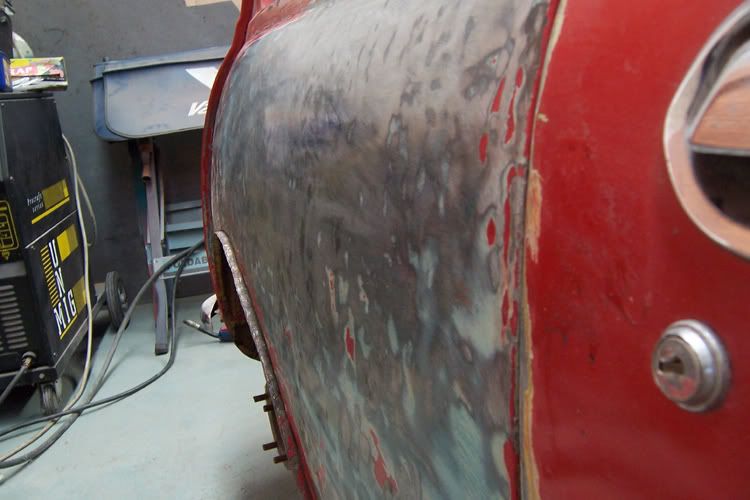
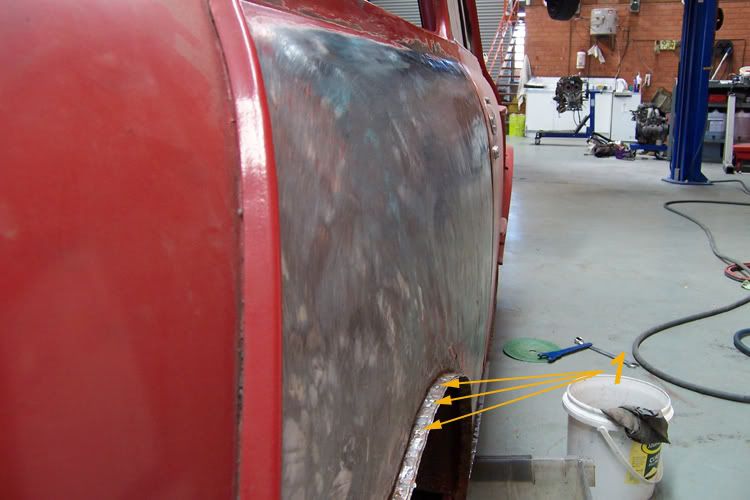
I thought I'd post a few tips on Body repair. I know it's not a FB or EK, but it's my mini, with some damage. The body I'm doing on this one will be the replacement for my rusted out yellow rocket that we have now.

Image
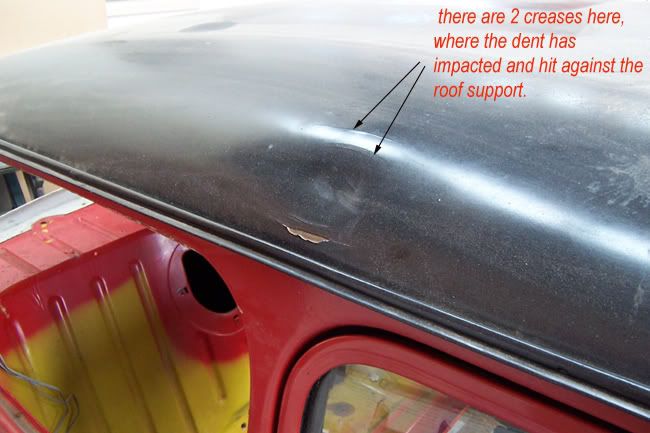
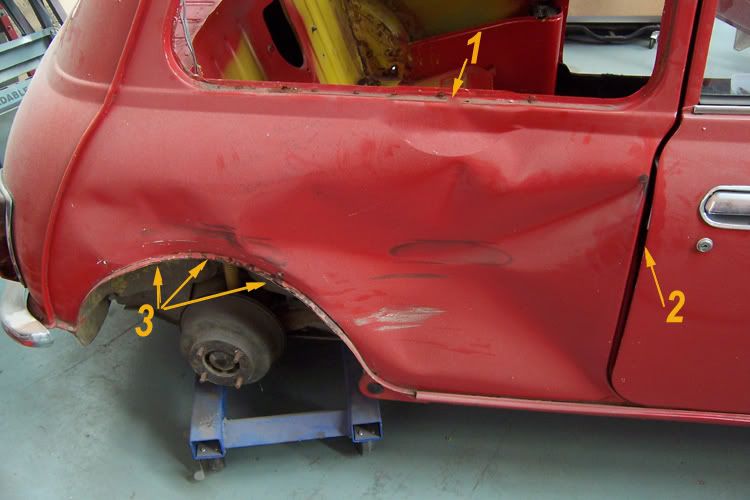
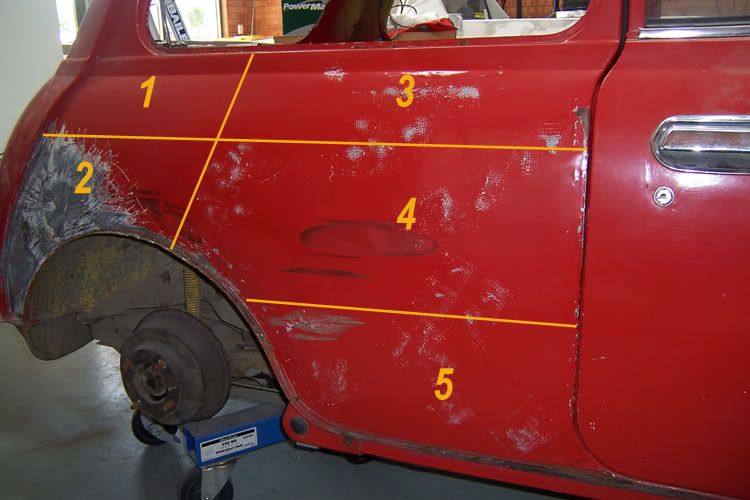
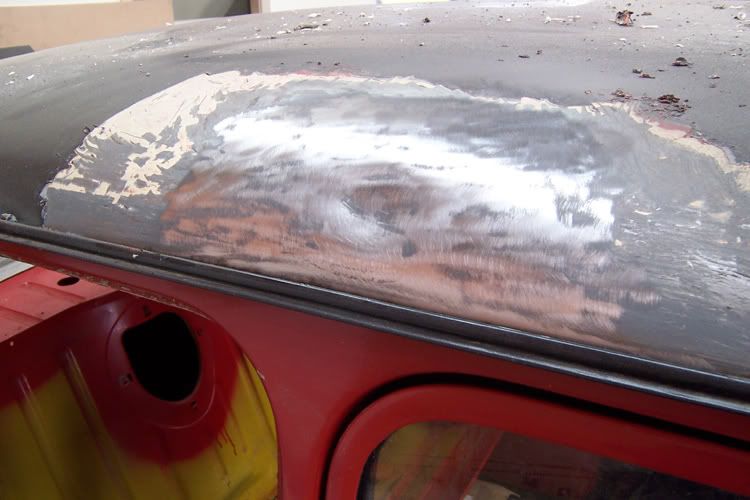
Here you can see the dent in the roof the size of your palm where a tree branch has fallen on her. There are 2 large creases which I marked, where the roof has bent in and hit the roof support. I had to cut the roof support out to repair this area.


Image
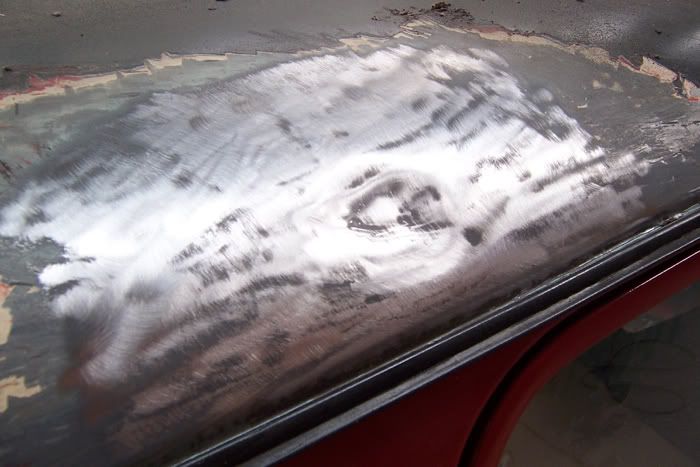
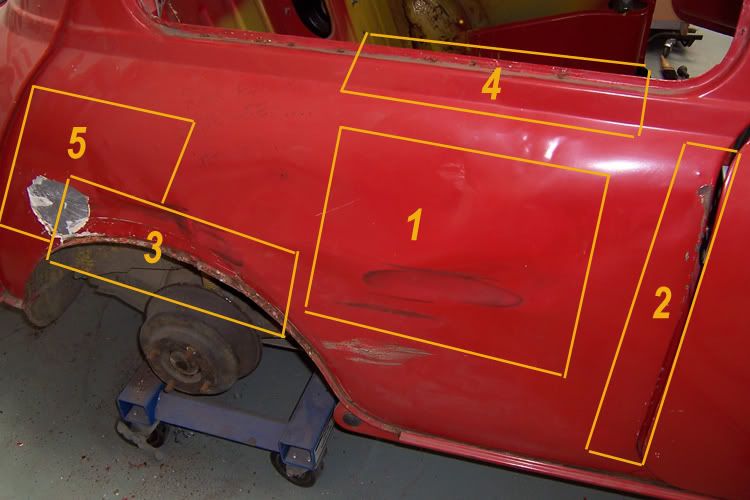
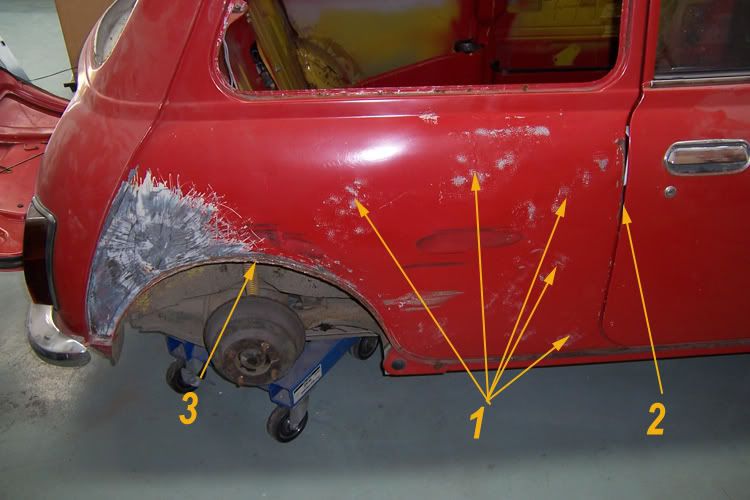
The first thing to do is to clean all the paint and primer from the area. I did this with the help of paint stripper and sanding disc on a 9'' grinder. The photo doesn't make the dent look that bad, but the crease is fairly harsh.


Image
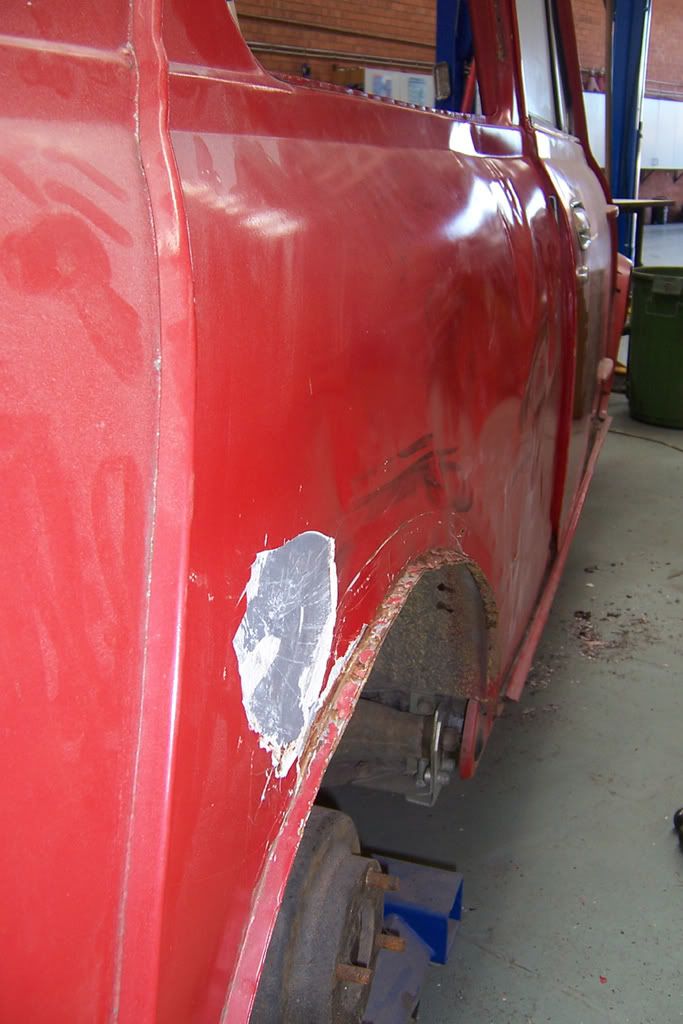
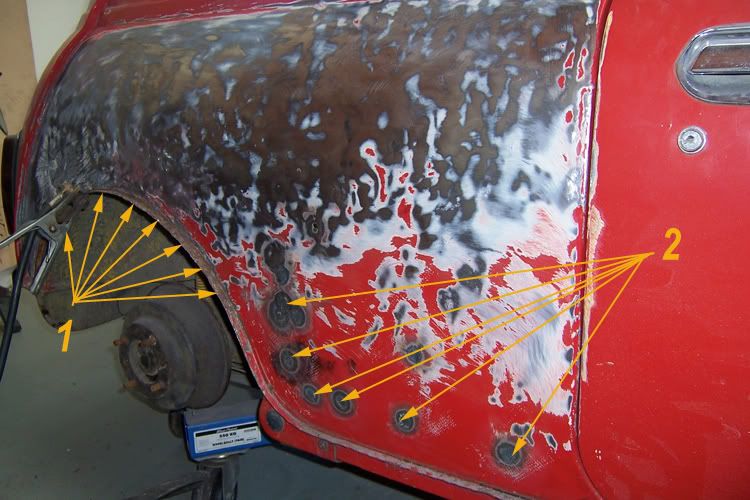
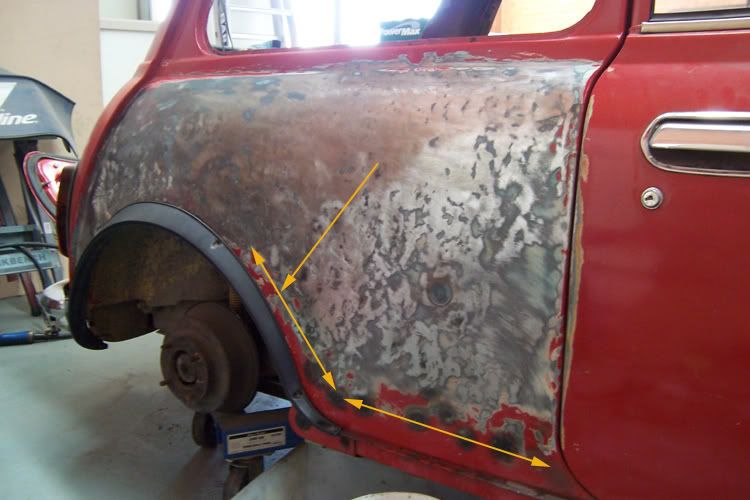
After clean up, you can see where you have to work the dent out, always start from the outside in, I used a hammer and dolly, for the exercise, you can buy a complete panel beating kit at Supercheap or elsewhere for a resonable price.


Image
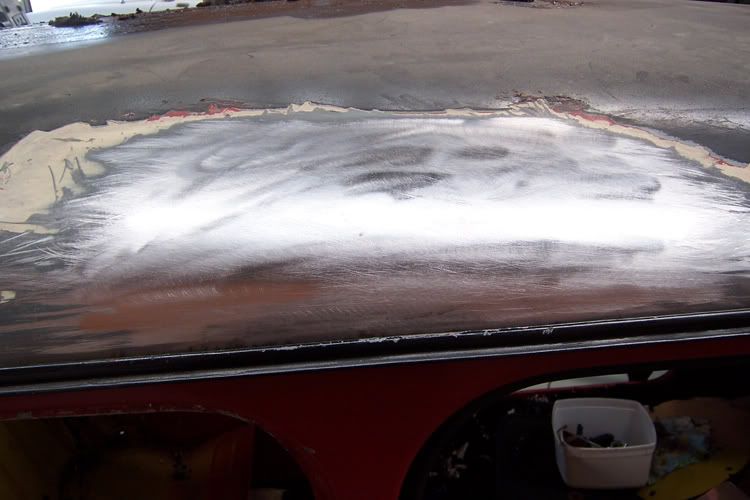
After working the dented area to a relatively flat surface, you can now see the slight imperfections. I used a slapper and dolly to smooth these out. A slapper is a tool that can be easily be made from a flat file, bent into a slight step shape with the use of an oxy to heat it before bending.
You use the dolly under all the low spots and hit the slapper, until you bump these lows up flush. ( a good tip is to blue ink on rag to wipe over the area) this will make those lows really stand out.


Image
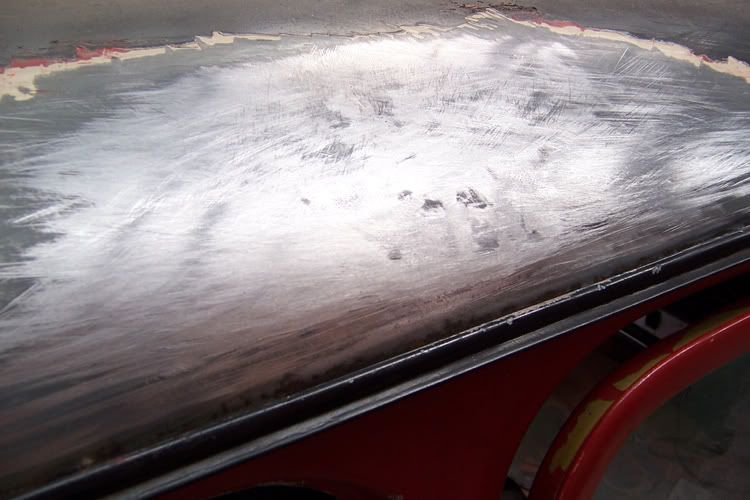
As you can see here from this shot. The roof panel is now flat and straight, after using the slapper to flatten the lows, I can then use a body file, to smooth over all the area, after doin this you may still need to bump a few lows, which I had to do. I then went over the whole repair with the sanding disc, to tighten the metal.

Posted: Mon Mar 31, 2008 9:31 am
by rosco
Thanks John,
I'm enjoying this - I have very limited skills with metal - mine are very crude and basic - rough shape with as few remaining dents as possible - I have learned however, that hammering the living daylights out of anything with the dolly directly under the hammer tends to spread the metal - leaving a "bulge" somewhere - it took me quite some time and many questions to lean to "hammer off" in the manner you have explained........ thanks......

Hope others are getting as much out of your input as I am.....?

frats,
Rosco

Posted: Mon Mar 31, 2008 11:19 am
by oldnek
Thanks Rosco, It gives a little insite for those who don't know.

John

Posted: Mon Mar 31, 2008 12:32 pm
by ekdave1962
hey great stuff thats what we want to see the how do things also ..

well atleast i do ..

D

Posted: Mon Mar 31, 2008 1:17 pm
by FB MAD
Yep, more of this please.

Mechanical side of things is easy for me as it was my trade years ago however when it comes to panelbeating and spray painting I'm as inexperienced as a kid doing high school work experience :oops: :oops: :oops: .

Thanks John 8)


Terry.

Posted: Mon Mar 31, 2008 2:56 pm
by Thommo
FB MAD wrote:Yep, more of this please.

Mechanical side of things is easy for me as it was my trade years ago however when it comes to panelbeating and spray painting I'm as inexperienced as a kid doing high school work experience :oops: :oops: :oops: .

Thanks John 8)


Terry.
I'm in the same boat as Terry.
I'll take all the advice I can get on panel work.

Can anyone do a similiar story on say, a rust repair patch on a front gaurd?

Cheers
Jeff

Posted: Mon Mar 31, 2008 9:05 pm
by rosco
Was having a ponder on the "slapping" method whilst sanding paint (again) -
I have drawn (either right or wrong) that the tool is slapped just beside where the dolly is underneath - that is, the dolly is the "working tool" under the area to be shifted and the slapper is the initial "force" required over a broad area so that the smaller contact area of the dolly can do its stuff............. this would justify using an old file - you need a bit of weight in the "slapper" - does this sound correct, John.......?

frats,
Rosco

Posted: Tue Apr 01, 2008 7:17 pm
by oldnek
Thats basicly the idea Rosco.
But to try to explain it and use it are two different things.
I use the slapper on the dolly, but hold the dolly lightly on the back of the panel as to let it bounce or recoil a bit, with the strike of the hammer or slapper, the use of a file actually shrinks the metal slightly, due the dimples on the file. To bump up little imperfections, you actually hold the dolly against the hollow and bump or slap the area surrounding the dolly. If that makes sense. I also use a shrinking hammer, which I will post up tonight. If you hit on the dolly you will stretch the metal somewhat, then you need the heat to shrink it again. But light bumping you can hammer off the dolly, and won't stretch it to much.

Regards John

Posted: Tue Apr 01, 2008 8:05 pm
by ben
Hi John, nice thread, whats your thoughts on shrinking dollys ?. I purchased one a while back and threw it in the corner in disgust. I don't think the dimpels are big/pointy enough to achieve any shrink. Specialy after i beat the s%^& out of it tyring to get a result (practice panel :wink: )

Ben

Posted: Tue Apr 01, 2008 9:34 pm
by oldnek
ben wrote:Hi John, nice thread, whats your thoughts on shrinking dollys ?. I purchased one a while back and threw it in the corner in disgust. I don't think the dimpels are big/pointy enough to achieve any shrink. Specialy after i beat the s%^& out of it tyring to get a result (practice panel :wink: )

Ben
Ben, I have not seen a shrinking dolly, most dollys are smooth. Either flat, curved or rounded in shape. So sorry mate I can't answer that one.

Posted: Tue Apr 01, 2008 10:37 pm
by ben
No worries John, i will post a pick of it, just for intrests sake.

Posted: Tue Apr 01, 2008 10:39 pm
by oldnek
Here is some more action guys.

The dreaded side of my mini. Where aparently a holden ute backed into her.
OUCH! :(

Image
Image
Damage to this extent would warrant replacement rear 1/4 section, for most panel shops. For me it's a challenge, and a excellent learning curve.
For me sizing up this task has to be thought out. I know it may sound crazy, but you have to sit back a bit and think how that steel bent in the 1st place. I did this, and marked out 3 key points.

* No 1.....Top window frame was kinked inward.

* No 2.....Large door gap you could slide your fingers into to unlock the door.

* No 3.....Wheel arch pushed in.

These key areas are to be worked out, before the panel can be brought back into shape. If not you'll just make more work for yourself.

Image
This shot shows how I broke the panel up into sections for working.

* No 1....The 1st place to start. Size 8.5 Redback work boot, and couple of heavy thrusts.

* No 2.....Once I kicked that area out, I then had to use a block chisel to hit the door frame back to shape, this also helps the main panel straighten, because it is actually pulling the panel back where it should be.

* No 3......I used the mig and welded spots, or ledges for areas where to hold vice grips, these were attached to a slide hammer, so I could then pull the wheel arch out. When I started to straighten the wheel arch the large dent at 5 started to pull out.

* No 4...... The window frame kink was a pain, due to poor access from the inner frame, I had to use the redback again. Then worked the area with hammer and dolly.

* No 5........This showed a previous repair which was just bogged up. After pulling the wheel arch out, this started to straighten itself.

Image
As you can see from this shot. I only used tools that most people would have, in there garages. And still managed to pull it out pretty good, after a hours work.

Image
These are the areas now i HAVE BROKEN INTO WORKABLE SECTIONS.
Starting with the least damaged area at No 1 then working my way across.
I have found if you practise this method, you find it less harrowing, to try and continually chase your work all over the panel. This way if you over work the area section, you can come back staright to it.

Image
I have been working the shrinking hammer on the return creases as shown by No 1. Once these were pretty straight I continued with the door gap alignment at 2, using a brickies bolster, which I ground a radiused edge on. And then bit more pulling at 3, the wheel arch with the aid of the slide hammer.
TIP: Cut cardboard templates from the good side panel and keep comparing that against your work, just as I did with the wheel arch, to get the right shape.

Image
Here is the roughed out product of now approx 3.5 hours work. Thats not to bad.

Image
You can see the weld spots at No 1 for the vice grip posistions.
The marks you can see at No 2 are heat shrinks. These are made from the oxy. Where a spot is heated orange to the size of a 10 cent, then hammer and dollied, whilst still glowing to shrink and re-compress the steel area.

Image
Close up of the heat shrinks. The panel in this area was very drummy, or loose. The Shrinks tightened that section right up. This area also is very inaccessable, being so close to the wheel arch. So dolly work here is very minimal.

Image
The panel is looking pretty good at this stage, I would be pretty happy to use the oll'e bog from here. But because I'm me, I will continue to try to get it better.

Image
You can see the the spots on the wheel arch, and notice how tucked it is around the arch itself. There is no way of getting in here, unless you cut the 1/4 off.

Image
The yellow marks are the no access points behind the panel for dolly, lever or bar work. I do not have a plug dent welder so I have no resort except for the nicky, But a bit in a dent that size won't really matter.
Will finish this 1/4 off tomorrow.
Hope you enjoy.

John

ah more great stuff

Posted: Tue Apr 01, 2008 11:06 pm
by ekdave1962
ah love this sort of stuff to us laymen it a great insight into how its done with such ease .. well to a pro that is i spent days chasing ripples around my EK 1/4 and the resorted to good old mr bog .. as i couldnt find a replacement with out buying a whole car ..

maybe so pics of ya tools would be sweet to .. ooh and how about a video .. lol

now im guessing this was your trade at some stage . ?

Thanks mate keep em coming ..

David

Posted: Tue Apr 01, 2008 11:09 pm
by EKSPCL
This stuff is ace! Just the things i like to read and learn about!

Now it's 11 at night and i want to have a shot at this :?

Posted: Wed Apr 02, 2008 9:59 am
by rosco
John - you're collectible..........I will print this entire post and add it to my body/paint folder............... I have had access to people with paint knowledge/skills who I have plagued for years with much respected appreciation.
I have only heard of some of your technique - but to have it explained and supported with pix is invaluable........... I cant' thank you enough for taking the time and contributing so much effort to share this with us................

I (with some hesitation) will now consider "pulling" some dents in my bonnet and that dastardly rear l/hs door I dropped back in '03 after spending three months on it.....................you'll see these in Yamba...

I don't have oxy - by may very well "travel" to get it................

thanks again, John - priceless stuff..........

frats,
Rosco