Page 1 of 1

Manifold polishing

Posted: Mon Feb 11, 2008 6:46 pm
by parisian62
Hi All,

I have a manifold that looks to me to be 'half' polished...

Image

Image

Image

You can see from the pics the polished areas as opposed to the original rough cast.

Is this something I could finish with the the right tools? If so what would I need? How would you polish the tight areas and around the SPECO script?

or something best left to the experts...?

regards
Stewart

Posted: Mon Feb 11, 2008 6:52 pm
by Trev
Take cover Stewart, wait till Rosco gets his hands on this one :lol:.
I would leave it for the pro's, but Rosco is very good at polishing, Trev 8) .

Posted: Mon Feb 11, 2008 9:52 pm
by captainbill
still some work to be done there stewart,unless you got a die grinder buffing and sanding wheels and a bit a patients i would send it in to get the treatment.Looks like theres some marks wont be able to get out.

polishing alloy

Posted: Mon Feb 11, 2008 10:34 pm
by rosco
Hi Stewart - you can come out of hiding, I won't write a novel (yet).

Thanks Trev, appreciate your compliments but think people who take a very close look at my work will notice the voids.......

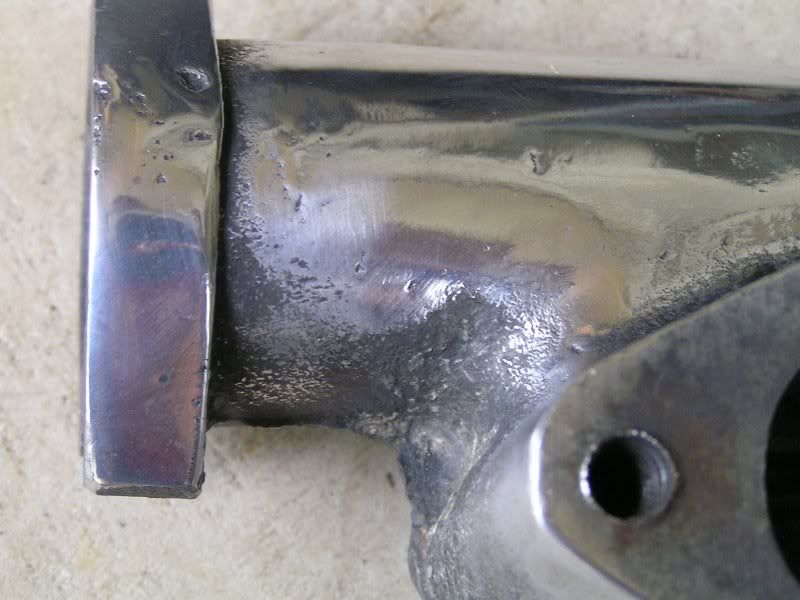
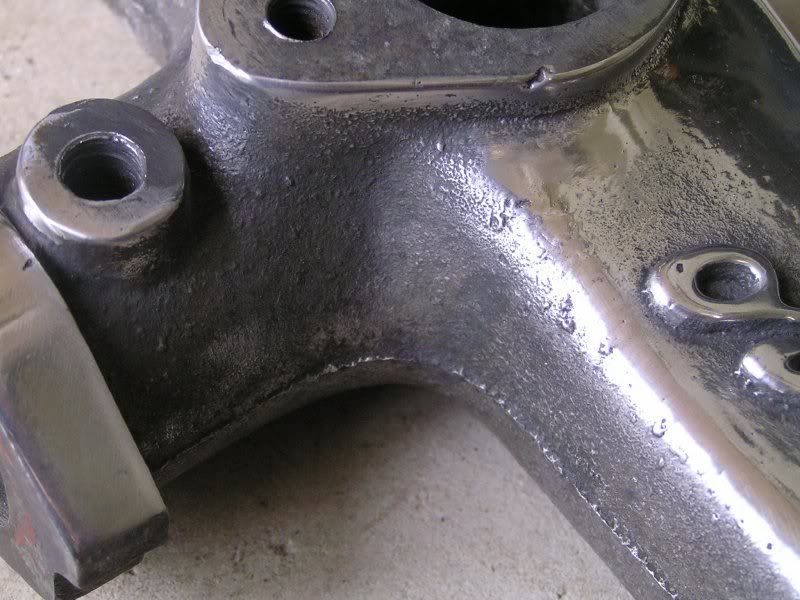
Stewart, to me, it would appear that "someone" has had a go at this with a "buff" and saw the effort required or got a bit scared as they got to the tricky bits............... result is that they have "buffed" the safe areas and left the tricky bits - much like some professionals tell you their product is "polished" - take a look at the concave curves and areas where a "buff" wont delve unless the surrounding detail is also removed..............recesses where mounting bolts are fitted are "usual" places for this...........

Alloy is a wonderful medium to polish - I don't know if you have any experience with it, but depending on the quality of the cast - it can come up nearly as good as chrome, but cools things down instead of heating them up as chrome plating tends to do........

It will never rust and only requires a bit of a scrub up with some alloy compound and a soft cloth to almost restore what the buff has brought up.
But being an alloy is usually soft and must be treated with respect whilst working around it with tools, etc...... soft cloths are a must for cleaning........

I don't know how many Brite Shine waddings I wore my fingers out with before coming to the opinion that if something alloy has to be polished well, it initially needs to be treated severely...........

Have you worked a "buff" on a bench grinder, Stewart? - if not, you're in for a few months of good reward.......... you will get out of this what you put in...... if you want good, it will take effort - if you want great, you will probably use up two/four weeks on this piece alone .........

When I find something I want to "attack" - I now use mechanical tools to grind away those "proud" high spots - but very, very carefully.
When all the "dags" are removed, I block back with 240 grit wet/dry until I get a "flat dull finish - don't "lean" too hard on this coarse paper or you will "grind" scratches into it - we just want to take off the remaining high spots and ground down the surface until the "lows" are brought up - the rest of blocking back is just a case of working the surface up with progressively finer grits through to 1000 or 1200 ............ until you get a very smooth flattened surface (satin).
For areas within lettering, fins, recesses etc, I make up special "tools" for hand working - usually icy pole sticks with wet/dry superglued to them - yes it becomes laborious, but the rewards often attract attention........
The cheats way (as many proprietary companies do) is just to flat "black" out the tricky bits............ I believe if alloy is to be highlighted - we need to show all the alloy........... each to their own............

- now to the buff.................

This is where the "polishing" starts - for alloy, I use a "stitched rag" buffing wheel, and a medium cut dressing bar............ when a shine starts to come up, I change to a calico buff and use alloy (white) dressing compound bar.
I tend to keep the stitched rag away from fine detail - better to "burn" a few calico buffs out than burn up the detail with a heavy hand.............

I think it very important to state that when using the buff - don't overheat your work or it will distort - depending on how thin it is..............

Also please be very mindful to work "off" your piece - never present a leading edge into the buff - or you won't be coming to Yamba - at best, without the piece you are working on, at worst................... nice knowing you, Stewart......... that buff will pick up your piece very quickly and hurl it at your face at a zillion miles an hour............... if you can "duck" it - you should have been a boxer...................

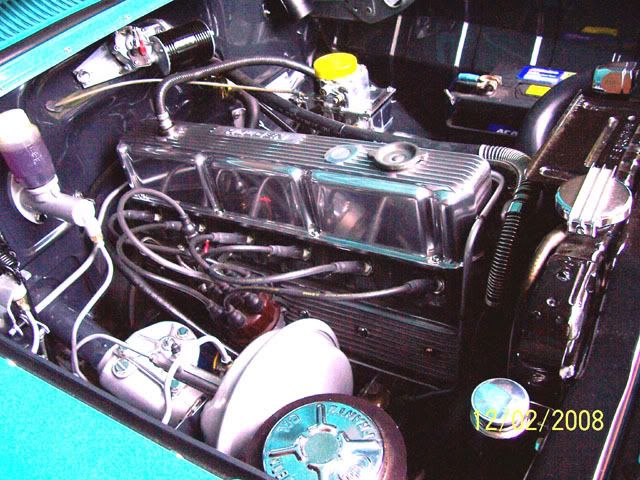
When you are satisfied with your work, I then "treat" the surface with a alloy mag wheel polish and finish off with Meguair's all metal restorer - I think you have seen the alloy fittings in my engine bay at Forbes - I even did the carby only to find out the blasted thing is covered by the air cleaner........................

Will give you the "full" job description if you decide to go ahead with it yourself...............

most will drop it off to a "polisher" - I prefer to do my own work - this is my passion.........

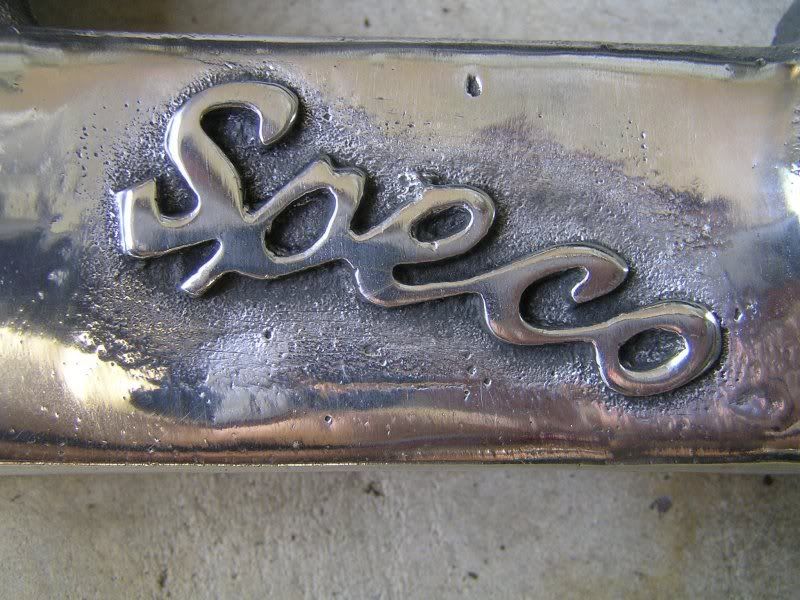
With the detail and importanc of that magnificent "speco" label, I would do it myself - I don't think polisher's appreciate just how "important" it is to us to keep fidelity in period detail............... not that I have any......

This is my bay - I did the rocker cover and side plates, alternator, carb, distributor, steering box cover and wiper plate............ there's probably more alloy which I polished, but can't remember from here............

Image

I'll take another pic tomorrow of just the rocker cover and side plates if you want a close up - for now this will do - you may have to zoom it up a bit to see the potential.............the rocker cover and side plates are Kryal Kastings - they were the "polished" set - I wasn't happy - Jan!

frats,
Rosco

Posted: Tue Feb 12, 2008 7:52 am
by parisian62
thanks for your replys CaptainBill and Rosco...I did have a chuckle at Trev's post...

More background on this piece...it was a mess and very rough when I got it. I did some experimental buffing and polishing but it didn't really come up the goods. I do have a bench grinder with an assortment of wheels and compound bars but am an absolute novice at this. I have the time...but not the patience...

I dropped it off at a polishers and the results are what you see above. When I dropped it off the bloke said "so you want the 'Speco' writing ground off?" :shock: I left him with strict instructions the Speco was to remain.

CaptainBill - Will look into the die grinder buffing and sanding wheels..

Rosco - I would be interested in getting the 'full' job description...

regards
Stewart

Posted: Tue Feb 12, 2008 8:03 am
by rosco
Hi Stewart,
went overboard again last night....... just wanted to outline.
Full job description is almost complete - but with a few tips and hints missing..

I used a "Dremel" to do some of my earlier work....... I ended up blowing it up.........
You may be interested to know that Bunnings are/were selling "Ozito" hand rotary machines - comes with a great assortment of attachments/wheels/pads etc - and at a very good price - just don't overload it and work very, very slowly with a steady hand ......... more tonight (anticipated)...will attempt to fill in the gaps - if I ever get this spray painting in the boot done - was supposed to be finished in primer yesterday, but got playing with the new "toy" gun........... speaking of which, yes - I'm pretty happy with it -now, after fine tuning the controls.......

Do you want a close up of the rocke(t) cover..........?

frats,
Rosco

Posted: Tue Feb 12, 2008 8:07 am
by parisian62
Many thanks Rosco. Looking forward to reading it and hopefully putting it into action. Saw your pics of the boot area - mightily impressed. Yes post up a pic of the Rock It cover :wink: ...

regards
Stewart

pix

Posted: Tue Feb 12, 2008 9:40 pm
by rosco
Hi Stewart,
just got in after cleaning up from today's spray job............. primer is on - wait a couple of weeks now then block it down.................

Took a couple of pix tonight - didn't want to use the flash - it flares and gives a false impression of chrome/polished alloy.

It was a bit dusty, just wiped the cloth over it and the carby to show how alloy will come up.................

Image

You will notice that I put a bit of effort into this - the state that it came in (highly polished - as the promo stated) was pretty average to sad...........
Basically, they had polished the flats only and left every other surface in that dull pitted alloy state as it came from the casting - including casting marks and material voids................
I didn't want to go chrome - it's just not me!
My plan was to rub it down over a long period of time with wadding - spent two weeks and got almost nowhere.......

Bit the bullet and got out the Dremel - used small sanding discs and wheels until the poor little thing just melted its windings......... but did start to get a result..............
Ended up taking to it with a fine sanding disk on the angle grinder - I would not suggest you do this Stewart - one slip and you'll have marks you won't be prepared to get out...................

Finally went back to hand working and made up some "blocks".
Used all sorts of things to get profiles - used small piece of steel (1" x 1" x 1/8") for the flat sections, wooden dowel (1/4", 1/2:\" and 1") for the concaves along the manifold side.
Used a fine file (regularly cleaned) for the fins until they were reduced far enough to get below the voids..............
This was all done using 240 grit wet/dry and using velvet soap to lubricate/clean the cuts...............
When I got it flattened and dull, I worked up through the grades repeating the same process until at 1200 it was just starting to show a reflection....

On with the stitched rag buff and some medium cut compound - within minutes it came to life.
I got it quite hot a few times and found that it actually got worse as load was applied........

When I could get no further shine from the stitched rag and medium, I changed to a calico leaf buff and used alloy (white) compound - this almost brought the result you see................
I dropped back to using Brite-Shine wadding (there's something in that stuff which works wonders on alloy - just be careful to avoid selecting a bit with any "sharps" in it) - that gave a deep lustre - next I used Eagle Mag wheel polish to finish the p0lish off and finally coated it with Meguiar's metal restorer to "seal" it........

When working the concaves - I cross-hatched and turned the dowels as I went - this seemed to give the flattest result without grinding into the alloy.

I now have an Ozito rotary grinder - cheap, but with great patiences and a very light "hand" has been effective in removing those casting marks before using the above method of dowels/ plates and wet/dry before the buffs..................

That's about it Stewart - like to know if anyone has better method ........

Second pic is of one of the concaves - I didn't take a before pic - but can tell you it was as it came out of the cast...........rough, nasty and full of pits/dags.......... think this looks a bit better - I polished up some stainles button head screws and washers to complete the job...................

Image

Also included is a pic of your's truly - my wife wanted to know what I had "blown up" in the garage - you can see the outline of my safety glasses - I titiled this pic "Alloy Head"................taken by my daughter after I came in for a break for dinner whilst working the cover on the buff.............

Image

frats,
Rosco

Posted: Tue Feb 12, 2008 11:10 pm
by basic.green
Hi all. when i do my polishing i put a bit of board on the ground and up the wall (well padded with rags) so if it comes out of your hands it wont damage it and don't work one spot to much or you will put waves in it and always use a block on flat surfaces. my 2 cents

Posted: Wed Feb 13, 2008 7:42 am
by Craig
Hi Rosco what filter do you run in your Franz remote filter

Posted: Wed Feb 13, 2008 9:00 pm
by rosco
Hi Craig,
I use the correct filter - I have heard of people using a no name toilet roll - only to further hear that their oil galleries/journals/and motor is stuffed.......

I get mine from a local supplier - can give you details if wanted - pm me....

frats,
Rosco

Posted: Thu Feb 14, 2008 7:50 pm
by parisian62
Don't scare me like that Rosco...I thought that ugly mug was the creature from the black lagoon... :wink:

Many thanks for posting up those extra details...I did have a go..about an hours worth of working my way through the wet and dry on one section...and yes the results I was getting were good...trouble was it was only one section and my patience wore pretty thin very quickly... :roll:

Confession time... I've dropped the piece back into the polishers to do a bit more tidying up work on it....I just don't have the patience for it. Because I'm on a budget the result wont be a show mirror finish piece but something a bit more presentable than the original cast.

Your polishing notes will still come in handy on some of the things I plan to do...

regards
Stewart

Posted: Thu Feb 14, 2008 8:22 pm
by rosco
Sure Stewart,
one thing which is always attainable - providing the polisher doesn't stuff up your detail - you can come back to it whenever and for how long you want to at some later stage - I get impatient for results, sometimes leaving things on the bench for a day or two, until I take the cover off and decide to go just that little bit further - the rocker cover, however, was a one off job ........

Creature from the black swamp re-emerges as close to human as possible after one very long soapy shower - much later on that evening.....

frats,
Rosco