Rosco's paint tips
Posted: Sat Jan 12, 2008 10:07 pm
Hi Cam,
this gives us a bit of "space" where we won't bother those who do not want to follow what you are doing regarding panels.
I suppose we must start with a basic outline.........
My basic procedure goes like this - this is for acrylic only - my enamel procedure is a little different..............although preparation is identical..
Degreasing, drying. - We need to discuss a fair bit here - there are pitfalls which most people fall for the first couple of times around........silicone is one of those which is often overlooked - now is the time to chemically strip any silcone waxes from your work - before you go grinding it further into the existing paintwork................we do this with a wax and grease remover - before any sanding or abrasion takes place!
Scraping, grinding, filing, brushing and sanding back.
A bit like erecting something - we need to establish a sound foundation from which to start from...
Grinding out or treating rusted areas.
If one thing is going to prematurely destroy your work - it will be rust.
Lots to talk about here.....
Welding in new sections too large or where filler is not suitable.
I remember you saying you cannot weld - sometimes it is better to get someone to weld in a piece rather then just try and fabricate using filler - or "bog" as it is known.....
Beating out dents.
If you can, get a cheap set of hammers and dollies - they don't need to be more than around 20-30 dollars - you will use them forever......
It is often much better to get some of the deep dents out rather than just filling and filling with bog - you will find in an accident that bog will break open very quickly - and reveal to the world where you have used it to fill big holes.......
Heavy sanding using very coarse paper/discs.
We need to create a substrate which is going "key" subsequent coats.
Thoroughly blow out all dust/filings.
We don't want stuff in cavities crevices to make an appearance later on when you come to laying down those precious top colour coats....
De-oxidine to exposed metal.
You MUST do this - it will neutralise any microscopic spots of surface rust - this process starts almost immediately metal is exposed to air - especially when humid........
Filling using a re-enforced filler.
This is used to fill larger gaps, dents, holes - it has fibre=glass or stainless particles in it which "hold" the filler together. It does have limits though, refer to welding above.......
To apply this stuff, you must mix it up exactly according to the instructions - don't be "tempted" to make it go off quicker by adding more hardener.
Only mix up enough which can be used in three minutes - again it will "go off - or gel" in warmer/drier conditions.
We use a plastic "card" to apply this stuff - you will learn to "scrape" it along the panel filling the voids as you pass.
You will need some acetone for cleaning up the mixing cup and "card" - not to mention your hands......... try to "clean up" before the stuff goes hard.
Sanding back.
You use a fairly coarse type of paper/disc here - it is pretty hard stuff to sand.
Getting a basic "shape" of how the panel should look, still with sanding scratches and tiny imperfections.
Filling using a fine filler.
This stuff is worth its weight in gold - in fact the stuff I use is in fact call "K & H Gold filler" very easy to sand and very, very fine - gives a very smooth finish when sanded.
Again, use your "card" or applicator. Acetone is again the stuff for clean up.
Sanding back.
This is where we actually start to "block back".
We use a very firm pad - one which will not crush, but just flexible enough to follow any contour.
of fine filler to obtain desired shape without voids.
This process is repeated a number of times rather than plastering the stuff on - if you plaster - you are both wasting material and time.
It can be applied quite successfully over itself, providing you wipe down with prepsol or a wax/grease remover and allow it to dry.
De-oxidine to surrounding exposed metal.
I am going to race ahead and put a bit into the next section - it is probably the bit most people have trouble with - it probably needs to be re-iterated that the most important part though is and always will be preparation of the panel prior to this...............
Spray procedure outline..............this is just an outline - although will probably be quite lengthy......and some of it will be quite detailed......
I could probably write a book on what I have leaned - both good and bad..
I do not spray below 18 deg or above 30
You run the risk of trapping thinners in the paint at cooler temperatures.
Flash off time must be lengthened accordingly.
If it is too hot, your paint will "air dry" as it makes way to the panel and results in the paint "sticking onto" the panel and not dissolving into the previous. In extreme cases you will see a sandpaper or heavily dusted appearance - do NOT try to correct this by applying futher wet coats.
Allow it to dry fully then block back - yo will only do this a few times before you "learn" not to spray "dry".......
If you must spray on a hot dry day - you can add a percentage of "retarder" into your paint mix - but you must also reduce the amount of normal thinners and end up with the same thinner/paint ratio.
On cooler days, of if you want a super gloss hard finish - you can opt for a "hot" thinner - be warned, this will penetrate "deep" into existing paint and may cause issues with fillers underneath - identified by "wet" looking patchies in the overall finish........ arggghhhh, there's a lot here Cam, thinners and how to get the most from them.......
We will discuss later the advantages of using different thinners and changing mix ratios - at specific times...............but for now, stick with the recommended mix just get some general purpose acrylic thinners and learn what "you" are doing with "it".
Pick the "right" day for your spray job - you will probably spend weeks in preparing panels for paint - don't get gung ho just because you have a day off - I have been known to "take" a day off because there didn't appear to be a suitable window approaching.
I do not spray above 50% humidity - there is no problem with humidity below this - we don't want to "trap" humidity in the paint.
Consult your gun handbook or notes - it will state what recommended pressure to spray at - it may even give you a number of different setting for different paint types.
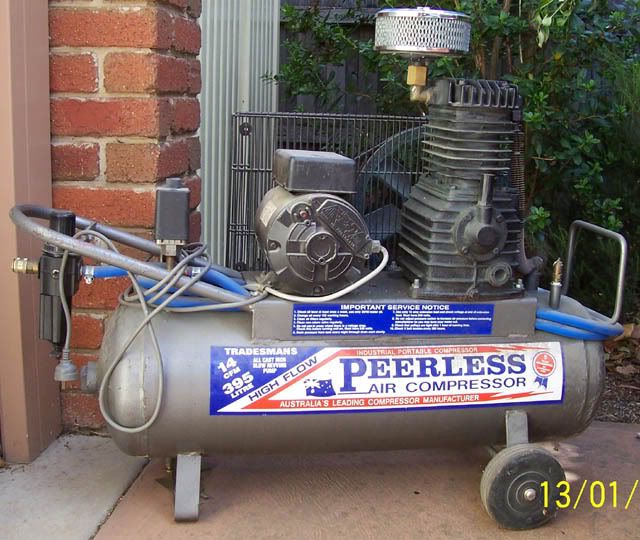
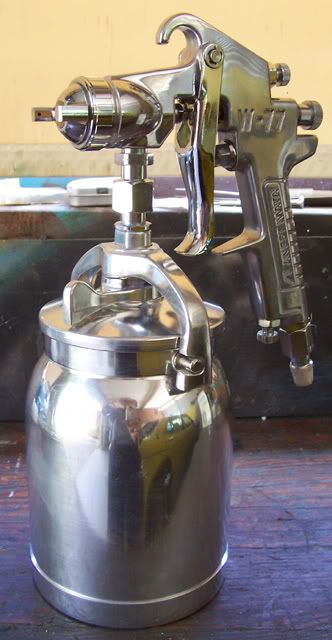
You must have a compressor capable of keeping up to the demand of the gun. You will not ever have too much, but if you do not have enough - all sorts of problems start to arise - your settings will alter as the pressure drops - I believe this to be more applicable with suction type guns......
Make absolutely sure you have a filter/dryer fitted to your air line - I use two, one on the compressor in the regulator and a final one just before the air line. You will probably appreciate that when air is compressed, it is heated - when it cools down it cools and attracts moisture - this moisture becomes water droplets which if they get into your airline will also get into your gun - and paint - I can't tell you how frustrating that is when you finally get a great finish only to have a trickle of water run down the wet paint and ruin it..................... arrggghhhhhh...........
If you can, buy an extra long length of air line - suspend it from a fairly high up point and have it run back to the drier on the compressor - whilst you are mixing up the next pot of paint, remember to "blow" down the compressor and drier.
I have designed and fitted a "shop" air line into my garage - it is comprised of about sixty feet of 3/4" copper pipe. It uses a flexible connection from the compressor and the entire length runs upwards around the inside of my garage. Finally it drops down to the second regulator/drier where my flexible air line is coupled - I have never had anything come out of this second drier...........just me, I'm afraid.
It is important to try and get any moisture out of your air line......
Drain your compressor frequently, always open the drain valve just slightly at the end of each day (or break) and let the reservoir "blow down" slowly - this helps get most of any crud, oil, water out of your system.
Always leave that drain open when not in use.
Back to spraying................
Normal distance from gun tip to panel is the span of you hand - approx 8 - 10 inches - I'm a dinosaur, you will have to convert that to cm.
Before you even get a gun, you can "play" with this just by passing you hand along an imaginary or existing panel - see if you can learn to make a pass keeping your hand exactly the same distance from the panel without "rolling your wrist" Try to imagine overlapping a previous pass by one third and whilst doing both of these, try to maintain a consistent speed.
You are going to have to actually spray some paint to learn what this speed will be.
I try to "look" at the wetness of the paint immediately behind the fan as it runs along the panel - that gives me the best indication of whether I am running fast/slow enough - too fast and the coat will be thin/dry - too slow and it will be "wet" and very likely to run..............you will learn to identify this, but not for some time...............if you now get a chance to see someone spray some paint - you will begin to "see" more than you previously were able to understand..............
When you "run" your gun along a panel, keep your distance and speed constant.
Try not to "roll" or "wave" your wrist as you go - that is don't "sweep" in an arc as you move along the panel - your coat will "build" at the closest point and be quite thin (possibly dry) at the start and end of any "wrist" stroke.
Try to keep the gun pointed at right angles to the panel - that is, don't allow the gun to point anywhere but at the centre of the line where you want to spray.
Learn to "trigger" the stroke - start your pass by starting a foot or so before the panel, get your speed constant then pull back the trigger before you reach the panel sp that the fan gets setup.
Continue all the way beyond the panel before releasing the tricker.
You do not want to have the gun start to reach it's settings after you reach the panel - always just prior.
Continue your run just beyond the panel end so that the settings to not start to break down as you reach the end.
Try to overlap each pass along the panel by one third - a good quality gun will be designed and machined to provide a slightly thicker film in the centre section of each pass - this allows previous and following passes to obtain an overall flat application...........
There is much more - you will start to ask questions once you have had a play with this............. but for now - it will give you an outline of laying paint down.
We will need to discuss spraying curves (both concave and convex) how to "plan" how you are going to make your passes (this is important for panels such as roof and how to shoot a whole vehicle at once).
I will later reveal my tips for tricky spots, crowns and working within recesses/door "shuts" and spraying "overhead" from beneath.
I must include a "faults and fixes" page which you may wish to keep handy.
that's enough background ........... for now...
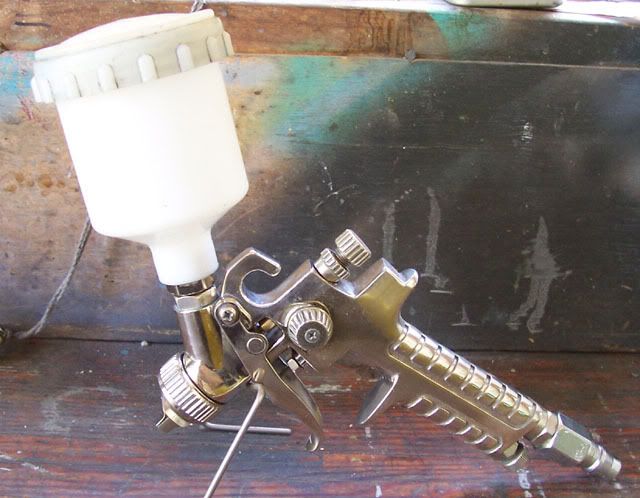
One thing on gravity guns Cam, if you forget to connect the air line, have not opened up the gun air control valve and pull back the trigger - paint will run out in a stream................... I've done it... I bet others have too!
So hopefully some of that will have found a "home" and you may feel you are ready to begin...........
It is now time to get out that new face mask, fit the filters and get used to wearing it when you spray.......... if you are contributing to superannuation, this is the bit which may help you retrieve some of it........
When ever you can "smell" paint whilst wearing the mask - it is time for new filters. With some of them - mine is a CIG or now known as BOC gases, you can get pre-filters which a just little thin paper pieces - they help prevent paint dust getting in and blocking your main filter - they will extend the life of main filters for quite some time.
Change these pre-filters after each session.........
Now to spraying.......
Always find something to "practice" on before you actually hit a panel.
It doesn't have to be anything special - I use an old fridge door......... there is that much paint on it now I could probably remove the metal and still fit it to the fridge..........
We need to get your paint, gun and pressure set as best we can before applying it to your panel.
What we want is to be able to make a pass and get a good even coat with a nice slightly wet fan.
Distance is going to be very important - when you get your needle, fan, pressure and speed ready, you must apply exactly the same technique to the panel.........makes sense......
Spray a quick burst at the panel from 8 - 10 inches. Have a look at what the paint looks like. If it is split, you have too much fan or too much pressure. Likewise, if it is centred or round, you have too little.
When you get a fan of the correct height and roughly even spread, run another one but this time along the test piece - you need to find out how fast/slow to make a pass.
You are looking for a nice slightly wet result of consistent height.
Too fast and it will be dry and thin, too slow and it will probably run - or remain wet looking for five or more minutes.
Our pass is going to start to visibly dry in about two to four minutes.
I suppose many people here will use a different style, I can only speak of what I do...........
Run another pass which overlaps your first - you are looking for the two to look as one large pass. This is going to give you how much to overlap.
When you start to get a feel for each of your guns, you will have enough experience with each one to know how much to overlap.
General rule is by one third............
Ready to spray the panel?
We start with 1k etch - this stuff is important - it etches into metal and provides a sound base onto which primer will "stick".
Some people go straight for the primer - don't, the etch is a great way of keeping your finish attached to the panel......
Spray ONE! medium coat of 1K etch primer - this is generally pre-mixed but make sure you "stir" the contents - the particles will settle in the bottom. Don't be tempted to try and "cover" with this - it is a translucent coating - you should be able to "see" everything under it.
If your coat is too thin, fast or pressure too high, you may find (spider web) starts to grow outside your spray area. This is because the etch is drying prior to reaching the surface. You can either drop back pressure slightly (although with a suction gun this will probably reduce the amount of "draw" up the pipe), open up the needle a bit or slow your pass down...........
You will know if you are too heavy, slow, or have the needle opened too far - it will run........... leave it, block it back - these words are going to "haunt" you forever Cam................
Initially your challenge is to find the combination where everything is set in unison (pressure, fan, needle, distance and speed) you will then be able to run a good moderate wet coat without runs................
note:- I do find that the 1K etch sprays a bit different to that of primer and top coats............
Mix up your primer/surfacer according to the data sheet for the product
- I use the old Dolmio, Aloro or Kan-ton glass jars - these have measures both in mls and ozs - try to learn to work with one not both.
I find these glass jars are great. I hope you can still get them.......don't think much of the food - we had to consume quite a bit, but it was a sacrifice I was prepared for my family to make............
Mix up enough paint to do the job - initially you are going to waste a bit - you'll get a feel for how much you'll need as you get into this.
I have a little trick which helps me determine just how the paint is going to "spray" - I shake the mix for twenty/thirty seconds or so in the glass jar and quickly place it on the bench - I count out in seconds how long it takes to see the bubbles appear - it is a guide - with most paints I spray it takes around 4 seconds - by my counting.
If it doesn't take that long - the paint is thin or the temperature is high.
If it takes longer - it is either thick or cooler - both these indications will have a bearing on how I will adjust my gun and run my passes............
You'll learn all of this as you go............. but most of it will only come when you actually start to spray.............speaking of which.....
Spray two/three coats of primer/surfacer and let it dry for a few days.
Block back using blocking pad and wet/dry papers working up from around 240 through to 400.
I want to walk you through blocking back, but not yet........ there are a number of tricks I have learned which may save you a lot of grief......
If you now see great spots which require quite some build - you are better off re-applying some fine filler and blocking back, rather than keep filling with primer - filler will not shrink in time - primer will to some extent.
But be warned - if you use a "hot" thinner later on - this will make any filled spots look "wet" and will cause different drying times in localised areas........ we'll get to this...........
Repeating primer/surfacers and blocking back until satisfied with preparation that is when you believe the surface is flat or follows the contour of your panel without "high or low" spots.
Final top coats of primer.
These ones are probably going to be blocked back - it's just an additional layer so that the following "guide coat" can be removed with.......
Spray mist coat of sub-frame black (guide coat) - keep this coat just barely visible- your are going to remove it all, it is only to provide a view of any problems prior to starting colour coats..
Block back to "find" low areas (remain black whilst sanding)
Build up again with primer as required by guide coat indications.
If you want that almost perfect panel, you repeat and repeat this until it only takes two/three light rubs to remove "guide coat".
When you have reached this stage your preparation is ready for colour coats - we do not "build" our surface with colour coats - the primer/surfacer should have done this for you.
Colour coats are for decoration and sealing of the primers......
I am going to confuse you if I go into this........... let's just say - colour coats are the "finish"...... primers will not seal and will permit moisture to penetrate - this is called hygroscopic - absorb water (I think this is whee your whole question originally started.... whether to go with Matt or Gloss.......?).
Some people only put down a few colour coats - I like to go a bit overboard and get a very sound sealing coverage in about three separate applications.
Every time you cut (and I hate the word "polish") you must remove some of the paint. Paint will deteriorate if left unprotected - to keep a finish looking fresh you must wax it. When it breaks down only the outer layer need be removed. This is done with an abrasive "cutter" and you will "see" the colour of your paint on the rags - it is thus logical that eventually you will run out of paint film............. so, I like to put that little extra on to begin with..........
I also run an extra pass over "crowns" and bits where people are likely to "touch" - I have an abhorent hatred for people touching my paintwork - most enthusiasts will never "feel" another person's vehicle - if you "must" then please ask permission - I will gently wipe away any dust/grit with a soft towel preferably by first spraying some "detailer" over it to lubricate the film........aarrggghhhhh those fine finish scratches can be so hard to remove..........
I know this is going to sound as if my vehicle is a show piece Cam - it's not! - but I am ever so proud of what I have done, with the little "training" I have been given.......... hopefully you will appreciate some of this in time...
My colour coats go like this.......
First 2-3 colour coats. Allow to fully dry - 2 - 3 days.
Block back colour coats with 600 wet until fully "flat" appearance.
We will need to talk about what we are aiming for, but again not here.
(Stop blocking back if primer appears - this indicates insufficent "work" using primer. Color coat is purely for finish - not building).
Further 2-3 colour coats.
Let dry and block back as previous.
Inspection for final coats - again we need to discuss this.....
Final 2-3 colour coats.
Leave for sufficient time for thinners to fully evaporate and film to flatten down - this may take weeks - I have panels which did not fully flatten for months - but only in an attempt to get a "plate glass" finish.
Tell you how to do that, but not probably for some time
This next bit is how we are going to get a nice gloss to your work.......
Begin compounding with a coarse cutting compound. I do this by hand but most will use an orbital buffer and pad...... I can't help you with this.
We need to discuss when to move up to finer cutters..........not now..
Move to finer cutting compounds until level of gloss is obtained.
Leave a few weeks before again compounding with fine cutting compound.
The reason I do this is to allow any trapped thinners to escape and further flatten down the paint.
You must allow sufficient "time" for thinners to "flash off" or escape between each coat whilst spraying - you risk trapping thinners under over lying coats if you don't.
The data sheet you receive with your paint (make sure you ask for it Cam - you can even get it prior to purchasing any from your chosen supplier)
This sheet will state what flash off is required between coats - it will only mention one specific temperature/humidity - if it is colder or more humid - it will take longer..............
Only after a couple of months should waxes or silicone sealants be applied...............
I do not like silicone - but it does provide lasting protection.
Silicone used on existing panels which are prepared can cause lots of trouble - if the get embedded into the paint, you will get "fish eyes" or crazy circles in your finish.......... I have learned to "hate" silicone around paint......
You can get an additive to mix in with your paint - it is supposed to "capture" any silicone - I have never used it. I find it easier to just keep away from the stuff..
Now for the between coat stuff - make sure everything is dust free - including you!
Wipe down with prepsol or a wax/grease remover - do not allow this to "dry" on the paint/surface - only wipe down as much as you can wipe off with dry, clean cloths at a time..............
Blow the surface to remove dust lint etc.
Try very hard not to disturb anything in your garage which will cause dust to get into the air............ I usually "spread" a bucket of water over the floor just before spraying - this is just me, Cam.............
Gently wipe over the surface with a "tack" rag - keep this in a sealed container. It will usually pick up all those little microscopic bits of dust you will find annoy the living daylights out of you when inspecting a finish.
Finally, don't be "tempted" to run you fingers/hand over paint until it is dry - it may look great/dry whatever, but you will find it is still soft and touching it may break its composition.............
So Cam, these are the basic steps - others will undoubtedly suggest different methods of performing each stage......... this is what I do, and it works for me - I can't say that it will for you but it is a start..........
There are quite a few additional "notes" and techniques I perform and will explain during each of the above...............
That should give you another five or ten minutes material to digest..........
looking forward to questions.
I have only every uploaded one pic onto this site - I may look at posting a few more which hopefully will aid to the explain some of the above..............
I would suggest you purchase a breathing mask prior to spraying - the one I use has replaceable filters - make sure you purchase the filters recommended for automotive spray painting.
Just looking at the above - we've got to seven pages already - there is probably enough for a book here................you may wish to save this in a folder somewhere............
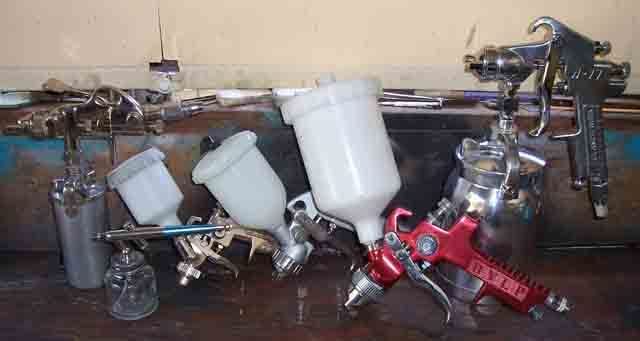
I'd like to talk on spray guns a bit before you go out and purchase one.....
but that's enough for now.............
frats,
Rosco
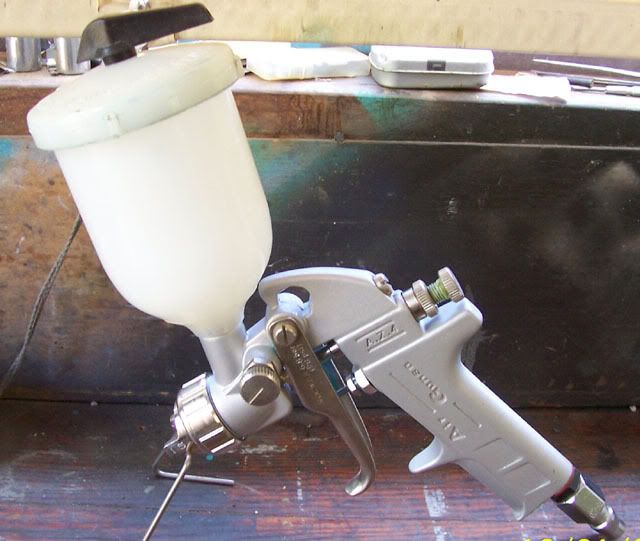
ps I'm going out to the garage to take a pic of my guns..........
I'll try and have it up this evening - with a brief discrption and what I use each one for..............
this gives us a bit of "space" where we won't bother those who do not want to follow what you are doing regarding panels.
I suppose we must start with a basic outline.........
My basic procedure goes like this - this is for acrylic only - my enamel procedure is a little different..............although preparation is identical..
Degreasing, drying. - We need to discuss a fair bit here - there are pitfalls which most people fall for the first couple of times around........silicone is one of those which is often overlooked - now is the time to chemically strip any silcone waxes from your work - before you go grinding it further into the existing paintwork................we do this with a wax and grease remover - before any sanding or abrasion takes place!
Scraping, grinding, filing, brushing and sanding back.
A bit like erecting something - we need to establish a sound foundation from which to start from...
Grinding out or treating rusted areas.
If one thing is going to prematurely destroy your work - it will be rust.
Lots to talk about here.....
Welding in new sections too large or where filler is not suitable.
I remember you saying you cannot weld - sometimes it is better to get someone to weld in a piece rather then just try and fabricate using filler - or "bog" as it is known.....
Beating out dents.
If you can, get a cheap set of hammers and dollies - they don't need to be more than around 20-30 dollars - you will use them forever......
It is often much better to get some of the deep dents out rather than just filling and filling with bog - you will find in an accident that bog will break open very quickly - and reveal to the world where you have used it to fill big holes.......
Heavy sanding using very coarse paper/discs.
We need to create a substrate which is going "key" subsequent coats.
Thoroughly blow out all dust/filings.
We don't want stuff in cavities crevices to make an appearance later on when you come to laying down those precious top colour coats....
De-oxidine to exposed metal.
You MUST do this - it will neutralise any microscopic spots of surface rust - this process starts almost immediately metal is exposed to air - especially when humid........
Filling using a re-enforced filler.
This is used to fill larger gaps, dents, holes - it has fibre=glass or stainless particles in it which "hold" the filler together. It does have limits though, refer to welding above.......
To apply this stuff, you must mix it up exactly according to the instructions - don't be "tempted" to make it go off quicker by adding more hardener.
Only mix up enough which can be used in three minutes - again it will "go off - or gel" in warmer/drier conditions.
We use a plastic "card" to apply this stuff - you will learn to "scrape" it along the panel filling the voids as you pass.
You will need some acetone for cleaning up the mixing cup and "card" - not to mention your hands......... try to "clean up" before the stuff goes hard.
Sanding back.
You use a fairly coarse type of paper/disc here - it is pretty hard stuff to sand.
Getting a basic "shape" of how the panel should look, still with sanding scratches and tiny imperfections.
Filling using a fine filler.
This stuff is worth its weight in gold - in fact the stuff I use is in fact call "K & H Gold filler" very easy to sand and very, very fine - gives a very smooth finish when sanded.
Again, use your "card" or applicator. Acetone is again the stuff for clean up.
Sanding back.
This is where we actually start to "block back".
We use a very firm pad - one which will not crush, but just flexible enough to follow any contour.
of fine filler to obtain desired shape without voids.
This process is repeated a number of times rather than plastering the stuff on - if you plaster - you are both wasting material and time.
It can be applied quite successfully over itself, providing you wipe down with prepsol or a wax/grease remover and allow it to dry.
De-oxidine to surrounding exposed metal.
I am going to race ahead and put a bit into the next section - it is probably the bit most people have trouble with - it probably needs to be re-iterated that the most important part though is and always will be preparation of the panel prior to this...............
Spray procedure outline..............this is just an outline - although will probably be quite lengthy......and some of it will be quite detailed......
I could probably write a book on what I have leaned - both good and bad..
I do not spray below 18 deg or above 30
You run the risk of trapping thinners in the paint at cooler temperatures.
Flash off time must be lengthened accordingly.
If it is too hot, your paint will "air dry" as it makes way to the panel and results in the paint "sticking onto" the panel and not dissolving into the previous. In extreme cases you will see a sandpaper or heavily dusted appearance - do NOT try to correct this by applying futher wet coats.
Allow it to dry fully then block back - yo will only do this a few times before you "learn" not to spray "dry".......
If you must spray on a hot dry day - you can add a percentage of "retarder" into your paint mix - but you must also reduce the amount of normal thinners and end up with the same thinner/paint ratio.
On cooler days, of if you want a super gloss hard finish - you can opt for a "hot" thinner - be warned, this will penetrate "deep" into existing paint and may cause issues with fillers underneath - identified by "wet" looking patchies in the overall finish........ arggghhhh, there's a lot here Cam, thinners and how to get the most from them.......
We will discuss later the advantages of using different thinners and changing mix ratios - at specific times...............but for now, stick with the recommended mix just get some general purpose acrylic thinners and learn what "you" are doing with "it".
Pick the "right" day for your spray job - you will probably spend weeks in preparing panels for paint - don't get gung ho just because you have a day off - I have been known to "take" a day off because there didn't appear to be a suitable window approaching.
I do not spray above 50% humidity - there is no problem with humidity below this - we don't want to "trap" humidity in the paint.
Consult your gun handbook or notes - it will state what recommended pressure to spray at - it may even give you a number of different setting for different paint types.
You must have a compressor capable of keeping up to the demand of the gun. You will not ever have too much, but if you do not have enough - all sorts of problems start to arise - your settings will alter as the pressure drops - I believe this to be more applicable with suction type guns......
Make absolutely sure you have a filter/dryer fitted to your air line - I use two, one on the compressor in the regulator and a final one just before the air line. You will probably appreciate that when air is compressed, it is heated - when it cools down it cools and attracts moisture - this moisture becomes water droplets which if they get into your airline will also get into your gun - and paint - I can't tell you how frustrating that is when you finally get a great finish only to have a trickle of water run down the wet paint and ruin it..................... arrggghhhhhh...........
If you can, buy an extra long length of air line - suspend it from a fairly high up point and have it run back to the drier on the compressor - whilst you are mixing up the next pot of paint, remember to "blow" down the compressor and drier.
I have designed and fitted a "shop" air line into my garage - it is comprised of about sixty feet of 3/4" copper pipe. It uses a flexible connection from the compressor and the entire length runs upwards around the inside of my garage. Finally it drops down to the second regulator/drier where my flexible air line is coupled - I have never had anything come out of this second drier...........just me, I'm afraid.
It is important to try and get any moisture out of your air line......
Drain your compressor frequently, always open the drain valve just slightly at the end of each day (or break) and let the reservoir "blow down" slowly - this helps get most of any crud, oil, water out of your system.
Always leave that drain open when not in use.
Back to spraying................
Normal distance from gun tip to panel is the span of you hand - approx 8 - 10 inches - I'm a dinosaur, you will have to convert that to cm.
Before you even get a gun, you can "play" with this just by passing you hand along an imaginary or existing panel - see if you can learn to make a pass keeping your hand exactly the same distance from the panel without "rolling your wrist" Try to imagine overlapping a previous pass by one third and whilst doing both of these, try to maintain a consistent speed.
You are going to have to actually spray some paint to learn what this speed will be.
I try to "look" at the wetness of the paint immediately behind the fan as it runs along the panel - that gives me the best indication of whether I am running fast/slow enough - too fast and the coat will be thin/dry - too slow and it will be "wet" and very likely to run..............you will learn to identify this, but not for some time...............if you now get a chance to see someone spray some paint - you will begin to "see" more than you previously were able to understand..............
When you "run" your gun along a panel, keep your distance and speed constant.
Try not to "roll" or "wave" your wrist as you go - that is don't "sweep" in an arc as you move along the panel - your coat will "build" at the closest point and be quite thin (possibly dry) at the start and end of any "wrist" stroke.
Try to keep the gun pointed at right angles to the panel - that is, don't allow the gun to point anywhere but at the centre of the line where you want to spray.
Learn to "trigger" the stroke - start your pass by starting a foot or so before the panel, get your speed constant then pull back the trigger before you reach the panel sp that the fan gets setup.
Continue all the way beyond the panel before releasing the tricker.
You do not want to have the gun start to reach it's settings after you reach the panel - always just prior.
Continue your run just beyond the panel end so that the settings to not start to break down as you reach the end.
Try to overlap each pass along the panel by one third - a good quality gun will be designed and machined to provide a slightly thicker film in the centre section of each pass - this allows previous and following passes to obtain an overall flat application...........
There is much more - you will start to ask questions once you have had a play with this............. but for now - it will give you an outline of laying paint down.
We will need to discuss spraying curves (both concave and convex) how to "plan" how you are going to make your passes (this is important for panels such as roof and how to shoot a whole vehicle at once).
I will later reveal my tips for tricky spots, crowns and working within recesses/door "shuts" and spraying "overhead" from beneath.
I must include a "faults and fixes" page which you may wish to keep handy.
that's enough background ........... for now...
One thing on gravity guns Cam, if you forget to connect the air line, have not opened up the gun air control valve and pull back the trigger - paint will run out in a stream................... I've done it... I bet others have too!
So hopefully some of that will have found a "home" and you may feel you are ready to begin...........
It is now time to get out that new face mask, fit the filters and get used to wearing it when you spray.......... if you are contributing to superannuation, this is the bit which may help you retrieve some of it........
When ever you can "smell" paint whilst wearing the mask - it is time for new filters. With some of them - mine is a CIG or now known as BOC gases, you can get pre-filters which a just little thin paper pieces - they help prevent paint dust getting in and blocking your main filter - they will extend the life of main filters for quite some time.
Change these pre-filters after each session.........
Now to spraying.......
Always find something to "practice" on before you actually hit a panel.
It doesn't have to be anything special - I use an old fridge door......... there is that much paint on it now I could probably remove the metal and still fit it to the fridge..........
We need to get your paint, gun and pressure set as best we can before applying it to your panel.
What we want is to be able to make a pass and get a good even coat with a nice slightly wet fan.
Distance is going to be very important - when you get your needle, fan, pressure and speed ready, you must apply exactly the same technique to the panel.........makes sense......
Spray a quick burst at the panel from 8 - 10 inches. Have a look at what the paint looks like. If it is split, you have too much fan or too much pressure. Likewise, if it is centred or round, you have too little.
When you get a fan of the correct height and roughly even spread, run another one but this time along the test piece - you need to find out how fast/slow to make a pass.
You are looking for a nice slightly wet result of consistent height.
Too fast and it will be dry and thin, too slow and it will probably run - or remain wet looking for five or more minutes.
Our pass is going to start to visibly dry in about two to four minutes.
I suppose many people here will use a different style, I can only speak of what I do...........
Run another pass which overlaps your first - you are looking for the two to look as one large pass. This is going to give you how much to overlap.
When you start to get a feel for each of your guns, you will have enough experience with each one to know how much to overlap.
General rule is by one third............
Ready to spray the panel?
We start with 1k etch - this stuff is important - it etches into metal and provides a sound base onto which primer will "stick".
Some people go straight for the primer - don't, the etch is a great way of keeping your finish attached to the panel......
Spray ONE! medium coat of 1K etch primer - this is generally pre-mixed but make sure you "stir" the contents - the particles will settle in the bottom. Don't be tempted to try and "cover" with this - it is a translucent coating - you should be able to "see" everything under it.
If your coat is too thin, fast or pressure too high, you may find (spider web) starts to grow outside your spray area. This is because the etch is drying prior to reaching the surface. You can either drop back pressure slightly (although with a suction gun this will probably reduce the amount of "draw" up the pipe), open up the needle a bit or slow your pass down...........
You will know if you are too heavy, slow, or have the needle opened too far - it will run........... leave it, block it back - these words are going to "haunt" you forever Cam................
Initially your challenge is to find the combination where everything is set in unison (pressure, fan, needle, distance and speed) you will then be able to run a good moderate wet coat without runs................
note:- I do find that the 1K etch sprays a bit different to that of primer and top coats............
Mix up your primer/surfacer according to the data sheet for the product
- I use the old Dolmio, Aloro or Kan-ton glass jars - these have measures both in mls and ozs - try to learn to work with one not both.
I find these glass jars are great. I hope you can still get them.......don't think much of the food - we had to consume quite a bit, but it was a sacrifice I was prepared for my family to make............
Mix up enough paint to do the job - initially you are going to waste a bit - you'll get a feel for how much you'll need as you get into this.
I have a little trick which helps me determine just how the paint is going to "spray" - I shake the mix for twenty/thirty seconds or so in the glass jar and quickly place it on the bench - I count out in seconds how long it takes to see the bubbles appear - it is a guide - with most paints I spray it takes around 4 seconds - by my counting.
If it doesn't take that long - the paint is thin or the temperature is high.
If it takes longer - it is either thick or cooler - both these indications will have a bearing on how I will adjust my gun and run my passes............
You'll learn all of this as you go............. but most of it will only come when you actually start to spray.............speaking of which.....
Spray two/three coats of primer/surfacer and let it dry for a few days.
Block back using blocking pad and wet/dry papers working up from around 240 through to 400.
I want to walk you through blocking back, but not yet........ there are a number of tricks I have learned which may save you a lot of grief......
If you now see great spots which require quite some build - you are better off re-applying some fine filler and blocking back, rather than keep filling with primer - filler will not shrink in time - primer will to some extent.
But be warned - if you use a "hot" thinner later on - this will make any filled spots look "wet" and will cause different drying times in localised areas........ we'll get to this...........
Repeating primer/surfacers and blocking back until satisfied with preparation that is when you believe the surface is flat or follows the contour of your panel without "high or low" spots.
Final top coats of primer.
These ones are probably going to be blocked back - it's just an additional layer so that the following "guide coat" can be removed with.......
Spray mist coat of sub-frame black (guide coat) - keep this coat just barely visible- your are going to remove it all, it is only to provide a view of any problems prior to starting colour coats..
Block back to "find" low areas (remain black whilst sanding)
Build up again with primer as required by guide coat indications.
If you want that almost perfect panel, you repeat and repeat this until it only takes two/three light rubs to remove "guide coat".
When you have reached this stage your preparation is ready for colour coats - we do not "build" our surface with colour coats - the primer/surfacer should have done this for you.
Colour coats are for decoration and sealing of the primers......
I am going to confuse you if I go into this........... let's just say - colour coats are the "finish"...... primers will not seal and will permit moisture to penetrate - this is called hygroscopic - absorb water (I think this is whee your whole question originally started.... whether to go with Matt or Gloss.......?).
Some people only put down a few colour coats - I like to go a bit overboard and get a very sound sealing coverage in about three separate applications.
Every time you cut (and I hate the word "polish") you must remove some of the paint. Paint will deteriorate if left unprotected - to keep a finish looking fresh you must wax it. When it breaks down only the outer layer need be removed. This is done with an abrasive "cutter" and you will "see" the colour of your paint on the rags - it is thus logical that eventually you will run out of paint film............. so, I like to put that little extra on to begin with..........
I also run an extra pass over "crowns" and bits where people are likely to "touch" - I have an abhorent hatred for people touching my paintwork - most enthusiasts will never "feel" another person's vehicle - if you "must" then please ask permission - I will gently wipe away any dust/grit with a soft towel preferably by first spraying some "detailer" over it to lubricate the film........aarrggghhhhh those fine finish scratches can be so hard to remove..........
I know this is going to sound as if my vehicle is a show piece Cam - it's not! - but I am ever so proud of what I have done, with the little "training" I have been given.......... hopefully you will appreciate some of this in time...
My colour coats go like this.......
First 2-3 colour coats. Allow to fully dry - 2 - 3 days.
Block back colour coats with 600 wet until fully "flat" appearance.
We will need to talk about what we are aiming for, but again not here.
(Stop blocking back if primer appears - this indicates insufficent "work" using primer. Color coat is purely for finish - not building).
Further 2-3 colour coats.
Let dry and block back as previous.
Inspection for final coats - again we need to discuss this.....
Final 2-3 colour coats.
Leave for sufficient time for thinners to fully evaporate and film to flatten down - this may take weeks - I have panels which did not fully flatten for months - but only in an attempt to get a "plate glass" finish.
Tell you how to do that, but not probably for some time
This next bit is how we are going to get a nice gloss to your work.......
Begin compounding with a coarse cutting compound. I do this by hand but most will use an orbital buffer and pad...... I can't help you with this.
We need to discuss when to move up to finer cutters..........not now..
Move to finer cutting compounds until level of gloss is obtained.
Leave a few weeks before again compounding with fine cutting compound.
The reason I do this is to allow any trapped thinners to escape and further flatten down the paint.
You must allow sufficient "time" for thinners to "flash off" or escape between each coat whilst spraying - you risk trapping thinners under over lying coats if you don't.
The data sheet you receive with your paint (make sure you ask for it Cam - you can even get it prior to purchasing any from your chosen supplier)
This sheet will state what flash off is required between coats - it will only mention one specific temperature/humidity - if it is colder or more humid - it will take longer..............
Only after a couple of months should waxes or silicone sealants be applied...............
I do not like silicone - but it does provide lasting protection.
Silicone used on existing panels which are prepared can cause lots of trouble - if the get embedded into the paint, you will get "fish eyes" or crazy circles in your finish.......... I have learned to "hate" silicone around paint......
You can get an additive to mix in with your paint - it is supposed to "capture" any silicone - I have never used it. I find it easier to just keep away from the stuff..
Now for the between coat stuff - make sure everything is dust free - including you!
Wipe down with prepsol or a wax/grease remover - do not allow this to "dry" on the paint/surface - only wipe down as much as you can wipe off with dry, clean cloths at a time..............
Blow the surface to remove dust lint etc.
Try very hard not to disturb anything in your garage which will cause dust to get into the air............ I usually "spread" a bucket of water over the floor just before spraying - this is just me, Cam.............
Gently wipe over the surface with a "tack" rag - keep this in a sealed container. It will usually pick up all those little microscopic bits of dust you will find annoy the living daylights out of you when inspecting a finish.
Finally, don't be "tempted" to run you fingers/hand over paint until it is dry - it may look great/dry whatever, but you will find it is still soft and touching it may break its composition.............
So Cam, these are the basic steps - others will undoubtedly suggest different methods of performing each stage......... this is what I do, and it works for me - I can't say that it will for you but it is a start..........
There are quite a few additional "notes" and techniques I perform and will explain during each of the above...............
That should give you another five or ten minutes material to digest..........
looking forward to questions.
I have only every uploaded one pic onto this site - I may look at posting a few more which hopefully will aid to the explain some of the above..............
I would suggest you purchase a breathing mask prior to spraying - the one I use has replaceable filters - make sure you purchase the filters recommended for automotive spray painting.
Just looking at the above - we've got to seven pages already - there is probably enough for a book here................you may wish to save this in a folder somewhere............
I'd like to talk on spray guns a bit before you go out and purchase one.....
but that's enough for now.............
frats,
Rosco
ps I'm going out to the garage to take a pic of my guns..........
I'll try and have it up this evening - with a brief discrption and what I use each one for..............