hiding wires, step by step "FINISHED"...
Posted: Fri Sep 28, 2007 8:17 am
ok team,
thanks to everyone who help me with all of my questions regarding hiding the wires in the engine bay... without your input none of this would have been possible
thankyou...
this is what i started with, some said not to bad. but i didnt want to see any wire, so i first opened up the bonnet, (still no cable) & started taking some before shots...

then wrote out a plan...
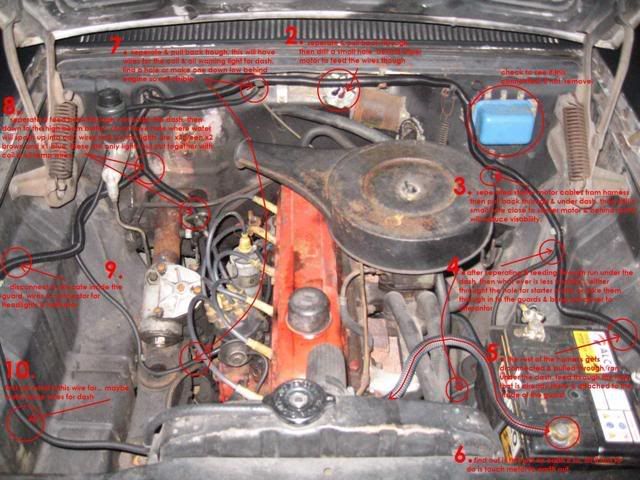
then just followed the plan... slowly.
started with finding a cosy spot for the next couple of weeks at
my Nan's places...

then disconnect the battery...

then disconnected the wiper motor...

stripped off ducting & tape & feed the just the wiper motor wires back through this little hard to find hole back inside into cabin...

then pulling it gently through & across, under the dash behind
the heater. then from the engine bay i drilled a hole using a 13mm drill
bit. before i did that i looked up behind the heater where the wiper motor is bolted to, to make sure i drilled in an ideal spot, safe & not visible. i then fitted a rubber grommet & feed the wires back through & reconnect...

next was the starter motor. i took the same steps as before, disconnect & strip back. (i always took photos before i disconnected anything, so i didn't have to rely on my memory where things went).


then once the wires were back insde the under & across the dash, i had to pull back the carpet & pull out this cardboard thing...(hopefully i can get a new one of these...

once i could see the metal i stated assessing were to drill the hole for the starter motor... then drilled using same drill bit & gommet size as before, feed the wires through & reconnected...


next on the list was the alternator, headlights, indicator & horn. first (i took photos before i disconnected anything, so i didn't have to rely on my memory where things went, again)...
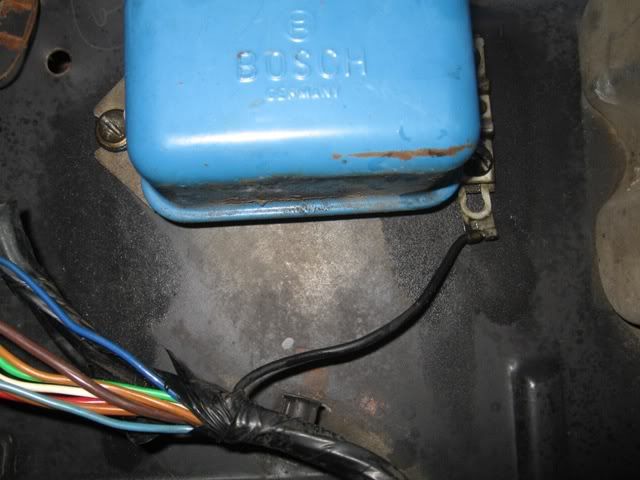


then the usual steps stip off tape & or ducting & disconnected all of them. then frrd them through into the cabin & across & under the dash behind the heater... now this is the piont where i needed to extend the wires to reach there new home, inside the guards...


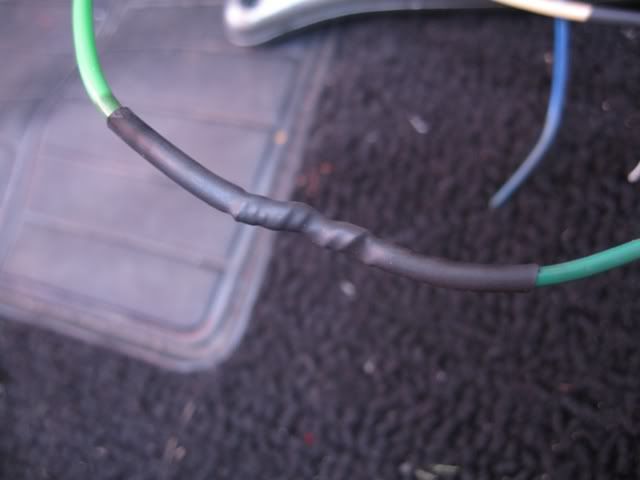
then i had to extend the wires... first, sniped & stripped off about 15mm off the end of each wire & joined them with the same colour wire... i then placed about 1.5 inches of heatshrink on to the old wire then twisted the bare wires together, then using the solder locked them into place. then i placed the heat shrink over the exposed wires & using a lighter i heated up the heatshrink & let it do its thing... (amazing stuff)
heatshrink on first then... twist

solder

heat-up heatshrint
then once i had my wires joined i need to drill a hole which would allow me to feed the wires into the guard. (be careful not to brake the drain tube, like i did)... i used the same drill bit as before but i used a grommet that had a slightly bigger opening, as there are about 7 wires that need to get through there... then jack the car up, took the wheel off for a better view. then i feed the wires through....


i then used some self adhesive plastic brackets to hold wires in place... (not sure how long they will stay there, but i 'm still looking for some thing better, that doest require drilling or screwing in to the car)...

i then had relocate the indicator, (which means disabling the indicator housing then i drilled a hole & placed grommet in the back wall just at the back of the indicator housing. feed the wire through then mounted housing back to car...


the headlights, horn & indicator where next & as i didnt want that connector thing screwed back into the car i used spade connectors & a bit of heatshrink to make them a bit more water resistant... then taped up and placed in conduc, the clips i've used are from jaycar, (there not meant for auto) they'll do till i get something better...


ok the right side done...

next was the highbeams... stripped the conduit & tape.


then i realized that it would reach inside without disconnecting the headlights/indicator, coil, temp dash lead, oil dash lead... (after i took some pic's & made notes where every thing went)


once the wires were inside i found out where would be a good place to drill a hole for the highbeam wires & then placed grommet & feed wires through & connected. (i always reconnected every thing ASAP)


then extended wires like i did on the other side previously, after measuring the lenght needed... (plus a bit more for theWHAT IF factor)
then drilled a hole CAREFULLY under the dash through to the guard, as i broke the drain tube on the other side... feed the wires through in to the guards & see where the wire need to go then place in conduit & clip to the car...


then i wasnt still that happy with the way the distributor area was looking... so i cleaned up the wires that were running to the coil...
before
after

then i was happy... for the moment.
over all i am very happy with the work that i carried out...
BUT...
none of wich would be possible without... (in no particular order) mephious, harko, devilrod, balcky, ekjay, thommo, smooth, ratbox, rosco, fb wannabe, fb mad, oldnek, craig, thropzed, blue ute, fb cruiser,
(AUST)Mod & parisian62... just to name a few
thanks
matty martin
thanks to everyone who help me with all of my questions regarding hiding the wires in the engine bay... without your input none of this would have been possible
thankyou...
this is what i started with, some said not to bad. but i didnt want to see any wire, so i first opened up the bonnet, (still no cable) & started taking some before shots...
then wrote out a plan...
then just followed the plan... slowly.
started with finding a cosy spot for the next couple of weeks at
my Nan's places...
then disconnect the battery...
then disconnected the wiper motor...
stripped off ducting & tape & feed the just the wiper motor wires back through this little hard to find hole back inside into cabin...
then pulling it gently through & across, under the dash behind
the heater. then from the engine bay i drilled a hole using a 13mm drill
bit. before i did that i looked up behind the heater where the wiper motor is bolted to, to make sure i drilled in an ideal spot, safe & not visible. i then fitted a rubber grommet & feed the wires back through & reconnect...
next was the starter motor. i took the same steps as before, disconnect & strip back. (i always took photos before i disconnected anything, so i didn't have to rely on my memory where things went).
then once the wires were back insde the under & across the dash, i had to pull back the carpet & pull out this cardboard thing...(hopefully i can get a new one of these...
once i could see the metal i stated assessing were to drill the hole for the starter motor... then drilled using same drill bit & gommet size as before, feed the wires through & reconnected...
next on the list was the alternator, headlights, indicator & horn. first (i took photos before i disconnected anything, so i didn't have to rely on my memory where things went, again)...
then the usual steps stip off tape & or ducting & disconnected all of them. then frrd them through into the cabin & across & under the dash behind the heater... now this is the piont where i needed to extend the wires to reach there new home, inside the guards...
then i had to extend the wires... first, sniped & stripped off about 15mm off the end of each wire & joined them with the same colour wire... i then placed about 1.5 inches of heatshrink on to the old wire then twisted the bare wires together, then using the solder locked them into place. then i placed the heat shrink over the exposed wires & using a lighter i heated up the heatshrink & let it do its thing... (amazing stuff)
heatshrink on first then... twist
solder
heat-up heatshrint
then once i had my wires joined i need to drill a hole which would allow me to feed the wires into the guard. (be careful not to brake the drain tube, like i did)... i used the same drill bit as before but i used a grommet that had a slightly bigger opening, as there are about 7 wires that need to get through there... then jack the car up, took the wheel off for a better view. then i feed the wires through....
i then used some self adhesive plastic brackets to hold wires in place... (not sure how long they will stay there, but i 'm still looking for some thing better, that doest require drilling or screwing in to the car)...
i then had relocate the indicator, (which means disabling the indicator housing then i drilled a hole & placed grommet in the back wall just at the back of the indicator housing. feed the wire through then mounted housing back to car...
the headlights, horn & indicator where next & as i didnt want that connector thing screwed back into the car i used spade connectors & a bit of heatshrink to make them a bit more water resistant... then taped up and placed in conduc, the clips i've used are from jaycar, (there not meant for auto) they'll do till i get something better...
ok the right side done...
next was the highbeams... stripped the conduit & tape.
then i realized that it would reach inside without disconnecting the headlights/indicator, coil, temp dash lead, oil dash lead... (after i took some pic's & made notes where every thing went)
once the wires were inside i found out where would be a good place to drill a hole for the highbeam wires & then placed grommet & feed wires through & connected. (i always reconnected every thing ASAP)
then extended wires like i did on the other side previously, after measuring the lenght needed... (plus a bit more for theWHAT IF factor)
then drilled a hole CAREFULLY under the dash through to the guard, as i broke the drain tube on the other side... feed the wires through in to the guards & see where the wire need to go then place in conduit & clip to the car...
then i wasnt still that happy with the way the distributor area was looking... so i cleaned up the wires that were running to the coil...
before
after
then i was happy... for the moment.
over all i am very happy with the work that i carried out...
BUT...
none of wich would be possible without... (in no particular order) mephious, harko, devilrod, balcky, ekjay, thommo, smooth, ratbox, rosco, fb wannabe, fb mad, oldnek, craig, thropzed, blue ute, fb cruiser,
(AUST)Mod & parisian62... just to name a few
thanks
matty martin