Tough one to fix that Roger - does it have the allow strip to go back on?
The problem for me would be getting a perfect finish underneath as thats what you see sitting in the drivers seat (the underside) if thats not perfectly smooth it would bug the Sh1T out of me every time i looked at it - I'd hunt for a better one - Sure there are still plenty out there.
The roof holes are easy to overcome with some good Rivnuts - very neat and seal 10 times better than the screws they used to use. I even did the rivets on the side brackets as well
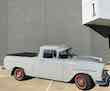
Ammo's Ute
Re: Ammo's Ute
You will find me lost somewhere!
-
Wrongway Roger
- Posts: 738
- Joined: Fri Jun 20, 2014 7:06 pm
- State: SA
- Location: Adelaide
Re: Ammo's Ute
I have the alloy strip which I have been sanding and polishing to remove the pittting.
I know what you mean about seeing any imperfection.
I built the family room on the back of the house some 20 years ago and I still see a couple of areas that I'm not happy with.
Now that I see what is under the alloy strip, I will be looking closely on other before buying.
Clay has pointed to Resto Spares in Vic, who do a repo for solid metal visors for #370 + postage.
I'm not sure about the fitment as there is no roof brackets. I seen my buffered about by truck passing when travelling to the Nationals each year.
I have put it to one side at moment while consider the options.
Cheers,
Roger.
There is a right way and a wrong way and then there is my way which is usually the long way.
-
Wrongway Roger
- Posts: 738
- Joined: Fri Jun 20, 2014 7:06 pm
- State: SA
- Location: Adelaide
Re: Ammo's Ute
Hi,
Nearly caught up on the build here.
Built a 60’s style tube grill which started out as a simple build until I realised the tubes needed to be curved tubes.
My roll bender did not have the 19 mm grooves so I did it by eye and hand.
I wanted the tubes to appear suspended with no mounting showing so built this these.
I also built some custom bullet ends to finish off the ends. These may or may not stay as I’m still undecided if it looks cool or daggy.
Last big change is the hidden tailgate hinges.
I have a couple of goes building these using cheap hinges and sheet metal to get the geometry correct. Not there yet but I will persist.
Anyone who has photos of the hidden hinges in the open position, I would appreciate seeing.
I know there may be some reluctance to share given the complexity and time taken to solve, so just asking.
Cheers,
Roger
Nearly caught up on the build here.
Built a 60’s style tube grill which started out as a simple build until I realised the tubes needed to be curved tubes.
- grill curve.JPG (115.02 KiB) Viewed 905 times
I wanted the tubes to appear suspended with no mounting showing so built this these.
- Grill 1.JPG (121.49 KiB) Viewed 905 times
- Grill complete 1.JPG (1.62 MiB) Viewed 905 times
- Grill complete 2.JPG (1.21 MiB) Viewed 905 times
I have a couple of goes building these using cheap hinges and sheet metal to get the geometry correct. Not there yet but I will persist.
- Hinges 1.JPG (123.38 KiB) Viewed 905 times
I know there may be some reluctance to share given the complexity and time taken to solve, so just asking.
Cheers,
Roger
There is a right way and a wrong way and then there is my way which is usually the long way.
-
Wrongway Roger
- Posts: 738
- Joined: Fri Jun 20, 2014 7:06 pm
- State: SA
- Location: Adelaide
Re: Ammo's Ute
Hi,
I have been tackling the front guards, removing rust and knocking out dents. I did the usual top of the guard and the bottoms using replacements from Rare Spares.
A tip to all - get the gloss paint off before sanding as it clogs up the paper.
I have been filling and sanding low spots then filling and sanding again for too long. My hat off to guys who do this for a living.
I'm so over body work at the moment and my arms ache and my fingers are shorter.
I think I have sanding every millimetre on each, at least 4 or 5 times
Hit it with a coat of etch primer to seal both the bare metal and the filler.
Also gave the tub a shot of primer.
I will let it cure overnight then a guide coat before blocking each guard to find more low spots.
Happy days ahead.
Cheers,
Roger
I have been tackling the front guards, removing rust and knocking out dents. I did the usual top of the guard and the bottoms using replacements from Rare Spares.
A tip to all - get the gloss paint off before sanding as it clogs up the paper.
I have been filling and sanding low spots then filling and sanding again for too long. My hat off to guys who do this for a living.
I'm so over body work at the moment and my arms ache and my fingers are shorter.
I think I have sanding every millimetre on each, at least 4 or 5 times
Hit it with a coat of etch primer to seal both the bare metal and the filler.
- guards 1.JPG (103.85 KiB) Viewed 879 times
- guards 2.JPG (140.26 KiB) Viewed 879 times
- Tub 2.JPG (101.9 KiB) Viewed 879 times
Happy days ahead.
Cheers,
Roger
There is a right way and a wrong way and then there is my way which is usually the long way.
Re: Ammo's Ute
Hi Roger - NIce work - a couple more passes and you're there.Wrongway Roger wrote: Thu May 07, 2020 4:25 pm
I'm so over body work at the moment and my arms ache and my fingers are shorter.
I think I have sanding every millimetre on each, at least 4 or 5 times
However. if your fingers are getting shorter make sure your sandpaper is up the right way
-
Wrongway Roger
- Posts: 738
- Joined: Fri Jun 20, 2014 7:06 pm
- State: SA
- Location: Adelaide
Re: Ammo's Ute
Hi,
I making progress now I have the rough side down, thanks Patrick for the tip.
Sanded both guards and filled more low spots.
I had to recheck each guard after looking at the photos as it appears there are a heap of low spots that I did not fill.
All good as it was just the different lights in the shed.
Weather not looking good for the next couple of days for body work so I will working on a hard lid for the tub.
Or I could go back to the tailgate hinges,
Cheers,
Roger
I making progress now I have the rough side down, thanks Patrick for the tip.
Sanded both guards and filled more low spots.
- Guard 3.JPG (103.32 KiB) Viewed 848 times
- Guard 4.JPG (115.56 KiB) Viewed 848 times
All good as it was just the different lights in the shed.
Weather not looking good for the next couple of days for body work so I will working on a hard lid for the tub.
Or I could go back to the tailgate hinges,
Cheers,
Roger
There is a right way and a wrong way and then there is my way which is usually the long way.
-
Wrongway Roger
- Posts: 738
- Joined: Fri Jun 20, 2014 7:06 pm
- State: SA
- Location: Adelaide
Re: Ammo's Ute
Hi,
I have been researching hidden hinges on the net, spend a couple of hours at the wreckers today, looking at door, hatch and tail gate hinges.
With what little information I could pulled together, I headed into the shed to have another attempt at making the hinges.
Bend wire again, formed some 2.5 mm sheet metal, welded to but hinges and attached to the ute and tail gate.
Pulled it off heated and reshaped the curve several times and still can’t get them to work.
Closest I got was the tailgate at about 30 degree angle from parallel before the bottom edge touches the roll pan.
I need to extent the curve outwards but not increase the length as this would place the top of the tailgate too high.
To say I’m pissed off is to understate how I feel. I know it has been done a couple of times before so I should be able to step up and make some.
The only advice I have received is “used 2” pipe and based on the front door hinges”.
Unless I have an epiphany ( look it up), the hidden hinges are toast on the ute.
As I have changed the mounting points for the original hinges, my only option may the weld up the tail gate.
Cheers,
Roger
There is a right way and a wrong way and then there is my way which is usually the long way.
Re: Ammo's Ute
What about side hinges ???
I started with nothing and still have most of it left.
Foundation member #61 of FB/EK Holden club of W.A.
Foundation member #61 of FB/EK Holden club of W.A.
-
Wrongway Roger
- Posts: 738
- Joined: Fri Jun 20, 2014 7:06 pm
- State: SA
- Location: Adelaide
Re: Ammo's Ute
Did consider side hinges but as I can’t work out drop down hinges, it is likely I would have the same issues.
The issue I think is in the curvature of the hinge, as it starts very tight then opens up before bending back to the back face of the tailgate. Complex geometry involved and I’m up to my biggest hammer now making adjustments.
At the moment I will step away, as there is too much thinking going on in my head.
Lots more to do like hard lid.
Cheers,
Roger
There is a right way and a wrong way and then there is my way which is usually the long way.
Re: Ammo's Ute
Roger,
(this is a train-of-consciousness post, so may be lacking in coherence . . .)
There's a reason the GM-H engineers put the tailgate hinges where they did: the tailgate's lower lip will actually pivot slightly upward as the tailgate is opened, because the hinge pin is rearward of the tailgate skin.
You've moved the hinge pin inwards a fair bit with your current arrangement, so it's no surprise (sorry!) that the lower lip of the tailgate fouls on the roll pan as the tailgate opens: imagine the circle described by the tailgate lower lip, whose centre is the hinge pin. Where the tailgate normally sits shut, the tangent to the circle will be sloping down at the rear . . . pick a number . . . anywhere between 30 and 45 degrees.
Wild conjecture here - maybe, just maybe, you could make hidden hinges work if the hinge pin were inside the roll pan, as close as possible to the rear, and quite a way down. This way, the radius of the circle defined by the lower lip of the tailgate will be large, and the tangent to the circle will slop downwards only slightly. The hinge tongues will then have to look like exaggerated versions of the front door hinge tongues in order to get the full 90+ degrees of opening (front doors would only open maybe 50 deg.).
You could do way worse than spend a morning at a wreckers' yard looking at how hatchback tailgates and Commodore bootlids are hinged. And that's not even going to a trapezium arrangement.
Rob
-
Wrongway Roger
- Posts: 738
- Joined: Fri Jun 20, 2014 7:06 pm
- State: SA
- Location: Adelaide
Re: Ammo's Ute
Hi Rob,
Appreciate your thoughts into my problem.
I have quick measure the pivot point from the original hinges to where I have them now is about 35 mm forward. I measure the current gap on my wagon tail gate to body and this around 30 mm.
Now given the tail gate is curved across this would account for the lack of gap I need.
I have trying a couple of methods to work out a design, firstly CAD or Carton Aided Design then switched to the tried and proven method, been old red wine. Solved many of the worlds problem via red wine. Seems the older the wine to more wisdom it has.
My brain is a little scrambled but will look into moving the pivot point as far back as I can and if needed, modify the tailgate mounts to suit.
Cheers,
Roger
There is a right way and a wrong way and then there is my way which is usually the long way.
Re: Ammo's Ute
Roger have you thought about something like these https://encrypted-tbn0.gstatic.com/imag ... Y5F3fTIA&s . Or using the same idea which should distance the tailgate further from the body the more you open it (I think!)
Sent from my iPhone using Tapatalk
Sent from my iPhone using Tapatalk
-
Wrongway Roger
- Posts: 738
- Joined: Fri Jun 20, 2014 7:06 pm
- State: SA
- Location: Adelaide
Re: Ammo's Ute
Hi,
Thanks for the reply. I looked numerous website and found a number with fairly large hinges systems.
This is from a ute that appears in Street Machine mag and that I saw at the Nationals in Perth a couple of year back.
Due the raining day I did not see the tail gate down and did not see the owner.
Based to comparing known measurements and that a small section of the rear panel has been removed, I thought I would be able to reproduce a set.
The hinges look fairly short as the distance across the rear is around 50 mm. This sets the amount of raise the hinge must go through to clear the rear panel.
I know they guys who have done the hidden hinges, another in FC ute I think in NSW, may not want to share and thus keep their mods unique but it is only engineering on what out there.
I'm a littler more settle than I was when I locked up the shed earlier today.
Maybe I will dream the answer in colour tonight.
Cheers,
Roger
Thanks for the reply. I looked numerous website and found a number with fairly large hinges systems.
This is from a ute that appears in Street Machine mag and that I saw at the Nationals in Perth a couple of year back.
- IMG_0326.JPG (83.34 KiB) Viewed 775 times
- IMG_0321.JPG (86.51 KiB) Viewed 775 times
Based to comparing known measurements and that a small section of the rear panel has been removed, I thought I would be able to reproduce a set.
The hinges look fairly short as the distance across the rear is around 50 mm. This sets the amount of raise the hinge must go through to clear the rear panel.
I know they guys who have done the hidden hinges, another in FC ute I think in NSW, may not want to share and thus keep their mods unique but it is only engineering on what out there.
I'm a littler more settle than I was when I locked up the shed earlier today.
Maybe I will dream the answer in colour tonight.
Cheers,
Roger
There is a right way and a wrong way and then there is my way which is usually the long way.

Re: Ammo's Ute
You need a mate who is a mechanical engineer or industrial designer. I am confident it can be solved relatively simply. Don’t give up. Put it to one side until inspiration comes, and focus on another aspect of the build.
Good luck with the sleep.
FB ute fixer upper, EK van on rotisserie
Good luck with the sleep.
FB ute fixer upper, EK van on rotisserie
getting my FB ute on the road
EK van on rotisserie
EK van on rotisserie
Re: Ammo's Ute
maybe the working out the radius on the curve of the hinge might help