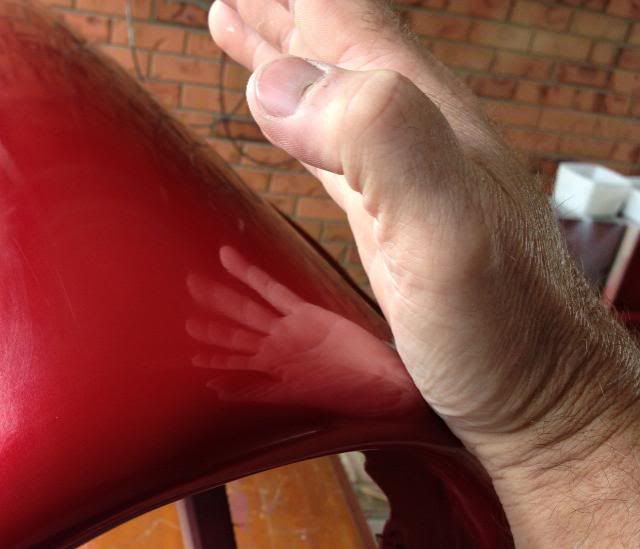
Acrylic clear coats are very soft, Finny - as you have found out.
Generally speaking, it is best to leave them quite some time before either sanding issues out or buffing.... it is easy to "burn" the soft clear coat with a vigorous buffing - and it will "melt" under the friction of the buff and cutting paste.
I continue to remain a solid colour person - it is the most forgiving and touch-up friendly paint of all auto paints.
If you have masochistic tendencies - you "can" spray black - and if you manage to fluke that magic finish off the gun - it is absolutely schmick.... but it is a beast to re-work and touch up....
Congrats on the bonnet.... waiting to see what you do with your guards - tread carefully.
frats,
Rosco
EK Wagon project - Total rebuild
Re: EK Wagon project - Total rebuild
you may find it comes back in spots finny had this trouble with the green sedan
but it was more of a faulty clear I used then weather conditions
I ended up rubbing it back a few times with some 800 to get it right out
but it looks good mate well done
but it was more of a faulty clear I used then weather conditions
I ended up rubbing it back a few times with some 800 to get it right out
but it looks good mate well done
EK JAY SINCE 1990
-
Mick Jagger
- Posts: 3438
- Joined: Mon Dec 08, 2008 12:48 pm
- State: NOT ENTERED
- Location: Brisbane
Re: EK Wagon project - Total rebuild
humidity is bad,i think its the start to another big wet? hope im wrong
kmawic
Re: EK Wagon project - Total rebuild
Tim I thought it was only around 180% 
The day before it was under 40% all day.
Checked in the morning and it was showing under 60, and I thought it normally drops as the day goes on.
And the retarder should have helped.
Wasn't looking too bad out on the northside.
It was all good until the end.
Which was when the humidity must have jumped.
Yes I won't do that again.

IT's LIKE WATCHING DRUNK MONKEYS TRYING TO HUMP A FOOTBALL.
Re: EK Wagon project - Total rebuild
I was giving them about 20 minutes between coats, and left 45 minutes between the colour and the clear.
I did thin the last ones out more though, which may have been the issue you mentioned.
Done now lesson learned, I hope.
I did thin the last ones out more though, which may have been the issue you mentioned.
Done now lesson learned, I hope.
IT's LIKE WATCHING DRUNK MONKEYS TRYING TO HUMP A FOOTBALL.
Re: EK Wagon project - Total rebuild
Sanding and compounding seems to have brought it back. 
Hope it stays that way.
A couple of minor issues, but it's a daily driver and I can work on them down the track.
Still need to get everything lined up and opening/closing freely without any contact.


Found a exhaust supplier today who will fit a 2" single system.
He also provided a gasket and sealant for the extractors.
Hope it stays that way.
A couple of minor issues, but it's a daily driver and I can work on them down the track.
Still need to get everything lined up and opening/closing freely without any contact.
Found a exhaust supplier today who will fit a 2" single system.
He also provided a gasket and sealant for the extractors.
IT's LIKE WATCHING DRUNK MONKEYS TRYING TO HUMP A FOOTBALL.
Re: EK Wagon project - Total rebuild
Thanks Tim.
The bonnet to guard doesn't touch, although I'm sure it will be fine as I install and tighten everything up.
It's the passenger door that is too tight.
But I haven't installed the side bolts yet, so I'm hoping they will pull it back in.
It's only just touching, but that's without the front guard stainless.
IT's LIKE WATCHING DRUNK MONKEYS TRYING TO HUMP A FOOTBALL.
-
bumper
- Posts: 717
- Joined: Mon Dec 31, 2007 10:07 am
- State: TAS
- Location: Devonport tasmania
- Contact:
Re: EK Wagon project - Total rebuild
Looking 
wanker????
I'd rather consider myself as an "owner operator"!!
FBEKHOLDENFANS page
https://www.facebook.com/groups/253705454864/
I'd rather consider myself as an "owner operator"!!
FBEKHOLDENFANS page
https://www.facebook.com/groups/253705454864/
Re: EK Wagon project - Total rebuild
Finny,
my suggestion would now be to just leave the paint to pull right down. Any further compounding or working the clear coats won't improve your finish until all those thinners/retarder get out. A few weeks with good air flow over the paint in warm weather will do wonders.
I am happy to learn that you thinned out the final coat/s - many make the mistake of really piling up the last couple - agreed, it looks very "deep" - but usually results in crow's feet or cracking.
And, please don't be tempted to put some wax or polymer on the paint - it will seal in what you are trying to evaporate out.
Your work is amazing - I love the finish you have achieved.
frats,
Rosco

Re: EK Wagon project - Total rebuild
looking awesome 
will you be blacking out behind the grill??
will you be blacking out behind the grill??
He who dies with the most toys wins!!
Re: EK Wagon project - Total rebuild
Last week of full time effort on the wagon.
Guards now lined up and finished. (unless I forgot something)

Also got the front mags on.
They just need a good polish.


And the doors still need to be aligned so they all close.
Looked at putting the trim on the seats, painted them the same at the outside of car.
But that will be difficult until I get it bolted down safely.
But they should go OK with the current seat colour.
My baby spoke its first word today.
A beautiful high and low note.
I was very proud.

Had to run extra wires for two horns, but that part can be ticked off the list.
And will I black out the front.
It was always on the plan.
It only have a light paint on red in that area.
The red tinge is just reflection.

Cleaned up and tested the front indicators and headlights tonight.
Unfortunately I had one rusted spacer/bolt.
So I cut it off and chemically welded on an addition.
I am always amazed at what this stuff can do.
I even used it to weld up a cracked plastic water trap on the compressor.
and it's all done and working in seconds.
Just DON'T get you fingers stuck.

All done and bolted back on now.
Still a hell of a lot to do.
Have a list of over 50 fix ups, let alone the still to do list.
Guards now lined up and finished. (unless I forgot something)
Also got the front mags on.
They just need a good polish.
And the doors still need to be aligned so they all close.
Looked at putting the trim on the seats, painted them the same at the outside of car.
But that will be difficult until I get it bolted down safely.
But they should go OK with the current seat colour.
My baby spoke its first word today.
A beautiful high and low note.
I was very proud.
Had to run extra wires for two horns, but that part can be ticked off the list.
And will I black out the front.
It was always on the plan.
It only have a light paint on red in that area.
The red tinge is just reflection.
Cleaned up and tested the front indicators and headlights tonight.
Unfortunately I had one rusted spacer/bolt.
So I cut it off and chemically welded on an addition.
I am always amazed at what this stuff can do.
I even used it to weld up a cracked plastic water trap on the compressor.
and it's all done and working in seconds.
Just DON'T get you fingers stuck.
All done and bolted back on now.
Still a hell of a lot to do.
Have a list of over 50 fix ups, let alone the still to do list.
IT's LIKE WATCHING DRUNK MONKEYS TRYING TO HUMP A FOOTBALL.
Re: EK Wagon project - Total rebuild
Just tackle them one at a time Finny, they will be gone before you know it I normally start with the hard ones, then they are gone and theres only easy ones left.
I started with nothing and still have most of it left.
Foundation member #61 of FB/EK Holden club of W.A.
Foundation member #61 of FB/EK Holden club of W.A.
Re: EK Wagon project - Total rebuild
Coming together real nice
[img]http://i47.photobucket.com/albums/f177/trevwood/WOOFTOsmall.jpg[/img]
Woofto Car Club Member No3
Woofto Car Club Member No3
Re: EK Wagon project - Total rebuild
The meandering path to completion continues, Finny - all looking good.
It may be a way off yet.... but when you finally get it all together (and there will always be "fix-it" and adjust jobs) and out on the road - just take a trip back down memory lane and reflect on where this amazing journey has been...... not many get to reflect on the long journey and enjoy what you are achieving.
Please, Adrian - Clark Rubber - please go and get some flat neoprene blanking plugs for those outrigger bolt access holes in your stone-tray/sub frame.
The amount of crap that gets into the front of the sub-frame is amazing - leaves, stones, sticks, insects........ add to this a continual dosing and drying of water and it won't be long before the front section of the s/frame starts to rust.
If I'm not wrong, in EK sub-frames there are tiny little drain holes at each end of the front section - something is annoying me that FB's didn't have these.
But, for all the EK ones are worth - they block up pretty darned quick.
Rubbish which gets in through those two holes can't get out - and it won't flush completely because it's an uphill climb over the cross-member mount wells - and the bolt tubes prevent the larger stuff from getting out.
I lost my original sub-frame because of those two holes....... completely ate one corner out and gutted the front section - as many reading this will accept, this is another little pet hate I have....
All looking great - it'll really start to gallop when you fit the grille and bumper/plates......
frats,
Rosco
Re: EK Wagon project - Total rebuild
Colour looks great! Nice progress