Blacky wrote:Good work mate , will look a heap better and you are building up a skillset to boot ! Really enjoying watching this build - it goes to show what can be achieved with a can-do attitude and being prepared to have a crack at it
Thanks mate, it’s an odd sort of fun seeing how much I can get done for zero bucks and not being precious if it doesn’t quite work out...
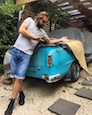
Very late night last night finishing sill panel details and sanding the final fender repair, masked the whole thing up till about 2:30am.
Came home from work tonight to dust the whole LH side with the last of the remaining paint I had - needs another coat or two. However the other side looked like this after one/two coats, so I’m hopeful this is going to come up just as well.
Don’t look too closely, it will get better... that said, I can already see it is much straighter than it was before I set off on this hand destroying exercise (I can hardly hold a drumstick at the moment), so I guess it was worth the effort??
Other news: Rear wheel cylinders are coming tomorrow, the big plan is to have this thing back on the deck on Saturday. Won’t be able to get near the shed much for a couple of weeks from Sunday, so it’s all guns blazing till then!
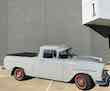
Ok! Another tilt at getting the Ute finished is underway.
After weeks of rain then a bunch of other life interruptions, I finally got the LH side of the car painted.
Also packed the LH rear wheel bearing with grease (both sides done now having forgotten to when I assembled the rear axle..) and I threw in new rear wheel cylinders & bled brakes, hopefully for the last time now. I got a deal I couldn’t refuse on new cylinders, but I’ll keep the old ones for sleeving in the future methinks.
Bonnet bar also went on last night, this week I’ll make a start on installing rubber door seals on the LH door and spare wheel door too. Really getting down to the small stuff now!
Cheers Joe
Coupla updates (sans photos):
With brakes bled and Leroy back on the deck, the next thing to attend to was the drivability/performance issues that have plagued this thing ever since I first got it running.
For those following, you'll be aware that I have rebuilt the motor with an overhauled head, new rings on existing pistons & honed bores, resulting in ring gap that was well within spec. It's running a near standard 'towing' cam grind, stock inlet manifold & the Strommy that it arrived with, which I kitted and adjusted to spec. The main jet is stock no. 51 size. It also has cheapie extractors into rowdy 2" exhaust and an HEI distributor with new vacuum advance unit and new fuel pump. Since getting it up and running, it hasn't so much as given a puff of blue smoke out the tailpipe and there are no fumes coming outta the walking-stick crank case vent - it's all hanging together well, idling fairly well and revving cleanly in neutral. There are no vacuum leaks. But once I take it out for a drive, there has been a woeful flat spot that felt like a combination of an inadequate or incorrectly adjusted accelerator pump and/or a failed ignition advance scenario. I couldn't drive it up the bump into my garage without a boot full of throttle and much drama.
So with all of this in mind, I borrowed a reconditioned Strommy from generous forum member Rob (ardiesse) this week and chucked it on, for a bit of a sanity check. The result of this simple swap nearly blew my mind! I now have a very very happy little Grey! On a warm evening here in Sydney, it started and idled perfectly with just a little choke and indeed could idle right down to what felt like 300 rpm, with the GEN light ablaze, before it would stall. Acceleration away from idle is now dead smooth and surprisingly strong, tractability for the all-important pull away from a crawl in second gear is flawless. YES.
I'm now in the process of getting another Strommy together so I can return this one - thanks Rob.
After a bunch of fanging around the industrial estate carpark down the lane from my place, I spent some time adjusting the headlight alignment, before installing the Rares dust seals and eyebrow trims for the last time. I set it a bit low cos I will eventually lower the rear ride height, but whatever the case, the H4s are so damn good that it hardly matters.
Post drive, nothing is leaking (yet), the clutch is working well, brakes are still bedding a little but work ok and there are no weird noises from steering & suspension. Damn the rear springs are firm! I might take the extra leaf out, oughta help me get the ride height I want too.. I can't see myself ever loading this thing up with anything heavy anyways.
Nice work - good idea on the springs too - might look into that myself as the utes are a bit bouncy with nothing in them.
H4's great upgrade also - cheers
FJWALLY wrote:Nice work - good idea on the springs too - might look into that myself as the utes are a bit bouncy with nothing in them.
H4's great upgrade also - cheers
Yeah mate, strongly recommend the upgrade! Scroll back through my build and have a gander at the lenses I bought. They really look the part. I detailed the wiring setup I used also
Glued in the LH door aperture seals with Loctite 454 and screwed down the scuff plate tonight. I’m a very big fan of these Better Auto Rubber outers:
The paint I used on Stephen’s injection moulded repro tailgate badge didn’t end up quite as ‘bright chrome’ as promised... but eh. It still looks great
Wasn’t 100% sure about placement, so just decided to make the badge in line with the chrome dividers in the taillight lenses.
Couple of finishing parts still to arrive, but it might be time to call up the wheel alignment shop I reckon...
To do a front wheel alignment at home, all you need is a level surface, a tape measure, chalk and a spirit level (and one of the fancy ones with an inclinometer is even better) . . .
To do a front wheel alignment at home, all you need is a level surface, a tape measure, chalk and a spirit level (and one of the fancy ones with an inclinometer is even better) . . .
Rob
Hi Rob,
I had reasonable success with my old HT using a home spun spirit level arrangement for camber and a combination of string and chalk for the toe angle. Castor I didn't find so easy to measure and indeed when I had it aligned properly was a little dramatic on one side from memory.
I kind of want to send the Ute for a proper alignment on a four wheel machine to establish how straight this car is, as I know it has been in big rear end hit. It also has entirely new susp/steering. As it all settles down, I'll do adjustments myself, but was thinking a pro-alignment to start with might be a good idea...