Hey Finny, If you don't fit the copper washers, the wheel cylinders will leak!!
Cheers Theo Z..............
EK Wagon project - Total rebuild
Thanks for the feedback. Yes I've got the message, without the washers they leak. Just seemed strange that there were none on it when I took them off the first time. The guy that did the cylinders, also told me without the washers, it will leak. Will take it back tomorrow and get the washers, apparently they are a special type.

IT's LIKE WATCHING DRUNK MONKEYS TRYING TO HUMP A FOOTBALL.
Well, picked up the washers this morning. 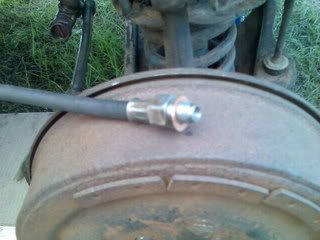
Optimistically put them on and tightened everything up. pumped up the brakes and..... Still leaking on both sides. Not sure why this is still happening, but it's getting annoying.
Decided to give it a break and start on pulling the head off the motor. I will admit that I have never done it before, but was told it would be easy. It was certainly a lot easier that trying to get the brakes working. I have documented it in case anyone else needs some ideas. I had the manual but it often referred to bits with no pictures.
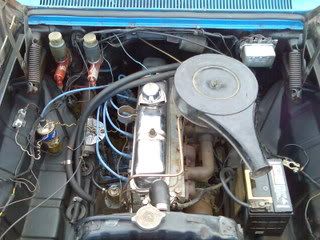
Well, this was the starting point. Bonnet was already off the car, but doesn't need to be removed. Have sprayed all the bolts and connections with RP7 the day before. I think that helped. Disconnected the bottom hose from the radiator and drained the water, didn't do the engine drain cock but should have. It's located under the manifold and looks the same as the drain cock under the radiator.
Took off the air filter and disconnected the choke cable, spring and throttle link, were it attaches to the carby.
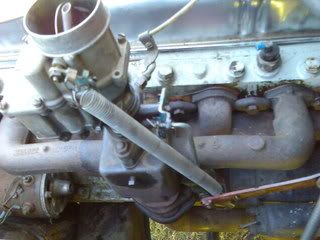
Undid the two bolts under the flange were the exhaust pipe connects to the bottom of the manifold. These were rusted pretty bad, but came off a lot easier than I thought they would. Undid the fuel pipe at both the Carby and Fuel pump and covered the fuel pump end with a rag (to stop anything getting into it). Undid the Vacumn advance pipe from the carby and the Distributor. Undid the bolts attaching the manifold to the side of the head and with some wiggling, removed the manifold and carby as one piece.
Undid the top radiator hose and disconnected the Negative battery lead from the bolt on the themostat and the bolt on the other side and removed the themostat.
Put pegs on all the spark plug leads (numbered them) and removed distributor cap and leads. Undid the Two bolts at the top of the Rocker cover and removed the cover and gasket. Removed the screws attaching the side plate, however you can't get them all out without removing the distributor. I was concerned about positioning it correctly again, but it has to come out. Watched how it moved while moving in in and out. Withdrew the distributor, held it in one hand while I unscrewed the last screw. As soon as that was done I placed it back in again, and it appears to line up exactly were it was before. (let me know if I have missed something on this one.) At this stage I could see bits of metal and two bent valve push rods on 5 and 6 cylinders.
Next undid small oil pipe in the middle, that runs from the head to the middle section of the rocker arm. At this stage I grabed some cardboard and drew an outline of the top of the head.marking the location of bolts. Stabed a screwdriver through the bolt locations so that as a bolt comes out, I could place it were it can go back into the same location.
(Sorry seem to have lost that picture, will get another one)
Next undid the 12 bolts attaching the rocker arms to the head (two are just nuts that screw down onto the long threaded bolts that held the rocker cover. Removed the rocker arm/s comes in two parts with the oil connection in the middle. and the push rods come out and at the bottom are the "valve tappets ?", the small cylinders that the push rods sit into. Pictures of broken valve tappets and bent push rods later.
The 15 Head to block bolts should now be all accessible. 7 were under the tappet cover and 8 were always visible. They are tight, and I didn't want to damage them with a loose spanner. I found a 14mm ring spanner fits very snugly with light tapping with a hammer to get the spanner onto the bolt head. There is a sequence to tightening and loosing the head bolts. Work anti clockwise starting at the front left bolt that was under the tappet cover, then right front, right rear, left rear, and repeat. Needed to add a pipe to the end of the spanner to get enough leverage to release the bolts. The inside ones were easy once the seal was broken however some of the outside ones fought until the end ( and were very dirty/rusty coloured)
With all the bolts out the head was still holding fast. Placed a rag over a metal pipe and placing it in the outlets on the manifold side jiggled it enough to break the seal. Lifted the head off the block.
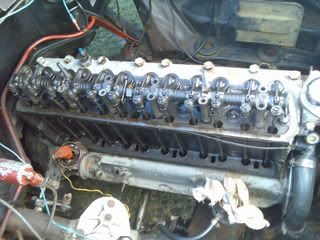
Could now see lots of things. Right and left side images.
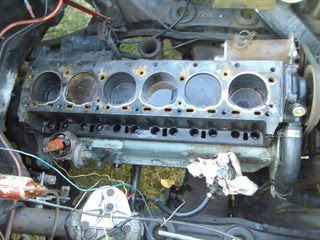
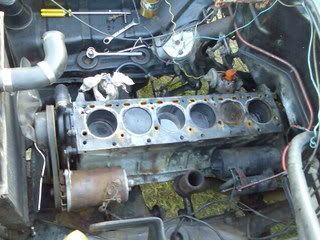
Water in the 3rd cylinder back. White oil in the rear cylinder. Some corosion in the water pockets, mostly at the rear. Lots or crap on the top of the pistons.
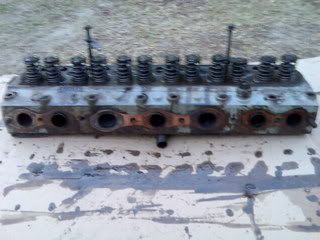
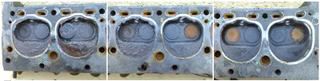
Looking at the valves in the head. The brown marks I assume were exhaust, can see the brown gets lighter and disappears as you go from No1 to No6. Also No5 seems stuck open.
Here is the broken/bent bits I mentioned earlier.

Well that's enought for now. State of Origin in over, Qld lost this one.
Hopefully the block is OK and I can jyst get the head done, Will get unleaded done at the same time. Off to see what can be done with the head tomorrow. I may yet get it running, shame about stopping her. Would also be interested in getting a better manifold/carby setup, and extractors when it goes back in. Not sure what's needed.
Brakes are still a worry.
Optimistically put them on and tightened everything up. pumped up the brakes and..... Still leaking on both sides. Not sure why this is still happening, but it's getting annoying.
Decided to give it a break and start on pulling the head off the motor. I will admit that I have never done it before, but was told it would be easy. It was certainly a lot easier that trying to get the brakes working. I have documented it in case anyone else needs some ideas. I had the manual but it often referred to bits with no pictures.
Well, this was the starting point. Bonnet was already off the car, but doesn't need to be removed. Have sprayed all the bolts and connections with RP7 the day before. I think that helped. Disconnected the bottom hose from the radiator and drained the water, didn't do the engine drain cock but should have. It's located under the manifold and looks the same as the drain cock under the radiator.
Took off the air filter and disconnected the choke cable, spring and throttle link, were it attaches to the carby.
Undid the two bolts under the flange were the exhaust pipe connects to the bottom of the manifold. These were rusted pretty bad, but came off a lot easier than I thought they would. Undid the fuel pipe at both the Carby and Fuel pump and covered the fuel pump end with a rag (to stop anything getting into it). Undid the Vacumn advance pipe from the carby and the Distributor. Undid the bolts attaching the manifold to the side of the head and with some wiggling, removed the manifold and carby as one piece.
Undid the top radiator hose and disconnected the Negative battery lead from the bolt on the themostat and the bolt on the other side and removed the themostat.
Put pegs on all the spark plug leads (numbered them) and removed distributor cap and leads. Undid the Two bolts at the top of the Rocker cover and removed the cover and gasket. Removed the screws attaching the side plate, however you can't get them all out without removing the distributor. I was concerned about positioning it correctly again, but it has to come out. Watched how it moved while moving in in and out. Withdrew the distributor, held it in one hand while I unscrewed the last screw. As soon as that was done I placed it back in again, and it appears to line up exactly were it was before. (let me know if I have missed something on this one.) At this stage I could see bits of metal and two bent valve push rods on 5 and 6 cylinders.
Next undid small oil pipe in the middle, that runs from the head to the middle section of the rocker arm. At this stage I grabed some cardboard and drew an outline of the top of the head.marking the location of bolts. Stabed a screwdriver through the bolt locations so that as a bolt comes out, I could place it were it can go back into the same location.
(Sorry seem to have lost that picture, will get another one)
Next undid the 12 bolts attaching the rocker arms to the head (two are just nuts that screw down onto the long threaded bolts that held the rocker cover. Removed the rocker arm/s comes in two parts with the oil connection in the middle. and the push rods come out and at the bottom are the "valve tappets ?", the small cylinders that the push rods sit into. Pictures of broken valve tappets and bent push rods later.
The 15 Head to block bolts should now be all accessible. 7 were under the tappet cover and 8 were always visible. They are tight, and I didn't want to damage them with a loose spanner. I found a 14mm ring spanner fits very snugly with light tapping with a hammer to get the spanner onto the bolt head. There is a sequence to tightening and loosing the head bolts. Work anti clockwise starting at the front left bolt that was under the tappet cover, then right front, right rear, left rear, and repeat. Needed to add a pipe to the end of the spanner to get enough leverage to release the bolts. The inside ones were easy once the seal was broken however some of the outside ones fought until the end ( and were very dirty/rusty coloured)
With all the bolts out the head was still holding fast. Placed a rag over a metal pipe and placing it in the outlets on the manifold side jiggled it enough to break the seal. Lifted the head off the block.
Could now see lots of things. Right and left side images.
Water in the 3rd cylinder back. White oil in the rear cylinder. Some corosion in the water pockets, mostly at the rear. Lots or crap on the top of the pistons.
Looking at the valves in the head. The brown marks I assume were exhaust, can see the brown gets lighter and disappears as you go from No1 to No6. Also No5 seems stuck open.
Here is the broken/bent bits I mentioned earlier.
Well that's enought for now. State of Origin in over, Qld lost this one.
Hopefully the block is OK and I can jyst get the head done, Will get unleaded done at the same time. Off to see what can be done with the head tomorrow. I may yet get it running, shame about stopping her. Would also be interested in getting a better manifold/carby setup, and extractors when it goes back in. Not sure what's needed.
Brakes are still a worry.
IT's LIKE WATCHING DRUNK MONKEYS TRYING TO HUMP A FOOTBALL.
 Woofto Car Club Member No4
head jobs
Thanks
Dan
dan
Dan, Seeto at Burpengary.
About $350, cleans up the head, adds the new seats for unleaded and keeps the valves. Pressure tests the head for cracks, etc. If valves are worn could be another $200 to replace. He removed the valves straight away, and showed me the ones that were worn. The head is currently in an acid bath and I'll know more next week. Barry is the guy I'm talking to, he's not young and he seems to know his stuff. He told me I only needed to replace some of the valves but after talking to him I decided to replace all the valves and get 186 valves in the inlets, but need to keep the 138 valve size on the exhaust (could have been the other way around), as if I fit 186 to both I can't get the unleaded seats to fit and they are only needed on one lot of valves, and cutting it back may cut through to the water. He also advised me on the block, and the issues that I may have if the rings are rusted. Seeto was a recommendation from my old mechanic, who I trust very well.
I can let you know more next week, after I have been through the whole process with them.
IT's LIKE WATCHING DRUNK MONKEYS TRYING TO HUMP A FOOTBALL.
A little more done getting ready for the body. Decided to make sure I have everything ready. Hadn't used the compressor for about 2 years, painted a 77 celica that time (mustang back) eldest son distroyed that one. Anyhow motor wasn't going, bearing had blown up, replaced it but more damage to the motor, replacement cost to high, bought a new one.
 Old compressor.
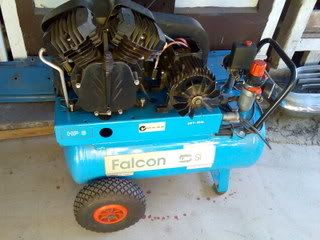
 New compressor. 3hp 17cfm.
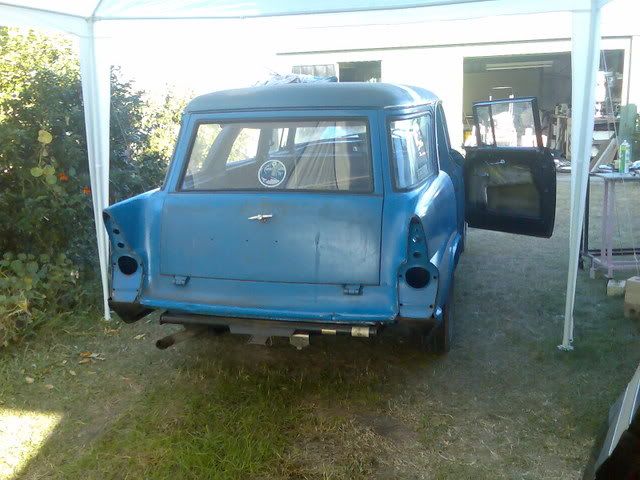
Gun and hoses all seem to be OK. Got primer, thinners, sandpaper, etc,etc. Took of the rear end gear. I couple of surface rust areas under the mouldings but the rest is good. VEry hard to get the rear bumper bar off when a towbar is installed, but eventually got it.
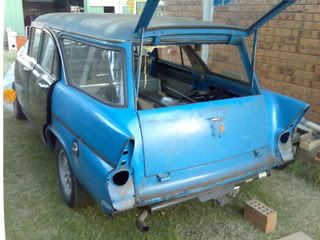
Will get rid of the rest of the trim, and gut the interior next. running out of space to store parts. Especially now that I have to get everything out from inside the car. Getting the fish oil off the car is a major pain. Anyone got an easy way?
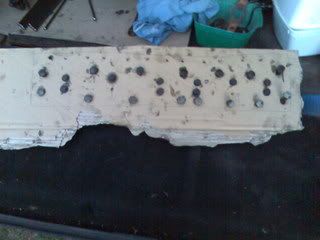 This was the cardboard I used to hold the engine bolts.
Old compressor. New compressor. 3hp 17cfm.Gun and hoses all seem to be OK. Got primer, thinners, sandpaper, etc,etc. Took of the rear end gear. I couple of surface rust areas under the mouldings but the rest is good. VEry hard to get the rear bumper bar off when a towbar is installed, but eventually got it.
Will get rid of the rest of the trim, and gut the interior next. running out of space to store parts. Especially now that I have to get everything out from inside the car. Getting the fish oil off the car is a major pain. Anyone got an easy way?
This was the cardboard I used to hold the engine bolts.IT's LIKE WATCHING DRUNK MONKEYS TRYING TO HUMP A FOOTBALL.

Still waiting to hear about the engine head, so decided to remove some more body work. Still struggling with getting the fish oil off the car, using wax and grease remover, but takes lots of elbow grease. Tried thinners and it seem to work OK but the fumes are a bit much, didn't like having my hands in it for that long and you still have to rub like crazy.

Got the door rubbers out. That took some time. The two outer ones on the passenger side were missing, hope you can buy them individually. The others were in good condition, obviously not the original ones. Hopefully I can reuse them again, if I can clean the glue off them.
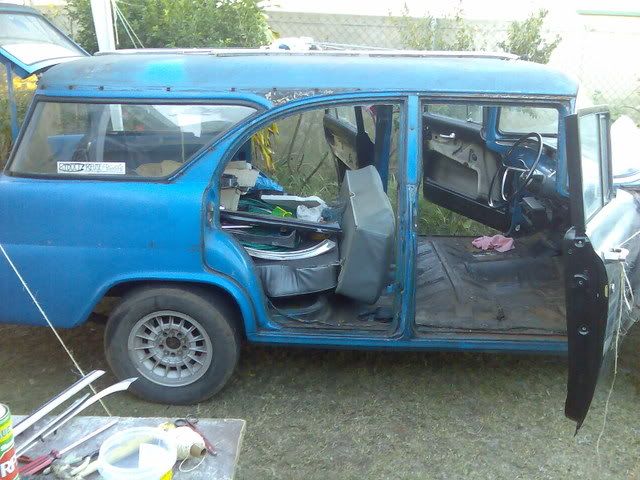
Removed the rest of the chrome from the roof and doors. Some minor rust to fix up. Got the rear doors off and the front seat out. Just have to find somewhere to put it all while the body is prepared.
Next time should have everything out of her, ready to cleanup.
Got the door rubbers out. That took some time. The two outer ones on the passenger side were missing, hope you can buy them individually. The others were in good condition, obviously not the original ones. Hopefully I can reuse them again, if I can clean the glue off them.
Removed the rest of the chrome from the roof and doors. Some minor rust to fix up. Got the rear doors off and the front seat out. Just have to find somewhere to put it all while the body is prepared.
Next time should have everything out of her, ready to cleanup.
IT's LIKE WATCHING DRUNK MONKEYS TRYING TO HUMP A FOOTBALL.
OK, it's been a month since my last notes, and a few things have happened  , and a lot haven't
  .
.
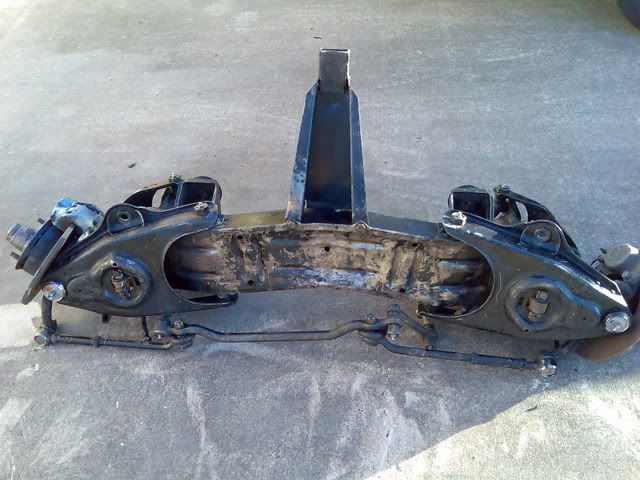
Have fixed the issue with the front brakes. I'm putting in a HR disc brake front end. Have cleaned it up and will replace all the ball joints/tie rod ends. Have also got the HR rear cylinders and shoes to do the back end. It's already been lowered,but I'm not sure how much. It also has an EH outrigger, just need to drill the holes for the Grey mounting. If I change to a 186, does anyone know if these engine mounts have already been moved ? Or do they still need to be moved?
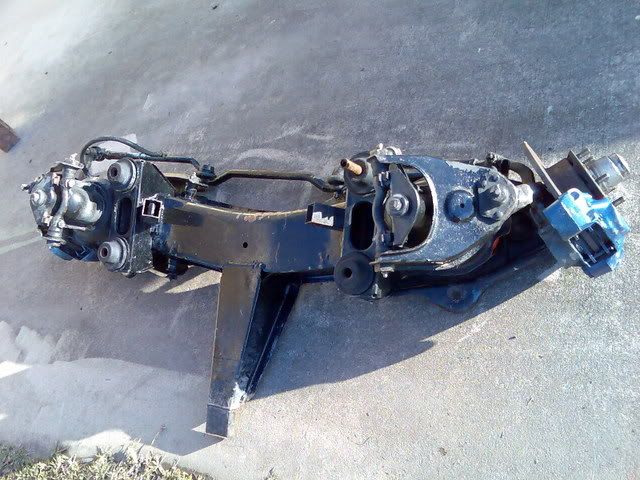
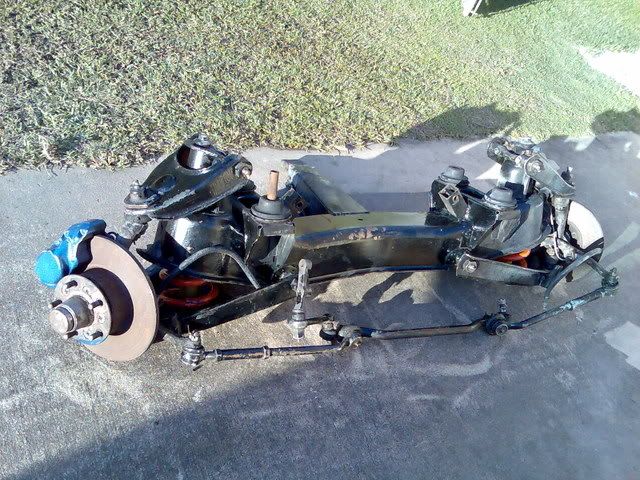
Took a lot of paint off with the pressure cleaner, may need to paint it again.
Still waiting to get the head back, but the mechanic couldn't get any exhaust valves. I got some off Ebay but they still haven't arrived yet.
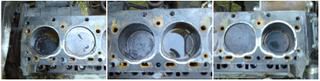
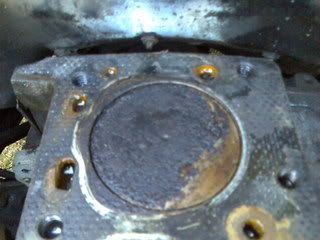
Spent a few more hours cleaning off fish oil, still more to do. Cleaned up the top of the block and noticed a lot of pitting on the top of piston 4.
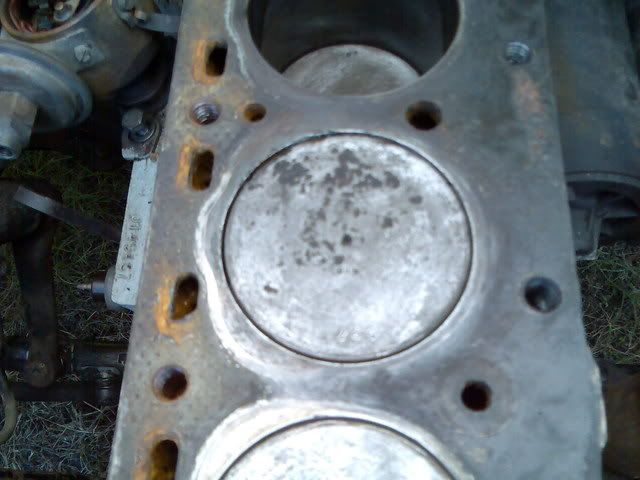
Will this affect the motor ???
Have fixed the issue with the front brakes. I'm putting in a HR disc brake front end. Have cleaned it up and will replace all the ball joints/tie rod ends. Have also got the HR rear cylinders and shoes to do the back end. It's already been lowered,but I'm not sure how much. It also has an EH outrigger, just need to drill the holes for the Grey mounting. If I change to a 186, does anyone know if these engine mounts have already been moved ? Or do they still need to be moved?
Took a lot of paint off with the pressure cleaner, may need to paint it again.
Still waiting to get the head back, but the mechanic couldn't get any exhaust valves. I got some off Ebay but they still haven't arrived yet.
Spent a few more hours cleaning off fish oil, still more to do. Cleaned up the top of the block and noticed a lot of pitting on the top of piston 4.
Will this affect the motor ???
IT's LIKE WATCHING DRUNK MONKEYS TRYING TO HUMP A FOOTBALL.
Engine mounts look like they have been moved into the right position for 186 to FB/EK to me.
Picture of pitted piston is a little blurry but would probaby be alright to use as is unless you are a perfectionist.Could have been caused by a number of different things.Sort of kind of looks like something hard may have made its way down there at some time.Any indication of marks in the cylinder head combustion area of this piston??
Main thing is to check if pistons are sloppy at all in the bores at TDC ( Top Dead Centre ) as this may indicate worn bores and/or worn or broken rings.
Get each piston to TDC and see how much they move in the bores by trying to push side to side.You can usually get an idea of condition by this way without having to pull engine apart.
This is only a rough way of checking condition however.
I can't think what to write here so this will do.
Hard to tell from picture, but i think the mounts need to be further back for a red motor in a EK/FB. I reckon mine are 15-20 mm back, see what others think  It is probably a better position there as it would give more clearance at the fire-wall, but could give fan-radiator problems and I think you would have to mess around with the gearbox mounts if you are keeping the original gearbox
Had a close up look at cylinder 4. Nothing on the head and the bore seems good. Valves on 5 and 6 were stuffed and push rods bent, but nothing on 4.
Will check the piston movement. Have sprayed the bores with WD40 and it doesn't drain away, so the rings should be OK ? I think.
If it fails I'll spend the money on a 186, instead of the bottom end. May go that way anyhow, once I see how the 138 goes.
Will check the piston movement. Have sprayed the bores with WD40 and it doesn't drain away, so the rings should be OK ? I think.
If it fails I'll spend the money on a 186, instead of the bottom end. May go that way anyhow, once I see how the 138 goes.
IT's LIKE WATCHING DRUNK MONKEYS TRYING TO HUMP A FOOTBALL.