Ammo's Ute

Post photos of your pride and joy, or updates on your rebuild!

Moderators: reidy, Blacky

User avatar
FireKraka
Posts: 2275
Joined: Fri Jan 24, 2014 11:12 am
State: WA
Location: Serpentine, WA

Re: Ammo's Ute

Post by FireKraka »

Hi Roger I did see one back up the page when looking from back to front on the drivers side but thought my eyes were just playing tricks, said like them a lot as we say subtle :eh:
I found the fc rear bumper fitted quite well I didn't cut anything out of it just welded it up and hid all the bolt holes etc.
looking good. :thumbsup:
Neil
Member of WA FB/EK Car Club
Frankenstein EK V6 Ute
FB Station Wagon Project
1950's Commer Light Truck (2.5 Ton)
User avatar
Errol62
Posts: 9899
Joined: Sat Dec 06, 2014 2:44 pm
State: SA
Location: Adelaide

Re: Ammo's Ute

Post by Errol62 »

Hats off to you doing the mods yourself Roger. I like to stay stock because it’s easier and I’m lazy, part of the reason at least.


FB ute fixer upper, EK van on rotisserie
getting my FB ute on the road
EK van on rotisserie
In the Shed
Posts: 1914
Joined: Wed May 16, 2012 10:18 pm
State: SA
Location: South Australia

Re: Ammo's Ute

Post by In the Shed »

Hey Roger
Yes did note the early signs of tail light mods and say good onya for having a crack at your own metal work whatever your aiming at. As you say it looks easy on the TV! For me I like a stock ute, even if I have to remind myself of the fun driving it with no heater, drum brakes and the factory fitted no performance grey donk........ all part of the 60's experience! :thumbsup:

Regards
Stephen
A day in the shed beats a day at work!
Blacky
Posts: 12429
Joined: Tue Jul 20, 2004 8:58 am
State: WA
Location: up in the Perth hills

Re: Ammo's Ute

Post by Blacky »

I have seen this ute in the flesh and know what Roger is talking about but I will keep quiet ..........
When you're faced with an unpleasant task that you really don't want to do, sometimes you just have to dig deep down inside and somehow find the patience to wait for someone else to do it for you.


Foundation member #61 of FB/EK Holden club of W.A.
User avatar
FJWALLY
Posts: 1833
Joined: Wed Nov 11, 2015 4:54 pm
State: VIC
Location: Forest Hill

Re: Ammo's Ute

Post by FJWALLY »

Those taillights look Killer Roger - very nice touch.
You will find me lost somewhere!
User avatar
Wrongway Roger
Posts: 710
Joined: Fri Jun 20, 2014 7:06 pm
State: SA
Location: Adelaide

Re: Ammo's Ute

Post by Wrongway Roger »

Hi,
Steve – stock is good and I do appreciate a rebuild but subtle custom is for me.

The change to a rear FC sedan bumper, which has been done before a number of times, but I do not like the over ridders.
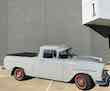
Clay scored the bumperettes for his ute.

I looked at Neil’s rear bumper on Frank but not sure on the painted finish.
There are spray on chrome like Hydrochrome and Exteme Hyrochrome out of the UK but for $600 + shipping maybe a little expensive just to try.
https://www.youtube.com/watch?v=A6kypid0XG0

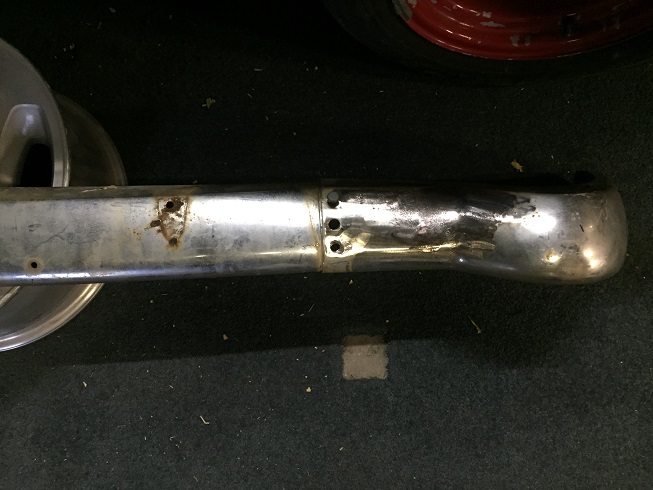
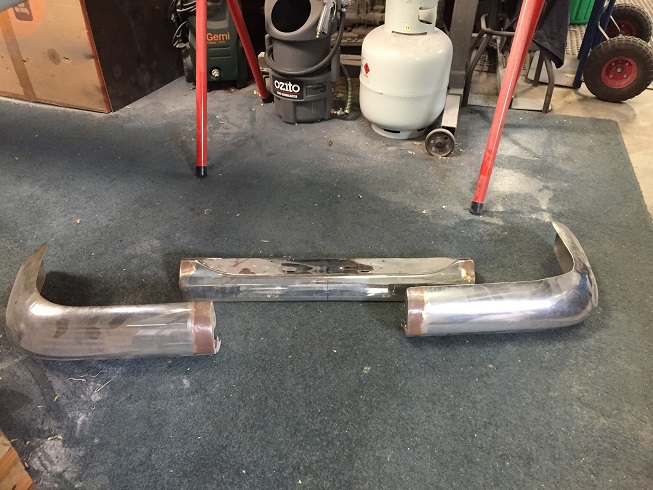
Purchased this one from Cary, one of our club members and straightened it.
FC Bumper 1.JPG
FC Bumper 1.JPG (115.46 KiB) Viewed 975 times
FC Bumper 2.JPG
FC Bumper 2.JPG (102.12 KiB) Viewed 975 times
I did consider a single piece bumper but the re-chrome cost sky rocketed to a quote of $1,300 +
Straighten and narrowed it, to tuck the ends in closer to the body and then chromed.
I lowered the number plate surround, to remove the gap between the top of the bumper and the bottom on the surround. Normally you would see the body but as I intend to use the narrow number plates I wanted to clean this up.
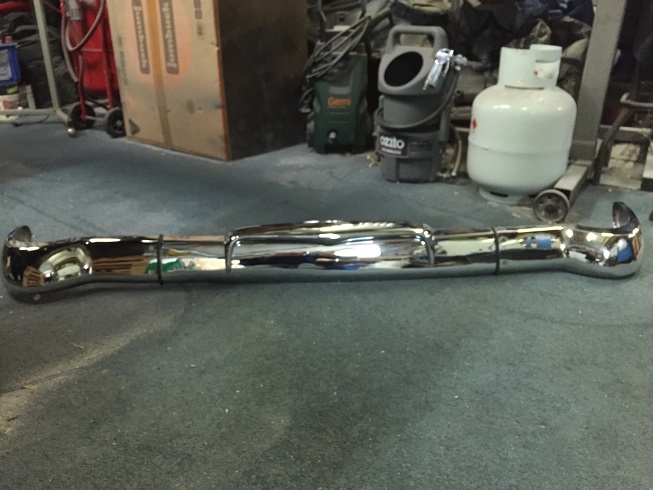
rear bumper.JPG
rear bumper.JPG (106.22 KiB) Viewed 975 times
I will still use the domed bolts to attach the bumper and Anne-Marie like’s bling and the chrome bumpers hits to spot.

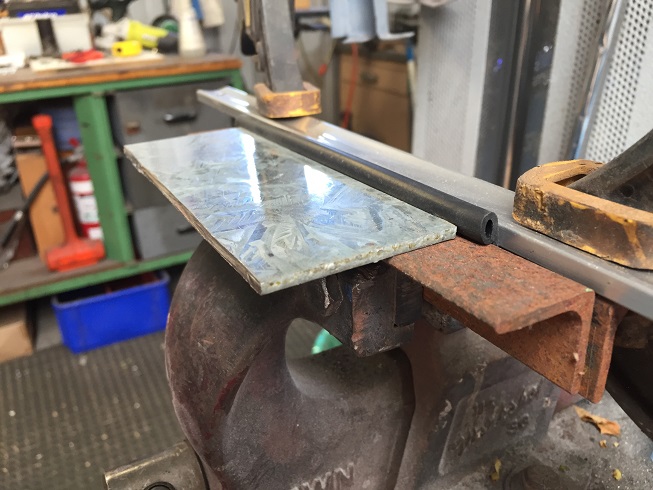
The front bumper has been narrowed and off the A Class Plating this week.
Front bumper.JPG
Front bumper.JPG (149.26 KiB) Viewed 975 times
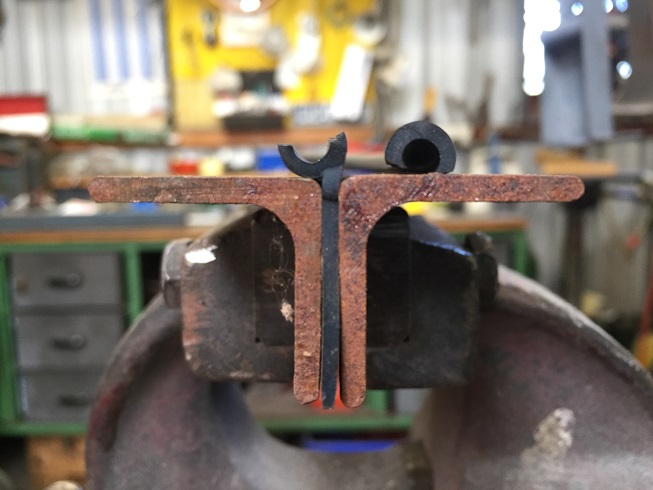
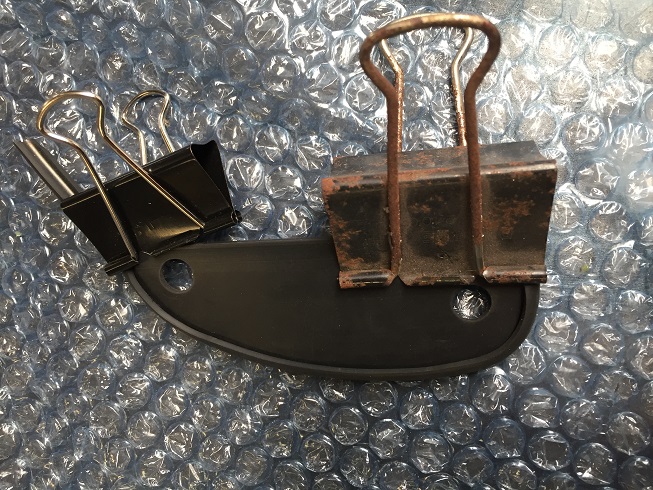
Did not like the joining faces on the rear bumper so made a couple of gaskets.
Needed to slice the rubber from one section into a ¾ curve and glue to the flat section.
Needs a little tweaking but happy so far.
Gasket 1.JPG
Gasket 1.JPG (119.91 KiB) Viewed 975 times
gasket 4.JPG
gasket 4.JPG (88.07 KiB) Viewed 975 times
gasket 3 (2).JPG
gasket 3 (2).JPG (194.87 KiB) Viewed 975 times
Lots more time spent that I anticipate to modify the bumpers. A lot of weld, grind, re-weld, file and hand sanding.
But as we know with chrome you only get a good result if the substrate is smooth.

Cheers,
Roger
There is a right way and a wrong way and then there is my way which is usually the long way.
User avatar
Wrongway Roger
Posts: 710
Joined: Fri Jun 20, 2014 7:06 pm
State: SA
Location: Adelaide

Re: Ammo's Ute

Post by Wrongway Roger »

Hi,

I have modified a HR front pan which again seemed a simple task but they are much wider and have substantially different corners.
Once I had cut it in half and started working the metal, I did enjoy shaping, cutting and welding to achieve the desired curves. My bottom lip dropped somewhat when I looked at the other un-started piece and realised, I had to repeat the curve but in the opposite direction.
Currently sitting in rough fill.
front pan 1.JPG
front pan 1.JPG (164.99 KiB) Viewed 945 times
front pan 2.JPG
front pan 2.JPG (133.46 KiB) Viewed 945 times
Second fill and sand completed.
front pan 3.JPG
front pan 3.JPG (126.39 KiB) Viewed 945 times
I’m considering adding driving lights somewhere on the front so maybe in this pan or in the indicator housing.
Another consideration is HD - EH style in the pan and a set of side indicators in the front guards. This would allow the driving lights to go into the indicator housing.

A little cold in Adelaide today so I cleaned off the heaters and set them going.
Running cost is around 50 cents an hour so fairly inexpensive.
heater.JPG
heater.JPG (82.64 KiB) Viewed 945 times
Cheers,
Roger
There is a right way and a wrong way and then there is my way which is usually the long way.
User avatar
Errol62
Posts: 9899
Joined: Sat Dec 06, 2014 2:44 pm
State: SA
Location: Adelaide

Ammo's Ute

Post by Errol62 »

Fantastic ideas there Roger. I toyed with the front pan idea, using an inverted fb cowl vent. Nowhere near the right shape and pretty flimsy, but the louvres would have looked nice.

Radiant heaters are a great idea.


FB ute fixer upper, EK van on rotisserie
getting my FB ute on the road
EK van on rotisserie
User avatar
Wrongway Roger
Posts: 710
Joined: Fri Jun 20, 2014 7:06 pm
State: SA
Location: Adelaide

Re: Ammo's Ute

Post by Wrongway Roger »

Hi,
Interior changes started with the bench seat now out of Mazda BT50. This gives me a drop down centre arm rest.
I may modify the arm rest to include cup holders and possibly some storage space for wallet, phone, etc.
Modified the seat mounts to match up to the existing bolt holes.
Seat 1.JPG
Seat 1.JPG (109.96 KiB) Viewed 935 times
Seat 2.JPG
Seat 2.JPG (114.07 KiB) Viewed 935 times
I have not decided on the shifter yet but did purchase a B&M Quicksilver some time back. Looking at it now it seems too chunky so I’m leaning towards a Lokar unit. Much simpler smoother lines but costly.
This is why the tunnel has not been opened up.

Using side mounted handbrake – HQ style from a Mazda, I think. It was centre mounted with the cable going through steel flex tube to the rear wheels.
Hand brake 6.jpg
Hand brake 6.jpg (65.68 KiB) Viewed 935 times
I do not like to look of the standard diagonal cross wire for the hand brake so this is what I’m currently working on.
Transfer the chalk drawing on the bench to paper.
Layout.JPG
Layout.JPG (89.27 KiB) Viewed 935 times
I will use a pair of the pivot wheels from the firewall and mount these through the floor in the tub.
pivot 2.JPG
pivot 2.JPG (133.59 KiB) Viewed 935 times
I will need to check the tail shaft clearance before proceeding so I’m packing this away of the time being.

Back to blocking now.

Cheers,
Roger
There is a right way and a wrong way and then there is my way which is usually the long way.
62ekute
Posts: 636
Joined: Thu May 23, 2019 6:58 pm
State: ACT

Re: Ammo's Ute

Post by 62ekute »

Nice work Roger...mmm...a heater (mmm...a roof). I should have thought about it before filling the garage with a pool table and working on cars in the driveway. Did you bring that dented bumper back to life yourself or did you outsource that? Patrick
User avatar
Wrongway Roger
Posts: 710
Joined: Fri Jun 20, 2014 7:06 pm
State: SA
Location: Adelaide

Re: Ammo's Ute

Post by Wrongway Roger »

Hi Patrick,
With the help of my son holding the bumper and I with BFH and oxy torch, we were able to save the bumper.
Pounded out the biggest dents then put it aside to consider further action. If I stay with one thing for too long, I give a little pissed that the progress in slow and this gives me time to look to ensure I'm going in the right direction.
A lot of welding and filing to get the shape back. There were a lot of small dents that don't show in the photo's.

I'm a tight arse so don't out source unless it can't be done in the shed, like chrome plating or panel dripping.

Too cold to do a lot today but did spend time measuring the diff and the wheel arches for new wheels.
Tried a heap of wheels, steel and alloy, that I have but nothing fits. Most have the tyre sitting outside of the rear guard
Calculating off set and back spacing with rim width.

Cheers,
Roger
There is a right way and a wrong way and then there is my way which is usually the long way.
In the Shed
Posts: 1914
Joined: Wed May 16, 2012 10:18 pm
State: SA
Location: South Australia

Re: Ammo's Ute

Post by In the Shed »

Good work Roger,
That bench seat looks good. Hmmm...... cup holders would be handy. I've tried juggling my keep a cup between my legs, but it ain't easy with vinyl seats, hot cup burning the wedding tackle whilst shifting gears & steering.

I'm with you, I like to have ago fixing things myself before farming jobs out. Save a few bucks but it is very satisfying turning a job around yourself.

Regards
Stephen
A day in the shed beats a day at work!
User avatar
FireKraka
Posts: 2275
Joined: Fri Jan 24, 2014 11:12 am
State: WA
Location: Serpentine, WA

Re: Ammo's Ute

Post by FireKraka »

Hi Roger I'm with you 'home built not cheque book built' as far as I can with my limited experience and skills.

Always tell the wife I am building on a budget and use a lot of second hand parts etc.

Keep up the photo posting mate and I think we should have our one Ute Nationals one of these days there seems to be a lot around now all coming out of the woodwork.

Neil
Member of WA FB/EK Car Club
Frankenstein EK V6 Ute
FB Station Wagon Project
1950's Commer Light Truck (2.5 Ton)
Blacky
Posts: 12429
Joined: Tue Jul 20, 2004 8:58 am
State: WA
Location: up in the Perth hills

Re: Ammo's Ute

Post by Blacky »

OK - no-one else has twigged so I will ask the question

" Wow Wrongway, the back of that ute looks so clean and uncluttered - how in the world did you hide the tailgate hinges ??????? "

8) 8) 8) 8)
When you're faced with an unpleasant task that you really don't want to do, sometimes you just have to dig deep down inside and somehow find the patience to wait for someone else to do it for you.


Foundation member #61 of FB/EK Holden club of W.A.
User avatar
Wrongway Roger
Posts: 710
Joined: Fri Jun 20, 2014 7:06 pm
State: SA
Location: Adelaide

Re: Ammo's Ute

Post by Wrongway Roger »

Blacky, hate say but little progress on the tail gate hinges, other than a couple of mock ups.
I have a deep respect to the engineers back in the day, who designed boot and door hinges.
I only sat the tailgate in position to get the taillight photo's.

Mechanical upgrades started with HR disc front end and narrowed commodore, rear mounted steering rack.
It has 202 and trimatic auto so Anne-Marie is OK with this. I do have a small SC14 super charger which may or may not be added.
I have done the reverse leaf changes on the HR rear and lower springs in the front. I will see how it sits once all the drive train it in but I want it low.

For the brake system, I’m using Gemini booster on the PBR dual master cylinder.
Modified a HQ brake pedal to clear the steering column as I moved the booster across and had the front calipers rebuilt.
brake set up 1.JPG
brake set up 1.JPG (205.9 KiB) Viewed 876 times
I’m using a VL commie column as I wanted a clean look on the column, one thin lever only.
gauge 3.JPG
gauge 3.JPG (128.46 KiB) Viewed 876 times
Replacing the switches on the dash with gauges
gauge 2.JPG
gauge 2.JPG (103.97 KiB) Viewed 876 times
The steering linkages are VL top to VK bottom with Borgrson style uni joint for support.
Steering 3.JPG
Steering 3.JPG (144.45 KiB) Viewed 876 times
Steering 4.JPG
Steering 4.JPG (130.16 KiB) Viewed 876 times
Steering 6.JPG
Steering 6.JPG (148.67 KiB) Viewed 876 times
Steering 7.JPG
Steering 7.JPG (144.95 KiB) Viewed 876 times
Moved fuel inlet to inside of the tub with flex tube to connect it to the tank
Fuel filler 1.JPG
Fuel filler 1.JPG (114.2 KiB) Viewed 876 times
Will go with standard tank but may increase later if needed.

Hope everyone is enjoying seeing the progress and changes in my build.

Cheers,Roger
There is a right way and a wrong way and then there is my way which is usually the long way.
Post Reply