Page 12 of 12
Re: Dave's Orange Betty EK Sedan
Posted: Sat Jul 22, 2023 5:53 pm
by Blacky
nice work mate


Re: Dave's Orange Betty EK Sedan
Posted: Thu Jul 27, 2023 7:45 am
by Orange Betty
All tidied up now

- 1.jpg (83.06 KiB) Viewed 4510 times
But now have this mess to deal with

- 2.jpg (58.94 KiB) Viewed 4510 times
Had to cut a section out of the rear cross support where the upright brace attached.

- 3.jpg (65.75 KiB) Viewed 4510 times
another day, another patch...
Dave
Re: Dave's Orange Betty EK Sedan
Posted: Thu Jul 27, 2023 7:30 pm
by funkyscooter
Tank is looking good Dave! Is the filler slightly to the right of center, or is it the way they have done the ribs in the top of the tank?
I have the same issue with a rusted out upright but on the drivers side. Was thinking of cutting a section out of the back of the car for access to the upright. Can't see how I could get a mig torch in there. Watching with interest!
Re: Dave's Orange Betty EK Sedan
Posted: Thu Jul 27, 2023 8:18 pm
by ardiesse
Gentlemen,
The rusted-out-upright-and-rear-box-section repair is on "Found Object" at FE-FC. Actually, it's easier on an EK, because the upright doesn't appear to be spot-welded to the rear of the body like it is on an FC.
Executive Summary: Remove a section of the box-section "floor" from under the car. Drill the box-section repair for plug-welds. Repair the rusty upright. Weld in the box-section repair. Clamp the upright in place. Working from the inside of the box-section, plug-weld the upright to the box section repair. The welds at the boot lip are easy. Re-weld the box-section "floor".
Rob
Re: Dave's Orange Betty EK Sedan
Posted: Thu Jul 27, 2023 9:09 pm
by Brett027
Same piece on Wilma. Remember it well. Had a look at Orange Betty today- tank mods look fantastic.
Re: Dave's Orange Betty EK Sedan
Posted: Fri Jul 28, 2023 10:26 am
by ardiesse
Will you be able to pass the taillight wiring harness through or past the upright section?
Rob
Re: Dave's Orange Betty EK Sedan
Posted: Fri Jul 28, 2023 1:02 pm
by Orange Betty
funkyscooter wrote: Thu Jul 27, 2023 7:30 pm
Tank is looking good Dave! Is the filler slightly to the right of center, or is it the way they have done the ribs in the top of the tank?
I have the same issue with a rusted out upright but on the drivers side. Was thinking of cutting a section out of the back of the car for access to the upright. Can't see how I could get a mig torch in there. Watching with interest!
Thanks Scott. Yep tank filler is 40mm offset to the right but lines up perfectly when using the original right side fuel tank rail.
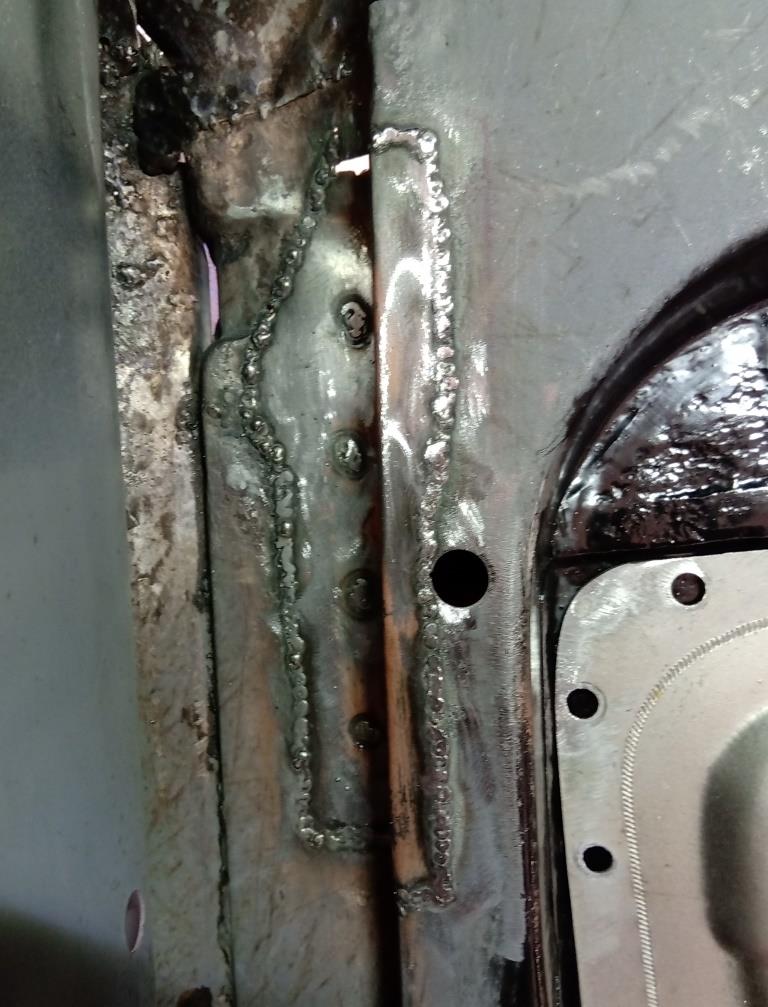
I just managed to get the mig nozzle in to weld up the sides of that rear box section I had cut out, not the best angle tho. Probably did it the hard way but it wasn't too bad.

- 1.jpg (105.64 KiB) Viewed 4455 times
Upright repair similar to Brett although I'm just going to lap it over the original bit remaining.

- 2.jpg (97.17 KiB) Viewed 4455 times
It's not quite a straight shot for the upright to the rear box section requiring the bottom of the upright to have little bend to it. I think if I weld the upright flanges to the box section first then I can massage the 'feet' down to get some plug welds in.
ardiesse wrote: Fri Jul 28, 2023 10:26 am
Will you be able to pass the taillight wiring harness through or past the upright section?
Rob
Yep still plenty of room behind the upright.
Cheers
Dave
Re: Dave's Orange Betty EK Sedan
Posted: Sat Jul 29, 2023 5:08 pm
by Orange Betty
All done

- 3.jpg (60.81 KiB) Viewed 4430 times
And a nice black coat hides a multitude of sins...
Dave
Re: Dave's Orange Betty EK Sedan
Posted: Sat Jul 29, 2023 6:25 pm
by Brett027
You've done a great job on this tank conversion and boot repair Dave. Great skills.
Re: Dave's Orange Betty EK Sedan
Posted: Sat Jul 29, 2023 9:57 pm
by Errol62
Nice to finish that off. Tricky repair behind the beaver. I like that you were able to avoid jigging around with the filler neck, and spare wheel won’t be missed. Keep going mate!
FB ute fixer upper, EK van on rotisserie

