Ol' Rusty - FB/EK Sedan

Post photos of your pride and joy, or updates on your rebuild!

Moderators: reidy, Blacky

User avatar
funkyscooter
Posts: 622
Joined: Wed Aug 16, 2017 8:12 am
State: NSW
Location: Sydney

Re: Ol' Rusty - FB/EK Sedan

Post by funkyscooter »

Nerd alert. Here is everything explain in pictures.
Delco.jpeg
Delco.jpeg (249.33 KiB) Viewed 5971 times
Maxtronic.jpeg
Maxtronic.jpeg (284.82 KiB) Viewed 5971 times
Maxtronic on.jpeg
Maxtronic on.jpeg (302.47 KiB) Viewed 5971 times
Washer Delay.jpeg
Washer Delay.jpeg (334.78 KiB) Viewed 5971 times
Washer Delay on.jpeg
Washer Delay on.jpeg (324.15 KiB) Viewed 5971 times
Washer Delay Off.jpeg
Washer Delay Off.jpeg (344.79 KiB) Viewed 5971 times
IMG_6885.jpeg
IMG_6885.jpeg (1.05 MiB) Viewed 5971 times
Scott
(Not so rusty) Ol' Rusty - FB/EK Sedan
Blacky
Posts: 13409
Joined: Tue Jul 20, 2004 8:58 am
State: WA
Location: up in the Perth hills

Re: Ol' Rusty - FB/EK Sedan

Post by Blacky »

Most impressive - far better than my childish scrawl on my post :clap: :clap: :clap:
I started with nothing and still have most of it left.


Foundation member #61 of FB/EK Holden club of W.A.
User avatar
FireKraka
Posts: 2650
Joined: Fri Jan 24, 2014 11:12 am
State: WA
Location: Serpentine, WA

Re: Ol' Rusty - FB/EK Sedan

Post by FireKraka »

My grease monkey brain just had a seizure :wtf: :crazy: :crazy: :crazy:
Member of WA FB/EK Car Club
Frankenstein EK V6 Ute
The Reverend FB Station Wagon Project
1950's Commer Light Truck (2.5 Ton)
User avatar
Errol62
Posts: 10885
Joined: Sat Dec 06, 2014 2:44 pm
State: SA
Location: Adelaide

Re: Ol' Rusty - FB/EK Sedan

Post by Errol62 »

Admire your concentration scooter. This all makes me giddy.


FB ute fixer upper, EK van on rotisserie
getting my FB ute on the road
EK van on rotisserie
User avatar
funkyscooter
Posts: 622
Joined: Wed Aug 16, 2017 8:12 am
State: NSW
Location: Sydney

Re: Ol' Rusty - FB/EK Sedan

Post by funkyscooter »

Drawing pictures helps me make sense of things :egeek: It will hopefully help me remember when its time to wire it into the car.
It's been a bit of a head scratcher that's for sure.

Now its back to the fuel tank. Was hoping to do a height measurement today, but I can't for the life of me work out where the rear bump stops have gone.
Scott
(Not so rusty) Ol' Rusty - FB/EK Sedan
User avatar
funkyscooter
Posts: 622
Joined: Wed Aug 16, 2017 8:12 am
State: NSW
Location: Sydney

Re: Ol' Rusty - FB/EK Sedan

Post by funkyscooter »

Citric acid is great for cleaning up parts - until you forget to take them out. Pot metal rocker cover decorative nuts.... into the bin!
IMG_6931.jpeg
IMG_6931.jpeg (848.2 KiB) Viewed 476 times
IMG_6933.jpeg
IMG_6933.jpeg (848.23 KiB) Viewed 476 times
Scott
(Not so rusty) Ol' Rusty - FB/EK Sedan
User avatar
funkyscooter
Posts: 622
Joined: Wed Aug 16, 2017 8:12 am
State: NSW
Location: Sydney

Re: Ol' Rusty - FB/EK Sedan

Post by funkyscooter »

Last job on the intermittant wipers. 3D printed box to mount on firewall/center console. Maxtronic, my circuit and relay all stuffed in the box. Wired it up so if the box has a failure, it can be removed without changing the functionality of the 2 speed wipers.
IMG_6947.jpg
IMG_6947.jpg (1005.53 KiB) Viewed 475 times
Scott
(Not so rusty) Ol' Rusty - FB/EK Sedan
Blacky
Posts: 13409
Joined: Tue Jul 20, 2004 8:58 am
State: WA
Location: up in the Perth hills

Re: Ol' Rusty - FB/EK Sedan

Post by Blacky »

That’s a bastard 😟😟😟
I started with nothing and still have most of it left.


Foundation member #61 of FB/EK Holden club of W.A.
User avatar
Harv
Posts: 5488
Joined: Mon Oct 08, 2007 2:00 pm
State: NSW
Location: Sydney, Australia

Re: Ol' Rusty - FB/EK Sedan

Post by Harv »

funkyscooter wrote: Wed Jul 02, 2025 10:51 am Citric acid is great for cleaning up parts - until you forget to take them out. Pot metal rocker cover decorative nuts.... into the bin!
If you’ve really got your heart set on using those nuts, let me know. I think I’ve got a set here you are welcome to. They are packed under the house, so would need to remind me once the shed is built.

Cheers,
Harv
327 Chev EK wagon, original EK ute for Number 1 Daughter, an FB sedan meth monster project and a BB/MD grey motored FED.
User avatar
funkyscooter
Posts: 622
Joined: Wed Aug 16, 2017 8:12 am
State: NSW
Location: Sydney

Re: Ol' Rusty - FB/EK Sedan

Post by funkyscooter »

[/quote]

If you’ve really got your heart set on using those nuts, let me know. I think I’ve got a set here you are welcome to. They are packed under the house, so would need to remind me once the shed is built.

[/quote]

Thanks for the offer Harv - I might just take you up on that.
Scott
(Not so rusty) Ol' Rusty - FB/EK Sedan
In the Shed
Posts: 2131
Joined: Wed May 16, 2012 10:18 pm
State: SA
Location: South Australia

Re: Ol' Rusty - FB/EK Sedan

Post by In the Shed »

That’s a bummer…… how long were they in the citric acid?
A day in the shed beats a day at work!
User avatar
Errol62
Posts: 10885
Joined: Sat Dec 06, 2014 2:44 pm
State: SA
Location: Adelaide

Re: Ol' Rusty - FB/EK Sedan

Post by Errol62 »

Had the same issue with the die cast bars on an FB cowl vent.


Sent from my iPhone using Tapatalk
getting my FB ute on the road
EK van on rotisserie
User avatar
funkyscooter
Posts: 622
Joined: Wed Aug 16, 2017 8:12 am
State: NSW
Location: Sydney

Re: Ol' Rusty - FB/EK Sedan

Post by funkyscooter »

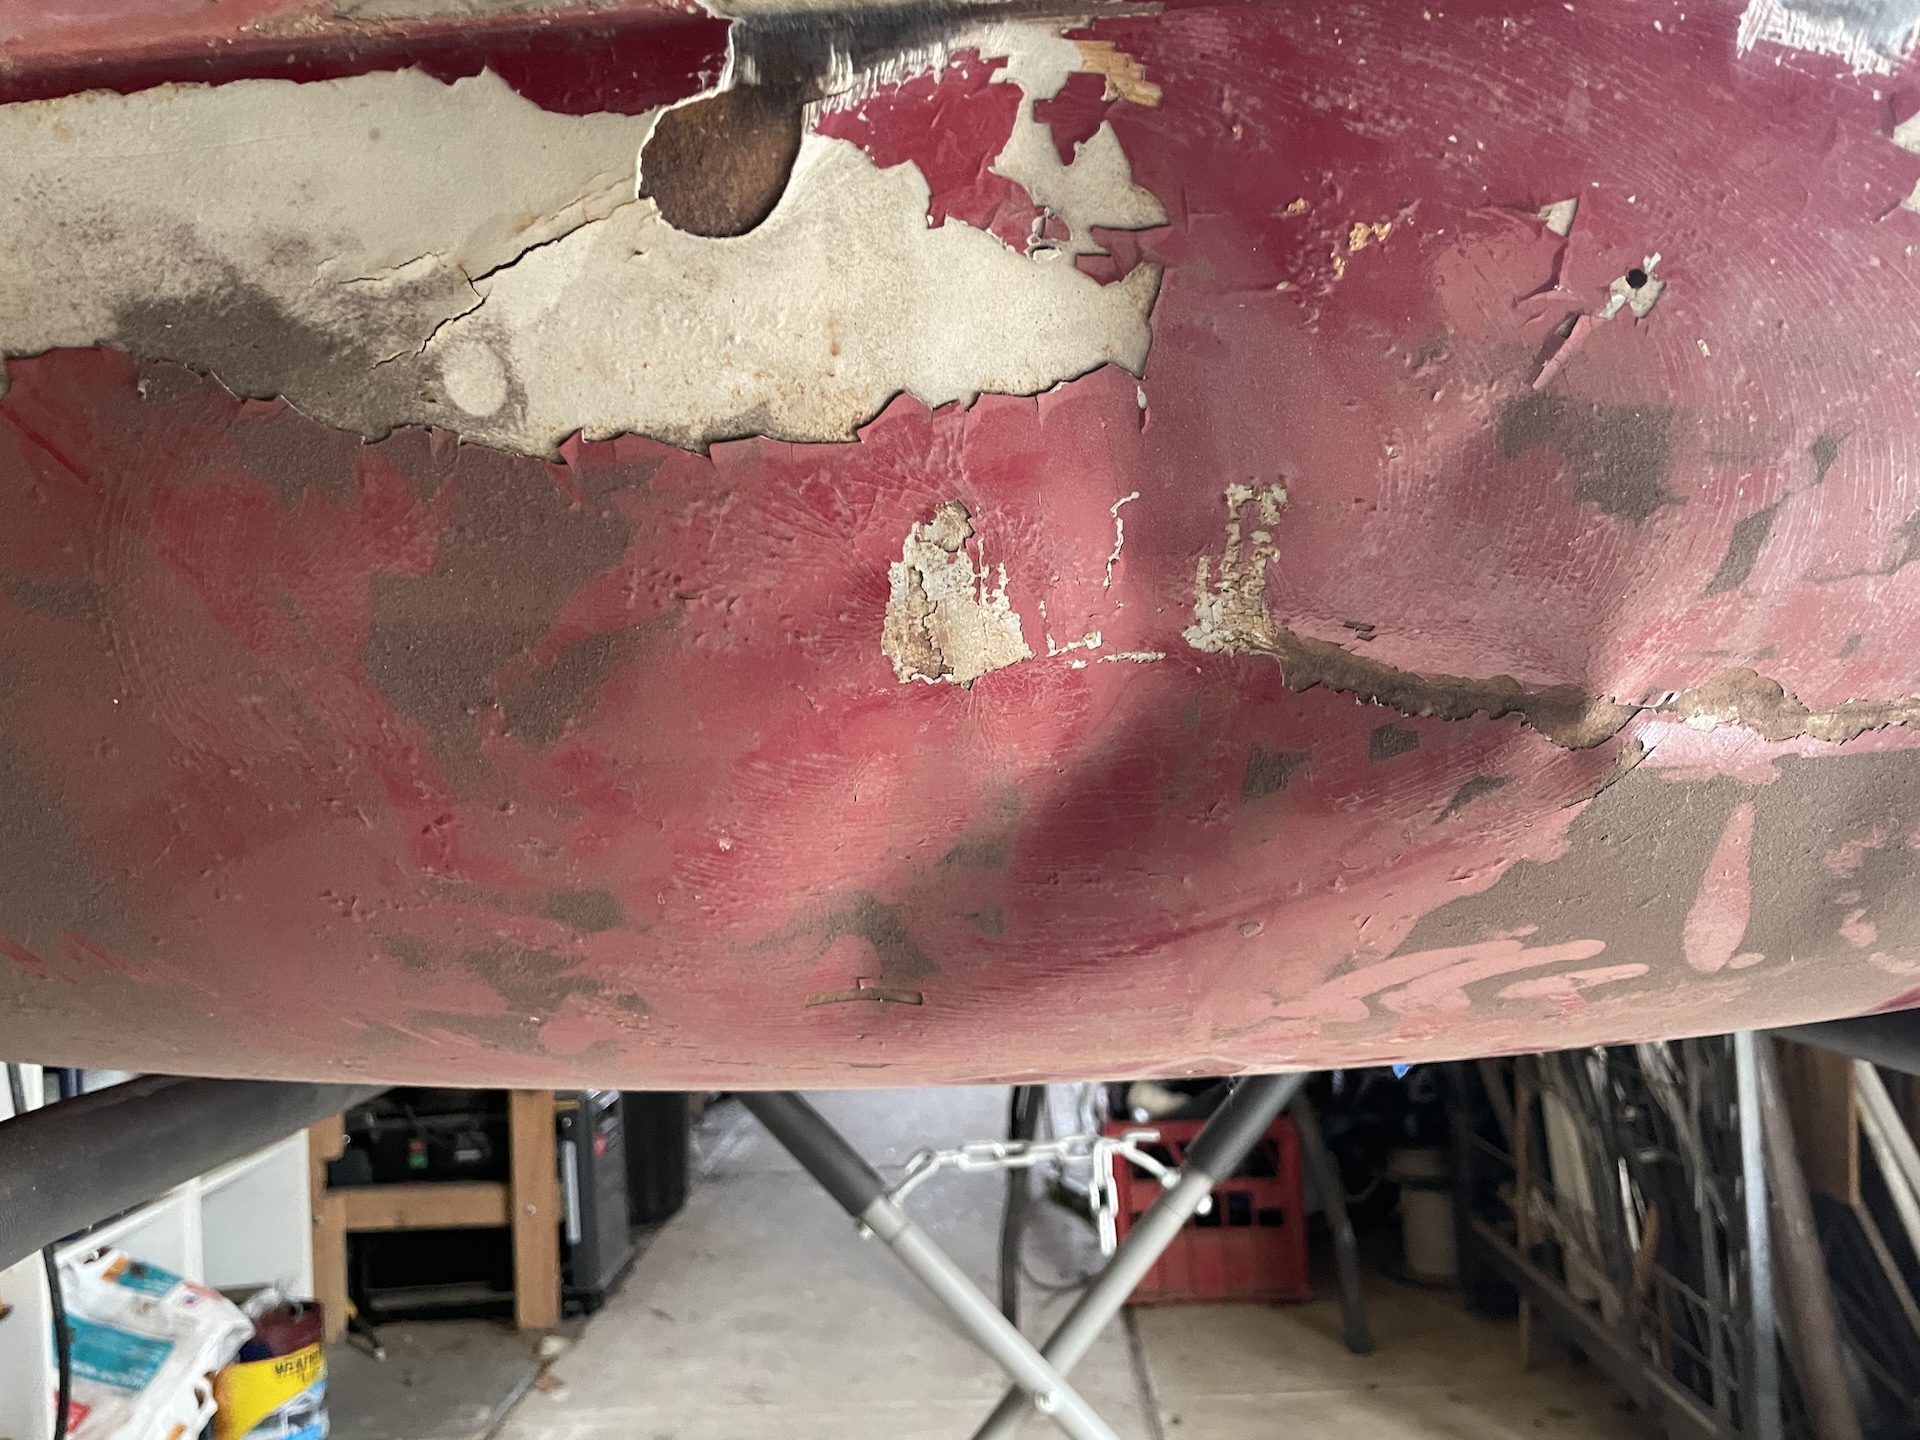
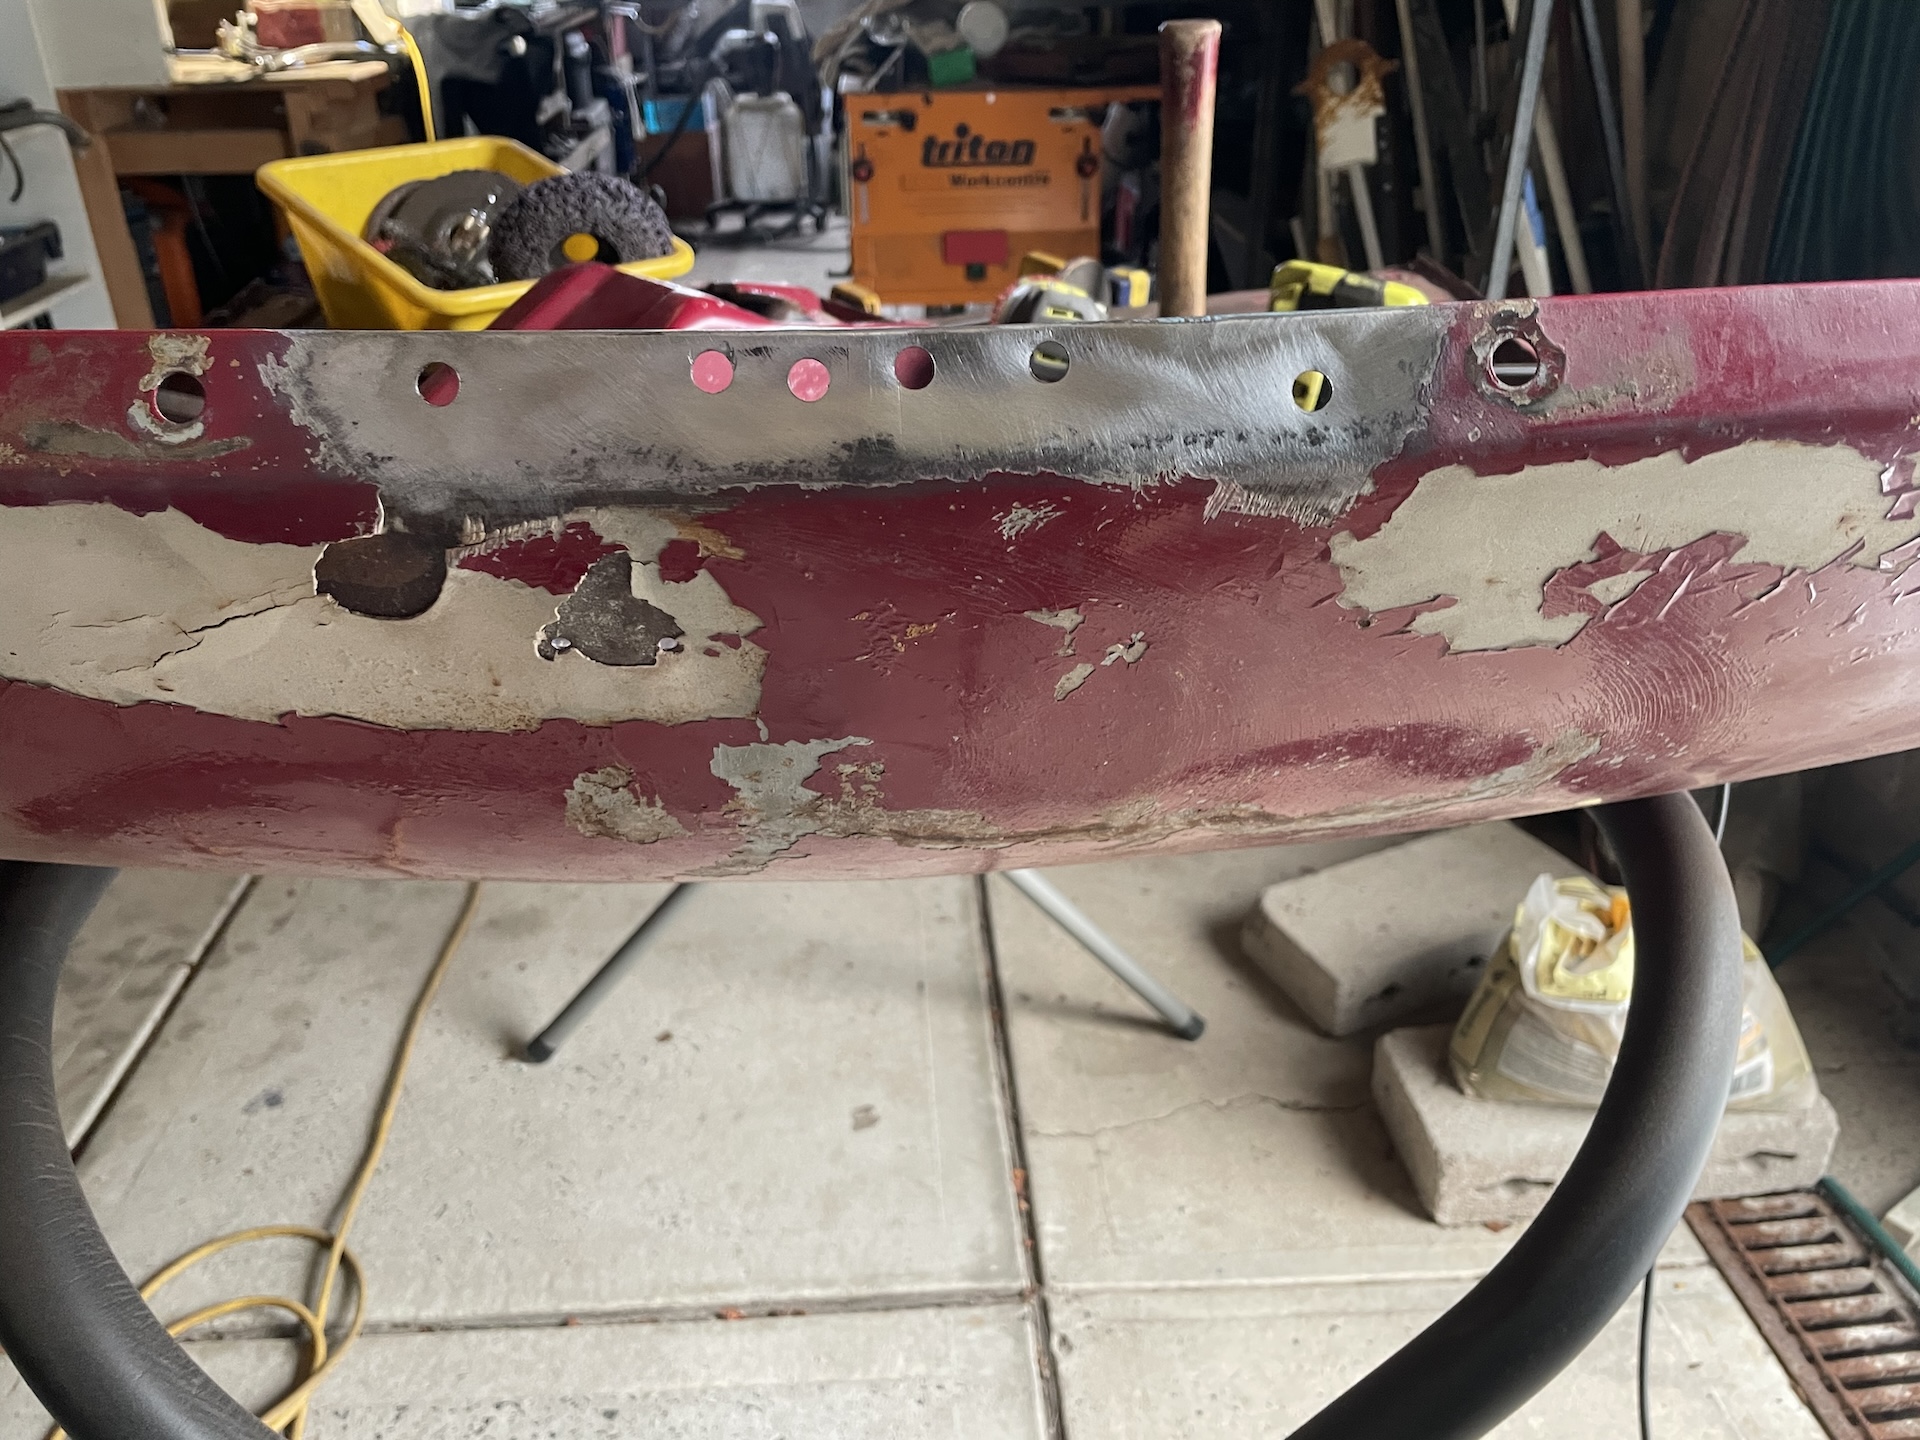
Few weeks back I went down and visited Brett and Project 2. 7 hour round trip to collect a bonnet, with a plan to use the front of it to repair my bonnet, which lost a fight many years ago with a garbage truck.

Idea was to take the skin of the donor and use my frame. But before I started with the transplant I decided, as the front of mine was in such bad shape, to have a go at repairing it as an exercise.

Failed to get a before photo, but here’s what it looked like after my first go at popping out the main dents. The main one released with a very loud and satisfying pop.
IMG_7428.jpeg
IMG_7428.jpeg (953.32 KiB) Viewed 270 times
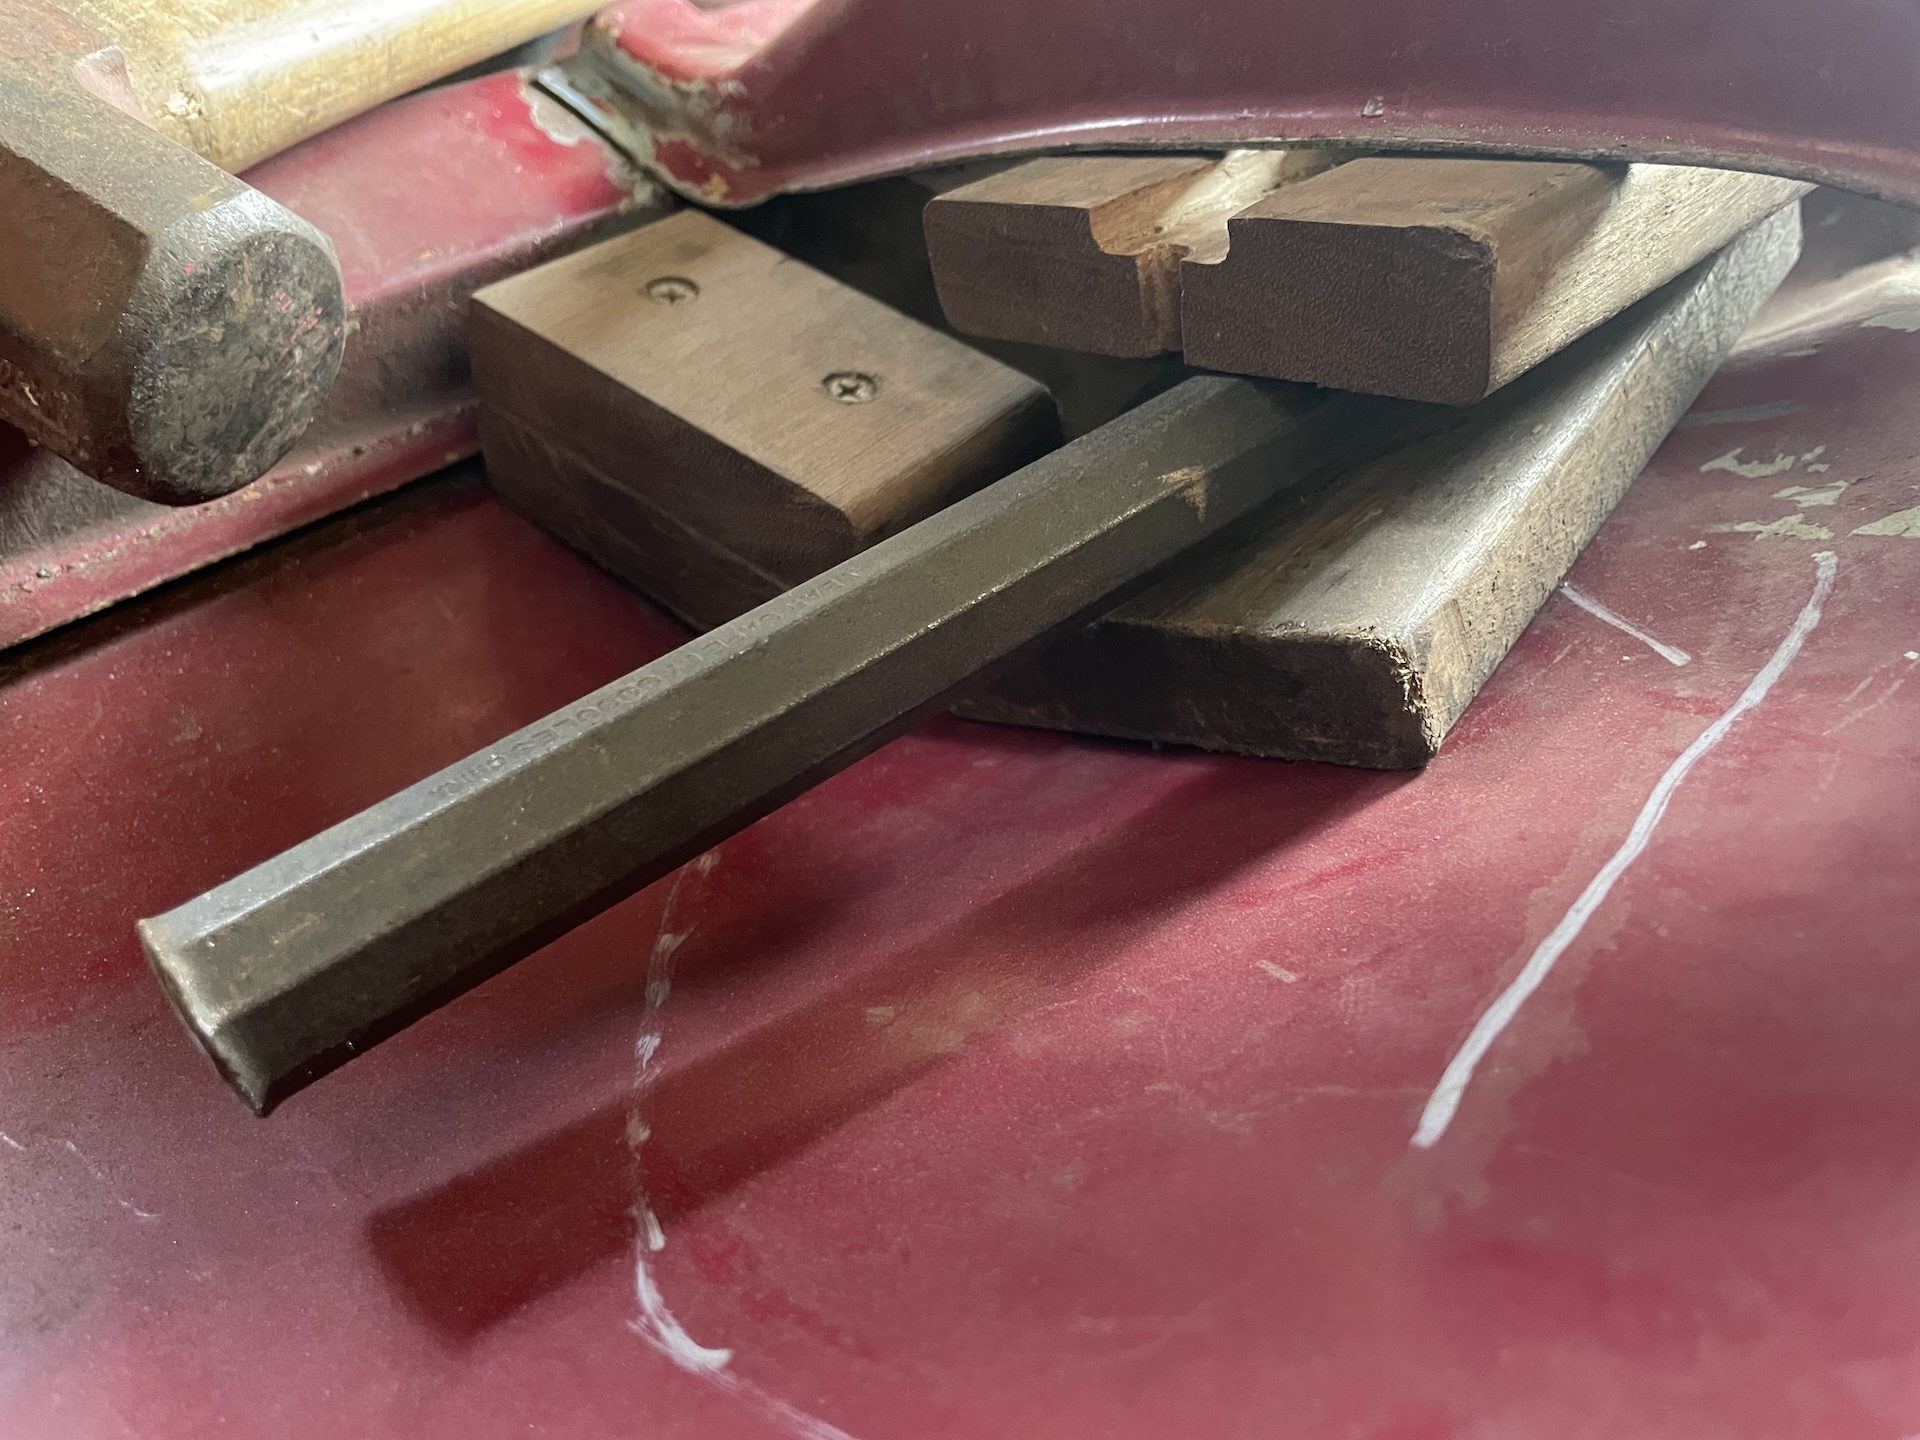
Method was to use hardwood wedges to force the dents out following the main crease lines. Didn’t want to just belt it with a hammer as it would only stretch the metal more.
IMG_7429.jpeg
IMG_7429.jpeg (824.14 KiB) Viewed 270 times
After round 2
IMG_7430.jpeg
IMG_7430.jpeg (887.99 KiB) Viewed 270 times
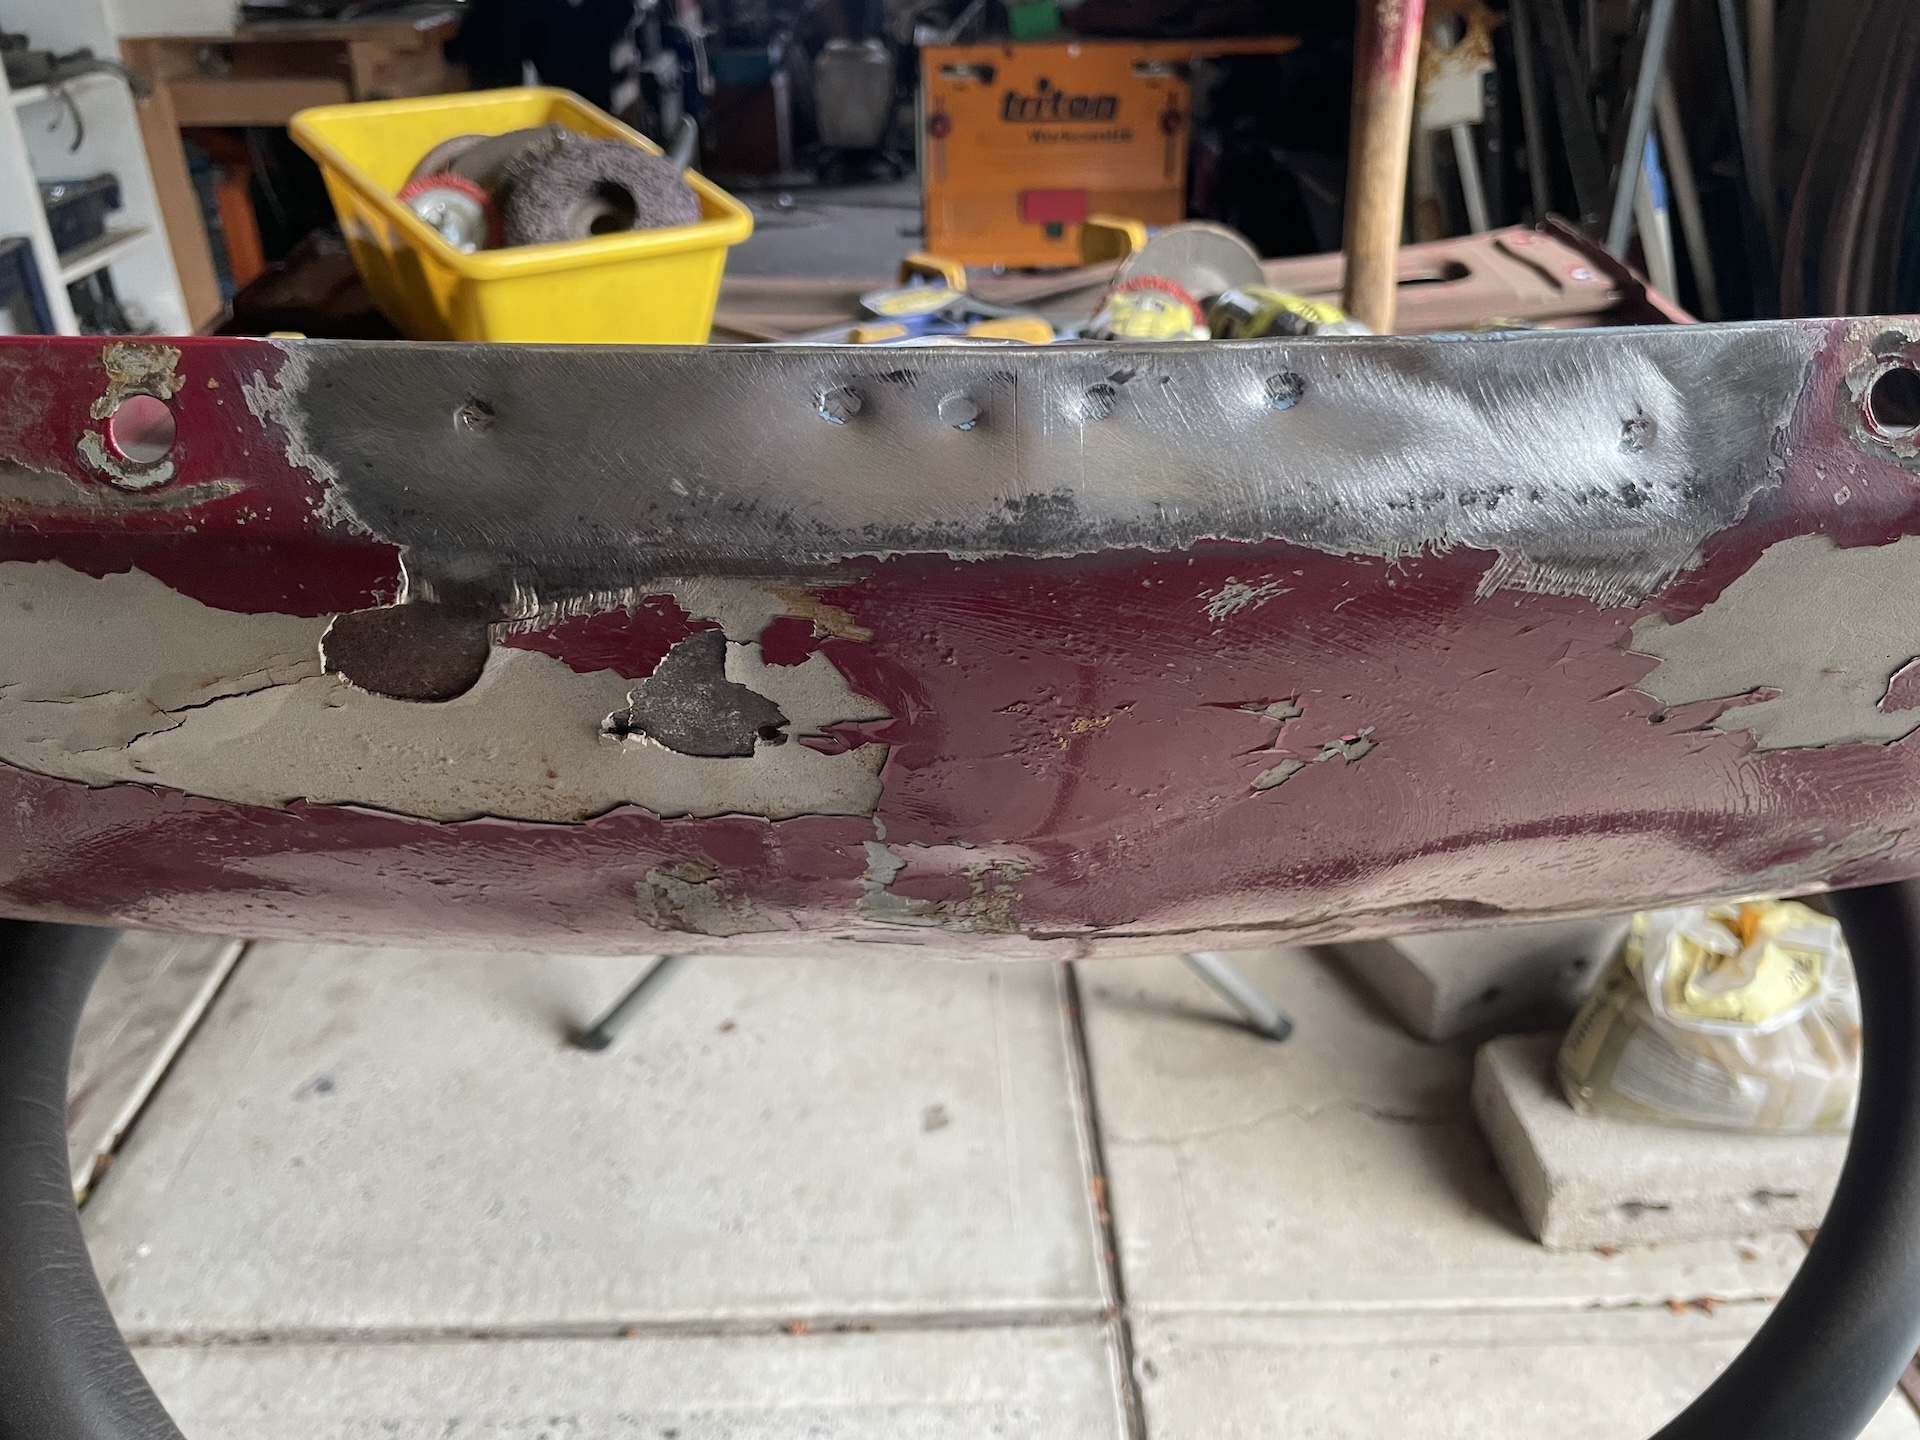
Off with the bonnet latch to get more access and time for some hammer/dolly. I ended up using the dolly as a hand held hammer to work broader dents out, and hammer/dolly to get the creases.
IMG_7433.jpeg
IMG_7433.jpeg (1.03 MiB) Viewed 270 times
IMG_7434.jpeg
IMG_7434.jpeg (888.04 KiB) Viewed 270 times
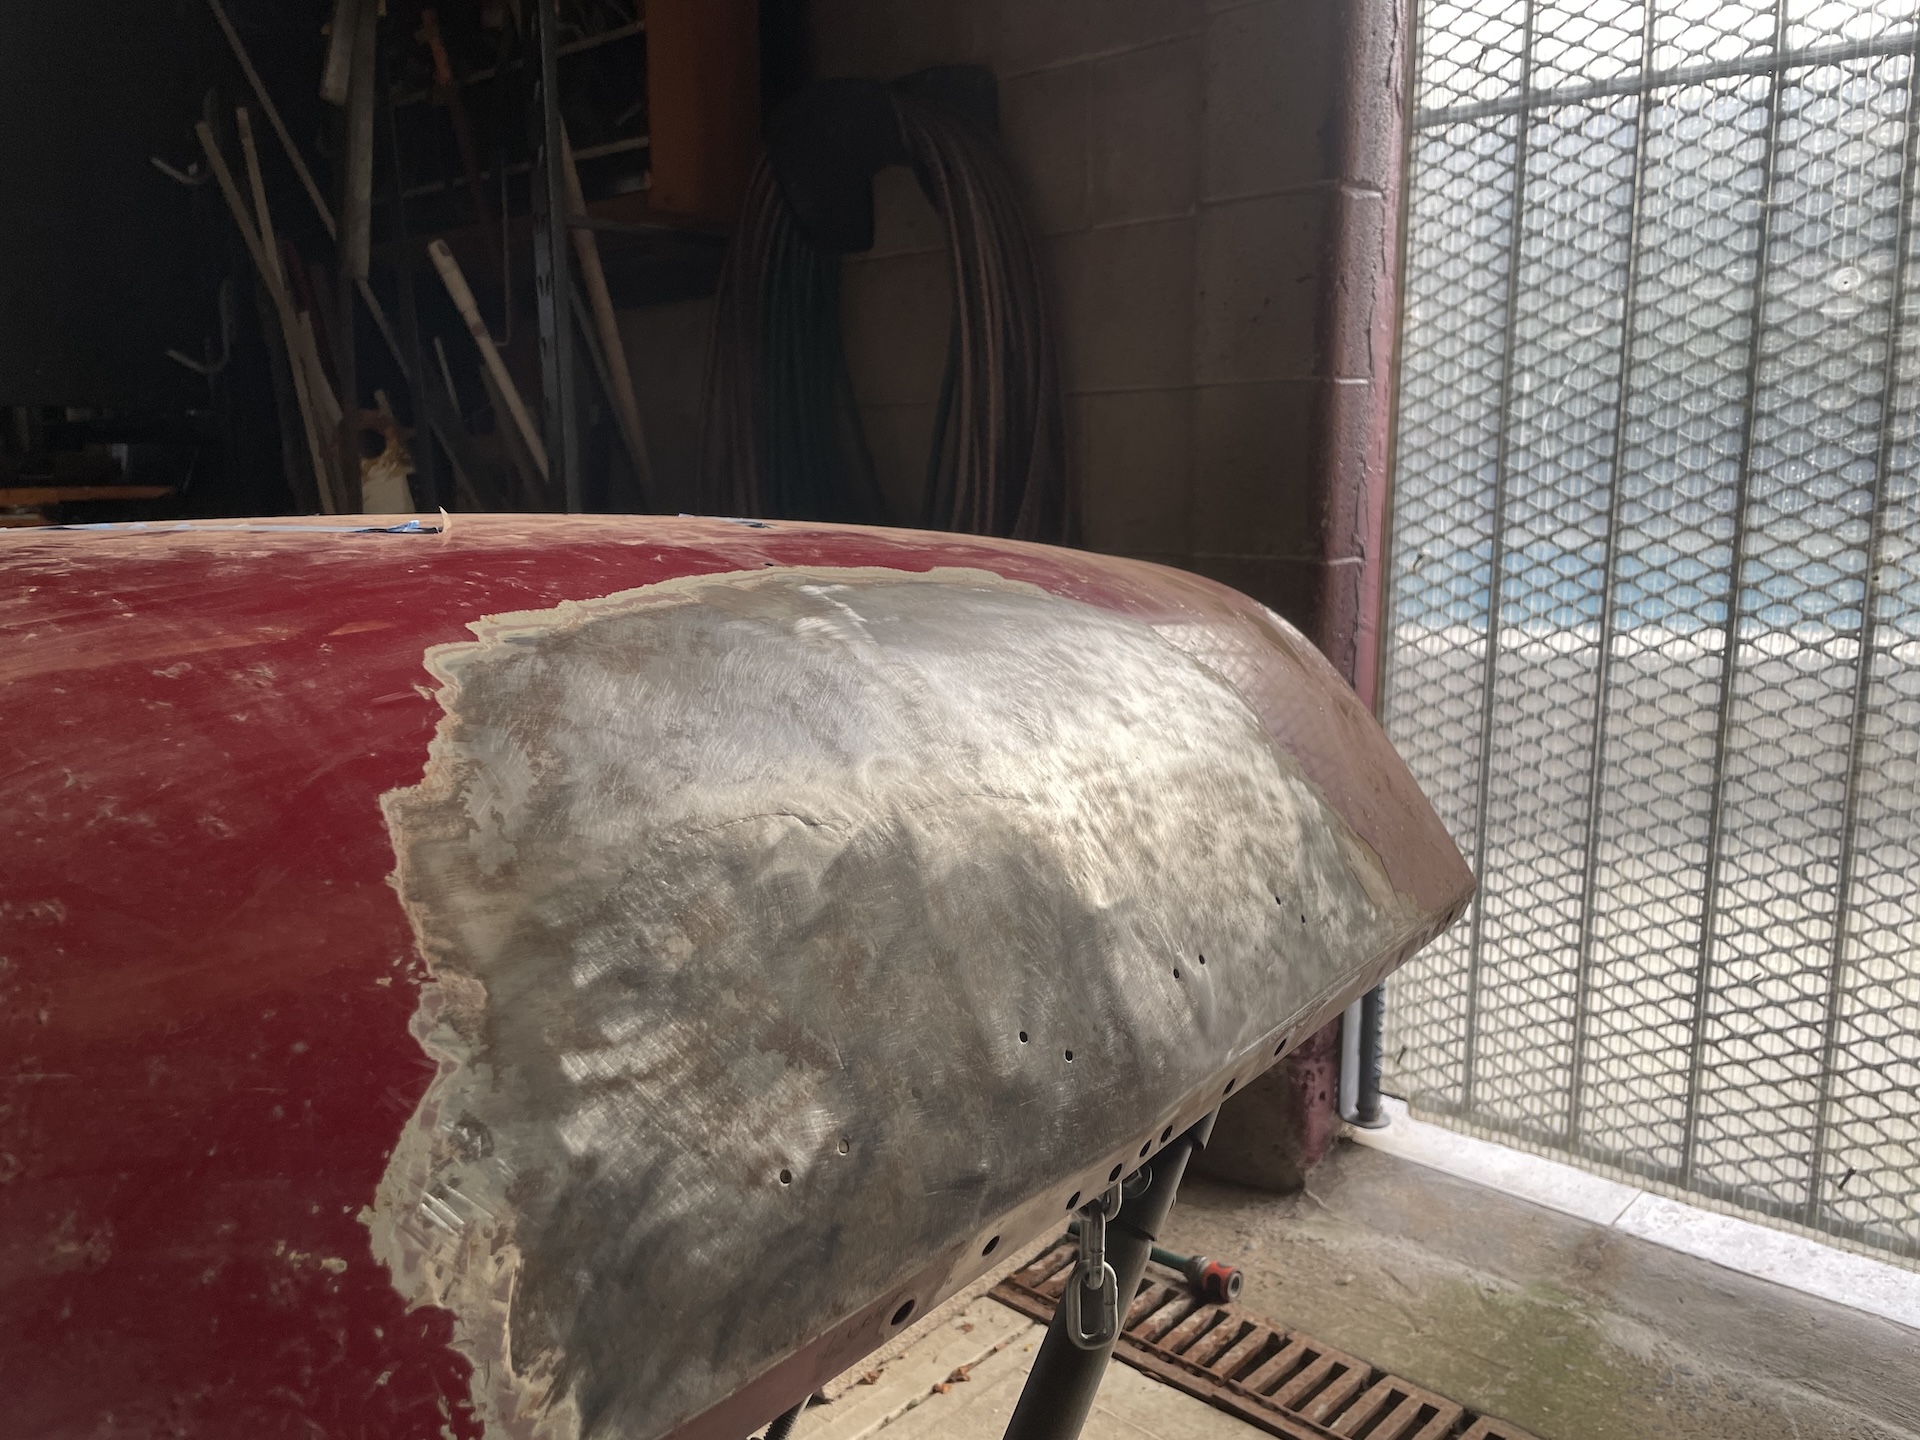
After another round things are starting to take shape. Missing the subtle centre line that fades in from the top of the nose to the bonnet bar. Starting to think maybe I can get this good enough.
IMG_7435.jpeg
IMG_7435.jpeg (875.96 KiB) Viewed 270 times
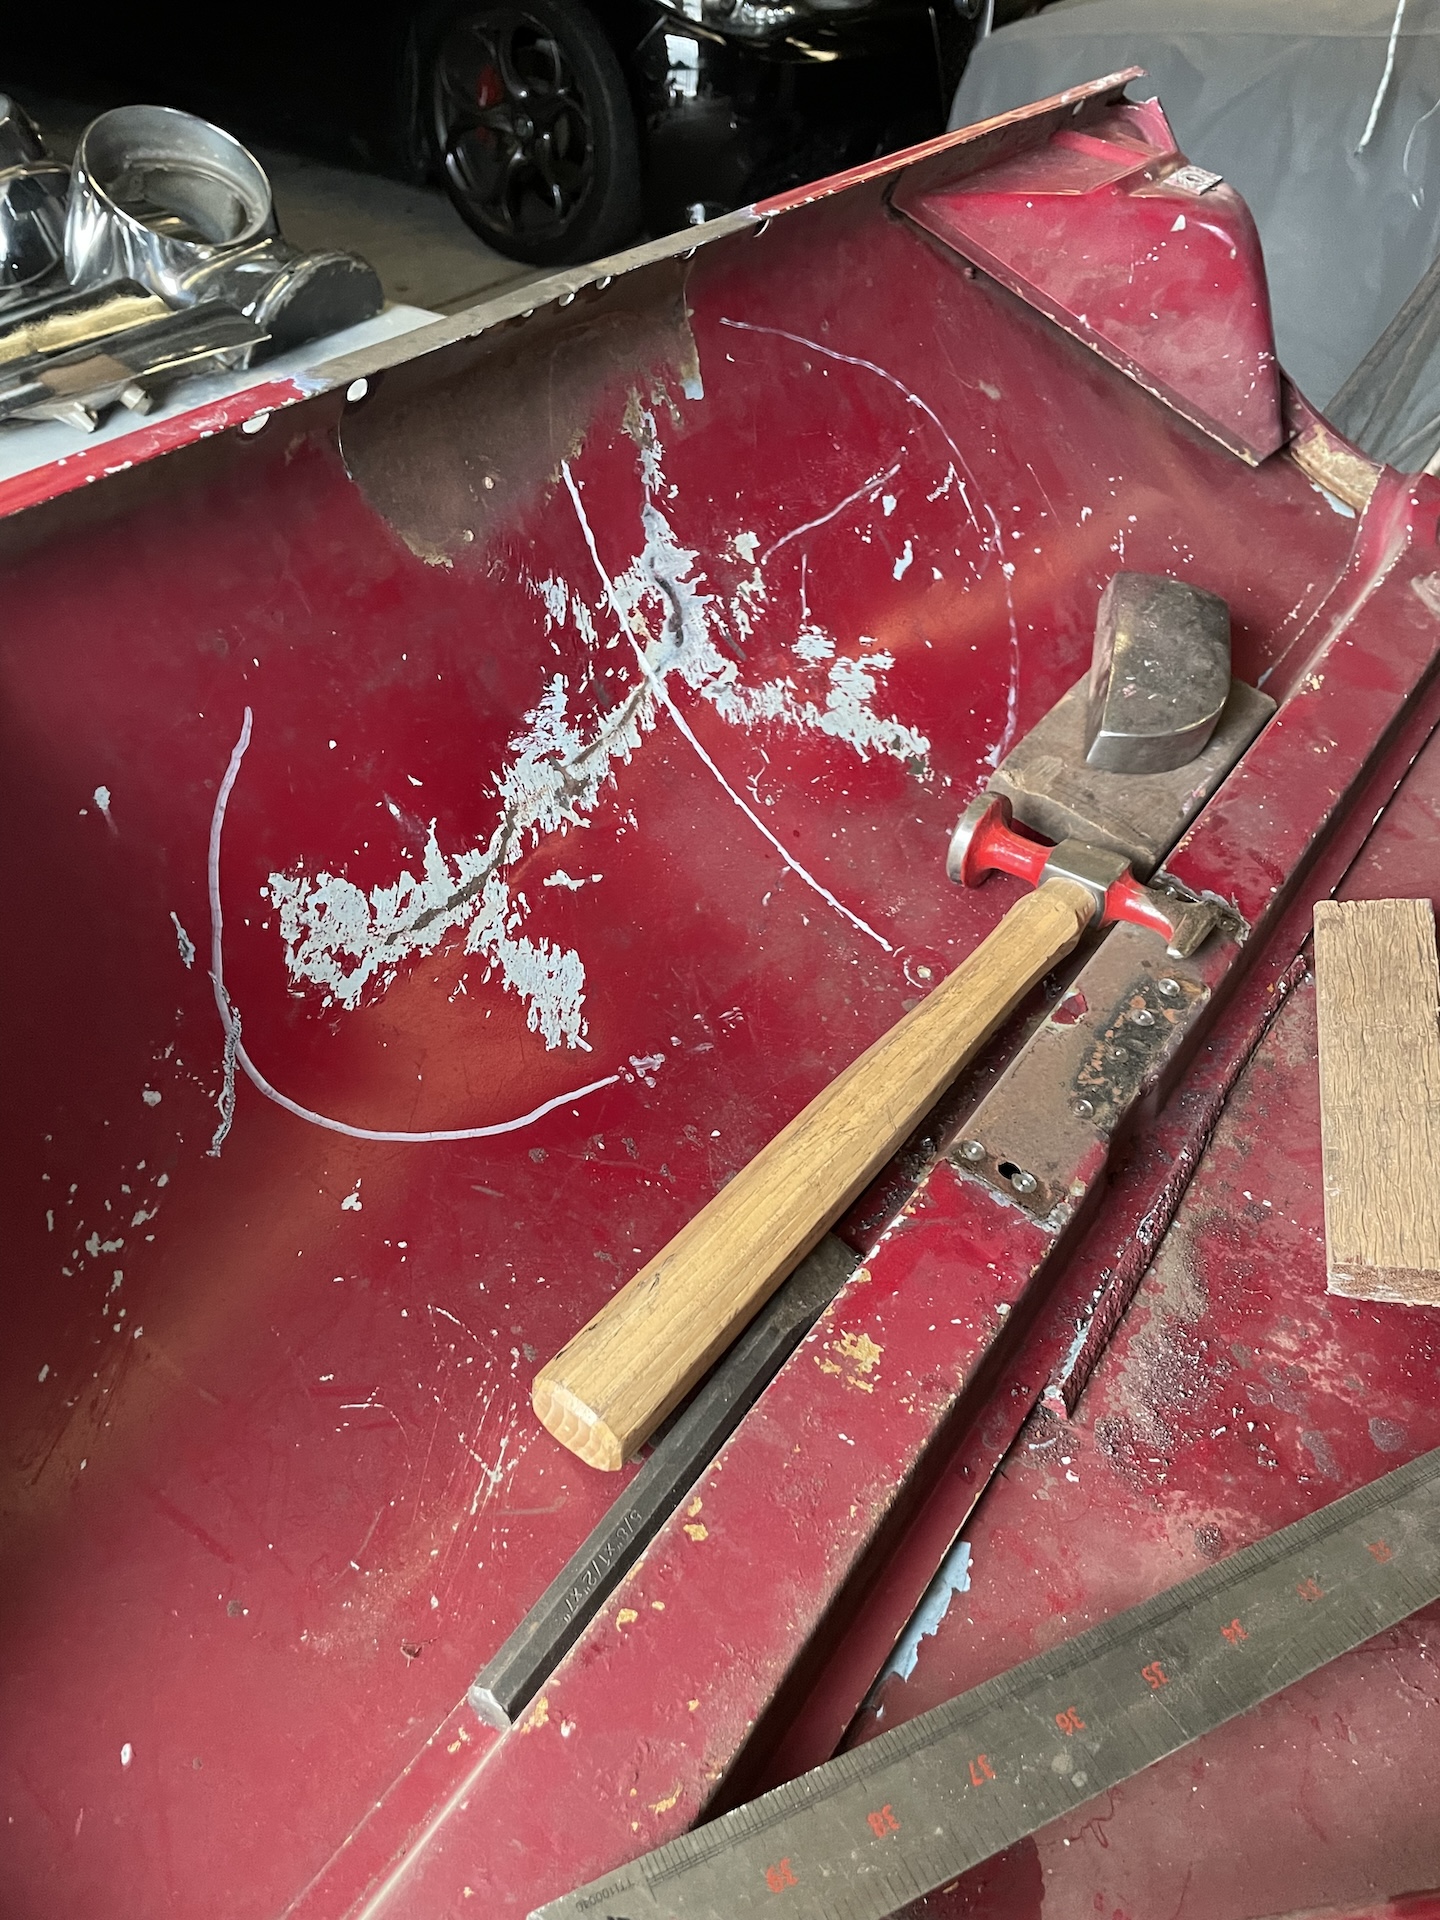
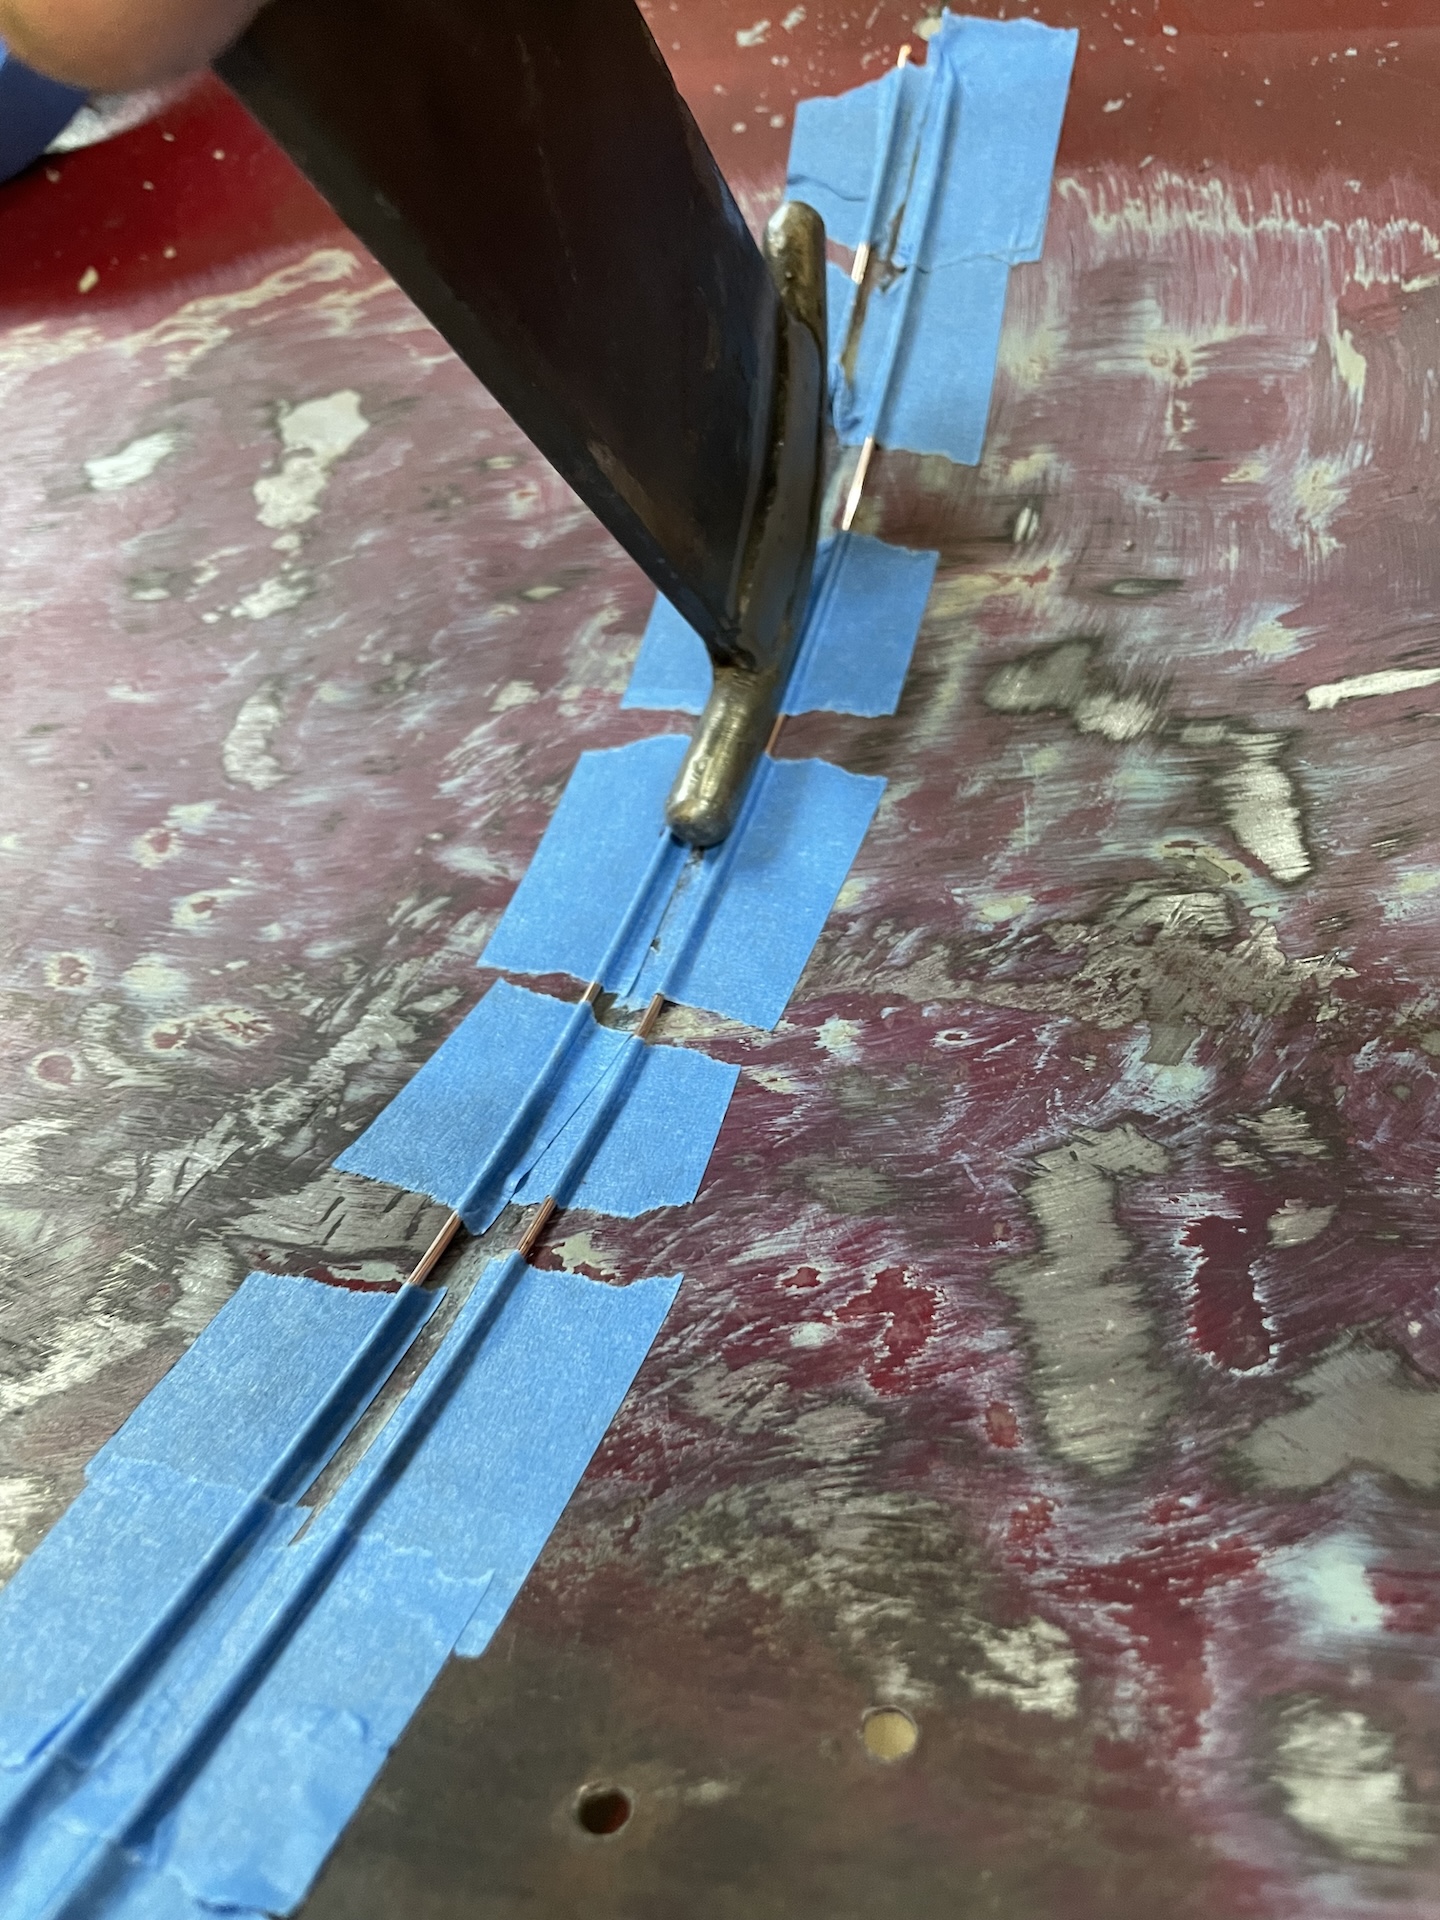
Slept on it, and woke up with a plan to get the centre line. Bent some filler rod and taped it to the underside to use as a guide. Made this little dolly for another project - should work to create a subtle line.
IMG_7456.jpeg
IMG_7456.jpeg (967.71 KiB) Viewed 270 times
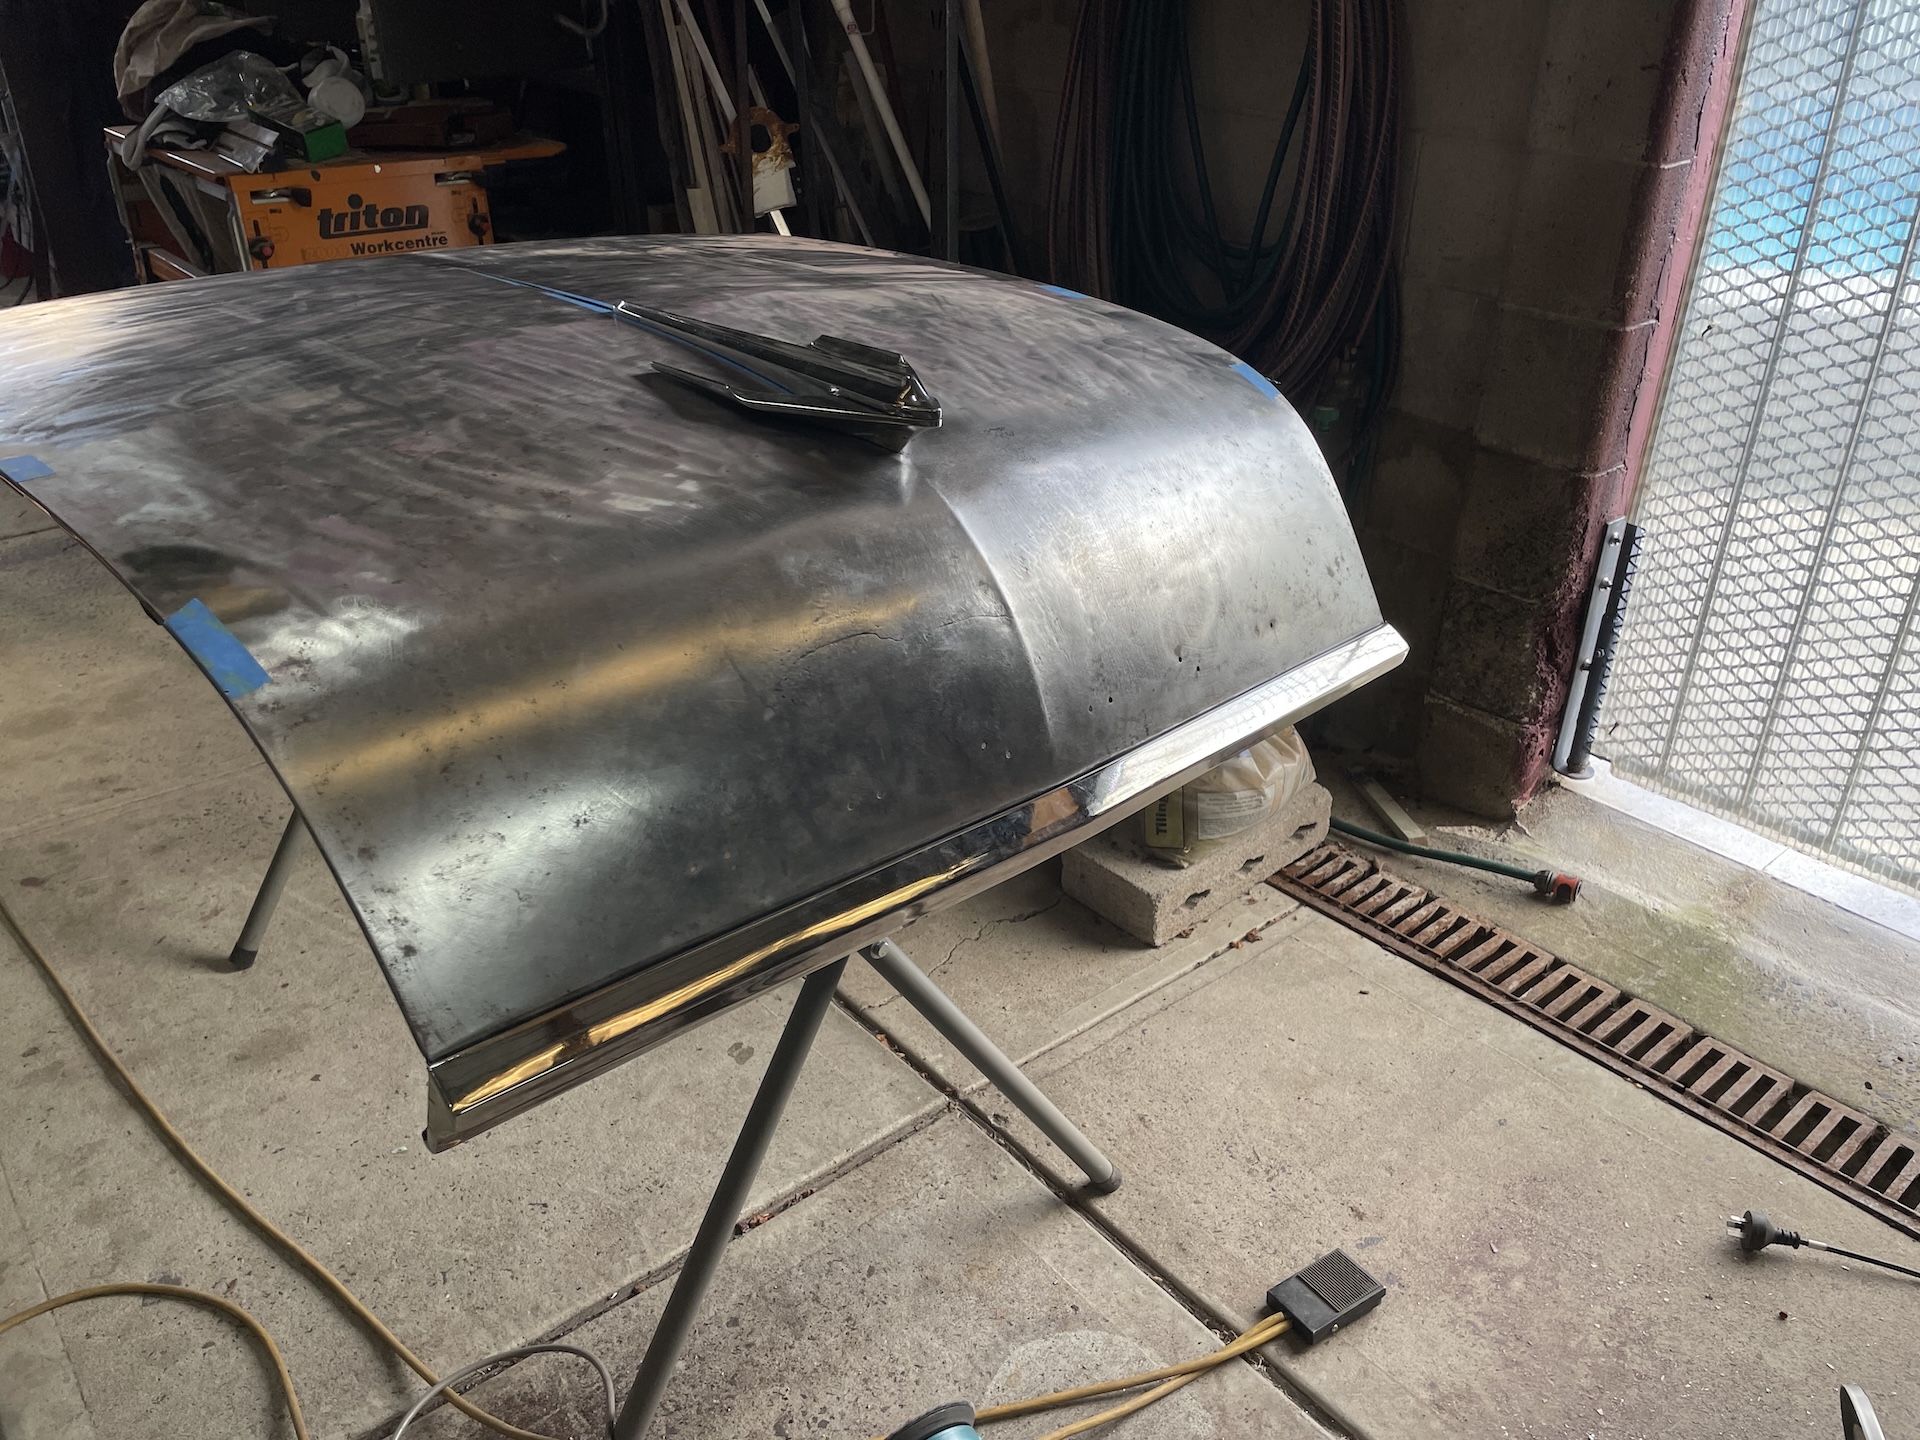
Some hours, and a strip disk later. Recreated the line by hitting it from the underside as shown above, with a bit of hardwood with rubber around it on the back, then planishing it from the top with the curved dolly underneath sitting in the guide. Then general fine tuning, shrink disk, planish, check flow of curve with straight edge, repeat repeat.
IMG_7458.jpeg
IMG_7458.jpeg (1.04 MiB) Viewed 270 times
To say I’m happy with the result is an understatement. Really didn’t think I could get the shape back. If the damage was in a flat section of a panel it would have been a different story, but that curve really holds the metal in place. I have gone more pronounced with the centre line, I think it flows into the bonnet bird nicely. So much so, well I have gone this far……
Scott
(Not so rusty) Ol' Rusty - FB/EK Sedan
User avatar
funkyscooter
Posts: 622
Joined: Wed Aug 16, 2017 8:12 am
State: NSW
Location: Sydney

Re: Ol' Rusty - FB/EK Sedan

Post by funkyscooter »

……Might as well take the line further. Same method - wire as a guide - with slight increase in degree of difficulty as I want to start the line wider to match the back of the bird, and then taper out to nothing. The design is also based on the limitations of access to the panel where the braces cross.
IMG_7461.jpg
IMG_7461.jpg (816.33 KiB) Viewed 270 times
Crawl around on the floor with the bonnet balanced on wood blocks and sand bags. Rubber backed block then just lifts it enough so the centre of the panel is taking the weight. Hit the underside with dolly at. Least a couple hundred times.
IMG_7460.jpg
IMG_7460.jpg (716.64 KiB) Viewed 270 times
Repeat, check, repeat, hit a lot harder than I thought I would have to, check, realise I hit it too hard, bit of planishing etc.
Result!
IMG_7464 .jpg
IMG_7464 .jpg (1004.19 KiB) Viewed 270 times
IMG_7465.jpg
IMG_7465.jpg (859.25 KiB) Viewed 270 times
IMG_7466.jpg
IMG_7466.jpg (942.07 KiB) Viewed 270 times
Pretty happy with that. If only I had have had a crack at fixing it BEFORE I bought the other bonnet. Oh well, the trip was worth it, Brett has given me some great inspiration moving forward, and I even ended up coming home with a decent repairable set of FB trims as well.
Scott
(Not so rusty) Ol' Rusty - FB/EK Sedan
User avatar
Errol62
Posts: 10885
Joined: Sat Dec 06, 2014 2:44 pm
State: SA
Location: Adelaide

Re: Ol' Rusty - FB/EK Sedan

Post by Errol62 »

Amazing work Scott. The sheet on the bonnet is pretty light and impressionable by my experience, in that the bonnet on my ute has bum prints on the front from resting mine against it. Anyway, a thorough skim bog will have it looking smooth as Stephen’s scone in no time……..


FB ute fixer upper, EK van on rotisserie
getting my FB ute on the road
EK van on rotisserie
Post Reply