Stephen
Ol' Rusty - FB/EK Sedan
-
In the Shed
- Posts: 2215
- Joined: Wed May 16, 2012 10:18 pm
- State: SA
- Location: South Australia
Re: Ol' Rusty - FB/EK Sedan
Good onya Scott for having a crack. Thanks for posting your methodical approach to your work 
Stephen
Stephen
A day in the shed beats a day at work!
Re: Ol' Rusty - FB/EK Sedan
love your have a go approach mate
I started with nothing and still have most of it left.
Foundation member #61 of FB/EK Holden club of W.A.
Foundation member #61 of FB/EK Holden club of W.A.
-
funkyscooter

- Posts: 685
- Joined: Wed Aug 16, 2017 8:12 am
- State: NSW
- Location: Sydney
Re: Ol' Rusty - FB/EK Sedan
Thanks Rob - I'm working on a repair at the top of the door frame and I bent that out to get the torch in. Realistically not sure what light bulb solution I was hoping for, but it great to get advise that confirms what you were thinking. The flat bar is a good tip. I bought some 10mm square bar that I will use to help form the rubber gutters. Not much weight behind it, but that might do it.ardiesse wrote: Mon Dec 14, 2020 10:31 am
You're concerned about getting the business end of the MIG down into the channel where the rubber sits in order to plug-weld . . . My advice is -
Don't form the return completely before welding the piece in. Go to about 30 degrees (say). If you can get yourself a short length of 10x25 flat bar, you can use it as a dolly inside the channel to form the return. Stretching (where the A-pillar curves downwards) is easier than puckering (where you bang your knee if you're tall). A pair of stumpy round-nose pliers is quite good as a tucking fork. Or you can just make a couple of hacksaw cuts and weld them up.
Rob
Scott
Scott
(Not so rusty) Ol' Rusty - FB/EK Sedan
(Not so rusty) Ol' Rusty - FB/EK Sedan
-
funkyscooter
- Posts: 685
- Joined: Wed Aug 16, 2017 8:12 am
- State: NSW
- Location: Sydney
Re: Ol' Rusty - FB/EK Sedan
Will do - it was patched over but fell out when I hit it with the wire brush.SunnyTim wrote: Tue Dec 15, 2020 7:35 am Good work. Don't forget to fill that aerial hole too. The never went there and it will likely let water under the top skin.
Scott
(Not so rusty) Ol' Rusty - FB/EK Sedan
(Not so rusty) Ol' Rusty - FB/EK Sedan
-
funkyscooter
- Posts: 685
- Joined: Wed Aug 16, 2017 8:12 am
- State: NSW
- Location: Sydney
Re: Ol' Rusty - FB/EK Sedan
Next piece. Top bit around the window.
Think I need some welding clamps


With the car window frame as a guide this should have been a breeze. But took several hours of shrinking, bending, twisting, stretching to get it to fit with the second bit
Scott
Think I need some welding clamps


With the car window frame as a guide this should have been a breeze. But took several hours of shrinking, bending, twisting, stretching to get it to fit with the second bit

Scott
Scott
(Not so rusty) Ol' Rusty - FB/EK Sedan
(Not so rusty) Ol' Rusty - FB/EK Sedan


Re: Ol' Rusty - FB/EK Sedan
Mate that’s detail. Did similar but rougher for a rear boot floor corner section in the ute. Shape is critical for screen seal there. Hats off to you for tackling it. All the welding and smoothing would have been trying to warp it a fair bit. Would be tempting to stitch in place, then fill, but harder to protect the inside.
FB ute fixer upper, EK van on rotisserie
FB ute fixer upper, EK van on rotisserie
getting my FB ute on the road
EK van on rotisserie
EK van on rotisserie
-
funkyscooter
- Posts: 685
- Joined: Wed Aug 16, 2017 8:12 am
- State: NSW
- Location: Sydney
Re: Ol' Rusty - FB/EK Sedan
So on to part 3 which is the tricky one as it has a straight vertical face along the entire length that bends sharply at one end and feathers back into the vertical. Reckon I had 4 versions of this in yellow paper before I was happy.
Bent the top over first then started the feathered bend.
Once that was done started working on the curve. Made a sand bag out of a pants leg and some cable ties then rounded off an old rubber mallet with the grinder. Used a cardboard template profiles off the driver’s side. This curve was surprisingly easy too achieve. Just take it slow.
And checked against the door
And here’s a trial fit as I started tackling the top part of the door rubber channel
Need to do the door rubber channel so I can check everything is going to work. Be spewing if I cock up the weld on this. It’s fitting together pretty well
Scott
Bent the top over first then started the feathered bend.

Once that was done started working on the curve. Made a sand bag out of a pants leg and some cable ties then rounded off an old rubber mallet with the grinder. Used a cardboard template profiles off the driver’s side. This curve was surprisingly easy too achieve. Just take it slow.

And checked against the door

And here’s a trial fit as I started tackling the top part of the door rubber channel

Need to do the door rubber channel so I can check everything is going to work. Be spewing if I cock up the weld on this. It’s fitting together pretty well
Scott
Scott
(Not so rusty) Ol' Rusty - FB/EK Sedan
(Not so rusty) Ol' Rusty - FB/EK Sedan
Re: Ol' Rusty - FB/EK Sedan
Metal magic
Sent from my SM-G973F using Tapatalk
Sent from my SM-G973F using Tapatalk
getting my FB ute on the road
EK van on rotisserie
EK van on rotisserie
-
In the Shed
- Posts: 2215
- Joined: Wed May 16, 2012 10:18 pm
- State: SA
- Location: South Australia
Re: Ol' Rusty - FB/EK Sedan
Great work Scott
Love the sand bag for metal forming, hope you manage to remove all the sand before you wear the pants again
Stephen
Love the sand bag for metal forming, hope you manage to remove all the sand before you wear the pants again

Stephen
A day in the shed beats a day at work!
Re: Ol' Rusty - FB/EK Sedan
Awesome metal fabrication,
I like doing this work as well although I don't take long to loose the plot and walk away !!! ( Happens a lot lately )
Must be a age thing I'm hoping.
Greg
I like doing this work as well although I don't take long to loose the plot and walk away !!! ( Happens a lot lately )
Must be a age thing I'm hoping.
Greg
So many cars so little time!
-
funkyscooter
- Posts: 685
- Joined: Wed Aug 16, 2017 8:12 am
- State: NSW
- Location: Sydney
Re: Ol' Rusty - FB/EK Sedan
Thanks for all the support. Keeps me motivated. This was never a quick fix but it’s taking a lot longer than I thought. Still plugging away. Bit hot in the shed and run out of MIG gas just before Christmas.
Here is the last piece. The rubber channel
Lots of bending and twisting etc to get it all to line up. Sorry was a bit slack with the camera but after much hand wringing I finally started tacking it together
Working from the bottom up. Refit the door to check alignment. Can’t quite close the door as the channel is bent open to allow for the MIG torch.
Started stitch welding. Worked small sections and allowed to cool. Also tried heating the area with a butane torch prior to welding to get better penetration.(read it somewhere) Not sure it works.
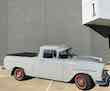
Then the gas ran out. Got a bit of grinding to do. And this was way more inviting
Scott
Here is the last piece. The rubber channel

Lots of bending and twisting etc to get it all to line up. Sorry was a bit slack with the camera but after much hand wringing I finally started tacking it together

Working from the bottom up. Refit the door to check alignment. Can’t quite close the door as the channel is bent open to allow for the MIG torch.

Started stitch welding. Worked small sections and allowed to cool. Also tried heating the area with a butane torch prior to welding to get better penetration.(read it somewhere) Not sure it works.

Then the gas ran out. Got a bit of grinding to do. And this was way more inviting

Scott
Scott
(Not so rusty) Ol' Rusty - FB/EK Sedan
(Not so rusty) Ol' Rusty - FB/EK Sedan
Re: Ol' Rusty - FB/EK Sedan
Love your work mate, you have way more patience than I do .....
I started with nothing and still have most of it left.
Foundation member #61 of FB/EK Holden club of W.A.
Foundation member #61 of FB/EK Holden club of W.A.
-
FbSTDwagon
- Posts: 790
- Joined: Thu Jul 02, 2020 3:04 am
- State: SA