EK Wagon project - Total rebuild

Post photos of your pride and joy, or updates on your rebuild!

Moderators: reidy, Blacky

Finny
Posts: 1895
Joined: Tue Mar 18, 2008 10:30 pm
State: QLD
Location: Brisbane North
Contact:

Re: EK Wagon project - Total rebuild

Post by Finny »

Aiming for Safety Certificate and Rego on Friday (This week), but still have a bit of work to complete tomorrow.
Tentatively optimistic...... :D :( :shock: :? :roll: :esurprised: :crazy: :thumbsdown: :thumbsup:
Circumstances made my Friday goal just a little to challenging. :( :(
I had to take my mother to hospital for day surgery, in the morning and needed to work around getting her back home.
Was all well on track when a multi car and caravan accident closed the entire Bruce Hwy, and redirected traffic past the front of my Roadworthy Mechanic and back to Qld Transport. The 20 minute trip to the hospital in eth morning took an hour and a half, and even the opposite direction was a nightmare.
Didn't fancy my chances and hit the postpone button. :( :(

However I got rid of a few of the challenges.

Front seat finally back in, without drilling or extending any holes.
It was as simple as undoing the front bolts right back and while loose, getting the back ones all in place.
Just what Harv suggested a few pages back.

Exhaust reconnected and it runs so much better and quieter. :D :D :D

Number place lights working and connected.

Image

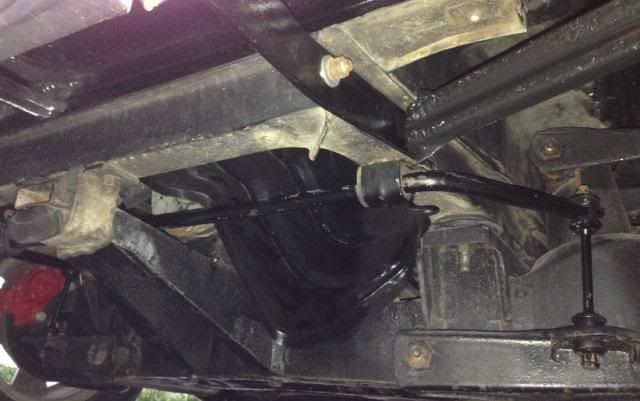
Front sway bar back in place.
Can be a little tricky and it has to be raised at the front.

Image

I also had to install the plate (stone guard) that goes at the front of the gearbox, between the motor and gearbox.
Jack up rear of motor and undo clutch and support brackets.

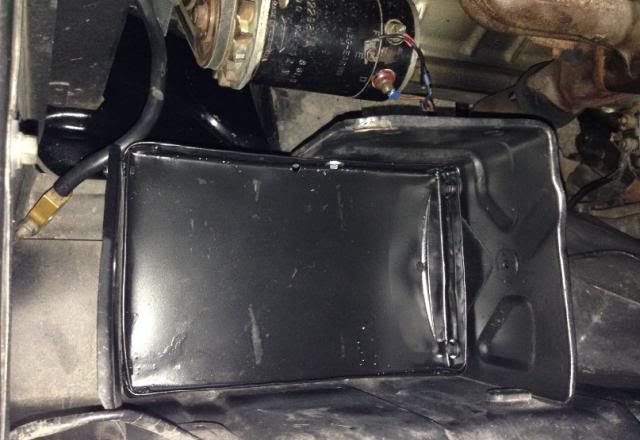
Had to actually make my own Battery tray.
Big vice, Bigger hammer, Lots of cutting and grinding and bending and welding and grinding and painting.
All done and bolted in.
Actually came out a lot better than I expected.

Image

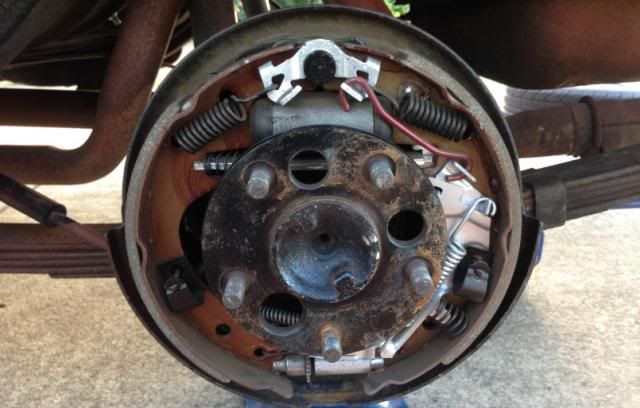
Did a final check on the brakes, and handbrake re adjustment.
All pins and plugs in place and working.

Image

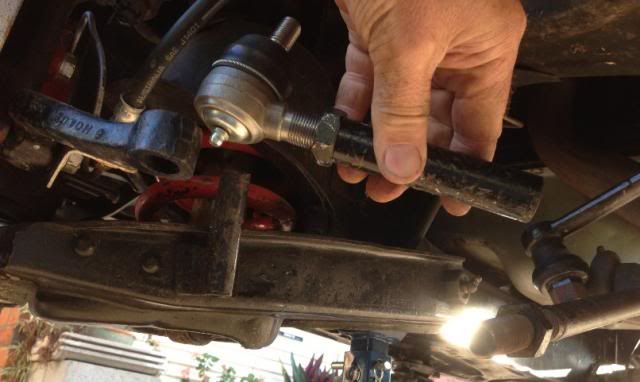
Need to get a steering alignment tomorrow morning and upon check noticed that I really should replace the ball joints.
So out with the old and in with the new.
Otherwise I'm sure I would be told that you need to replace them first.

Image

Steering is now really out and fairly erratic.
Lucky the tyre place is about 100 metres down the road.

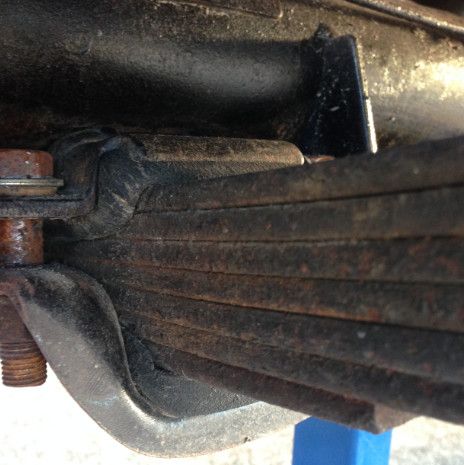
Yes I know the photo shows it still needs spacers.
But I was counting and no wonder it sits high at the back I count 7 springs.
Maybe I can just take 2 out ?

Image
Last edited by Finny on Tue Jan 21, 2014 10:11 pm, edited 1 time in total.
Image
IT's LIKE WATCHING DRUNK MONKEYS TRYING TO HUMP A FOOTBALL.
rosco
Posts: 2569
Joined: Wed Feb 04, 2004 8:34 pm
State: VIC
Location: Melbourne

Re: EK Wagon project - Total rebuild

Post by rosco »

Sorry to hear of your Mum, Finny - hope all is better now.

I looked and looked for a post from you Friday night - was going to PM you and see how you went... guess we'll get that roadworthy post some time this week.

I may be wrong, but your sway bar issue might be to do with the top insulation rubber from the outrigger - does is sit roughly where the EK cross-member outrigger did?
I'll take a peek at mine today and maybe take a pic for you - my bar does run close to the outrigger, but it doesn't touch.
All of this sort of needs doing before the wheel alignment - or if you change the angle of the cross-member, it will likely throw the caster out a bit.
Good move to replace those tie-rod ends.... I did the upper and lower ball joints on mine, plus the wishbone bushes and upper control rod - it made a lot of difference to the steering of the vehicle... unless you take the load from the springs away from the wishbones - you really can't tell if the ball joints need replacing.... the wheel alignment blokes will probably find any replacements necessary.

Battery tray - yes..... grrrrrr - another week of my engine bay project.... well, it would have only been a few hours if I didn't go overboard (again!).
I should have just built a new one out of 1/8th steel..... by the end of it, I probably had...

I tried cutting out the "holey" bits and building up using the mig with brass/copper backing plates... gave up after about 1,000 goes at filling holes (the mig is a great way of finding out where any rust is).

For the small amount left of my original tray - you went the right way, trust me....

Mine ended up with four angled down plates all welded together with a 1" flat section and new wall right around it.
I drilled out the centre of the base to make a 5/8th hole then welded in a drain tube made from a piece of 3/16" thick steel tubing - long enough to reach below the sub-frame skirt.

I cut the base of the tube at an angle to create the same drawing effect of the sump breather pipe on a grey motor.
This tube runs down through the hole in the horizontal part of the sub-frame skirt.

I cut out and fitted a 1 1/2" x 1/4" thick perimeter insulator from neoprene strip to keep the battery away from the metal base.

I lost one sub-frame due to rust down in that corner - and wanted to prevent any battery acid (not that we use unsealed batteries much these days) finding its way to the corner where it can't be seen.....

I can't help you with the rear springs - there sure are a lot of leaves in yours. hoping someone will chime in and help you with options.

Looking forward to your next report.... fingers crossed, Finny..

frats,
Rosco
User avatar
Harv
Posts: 5104
Joined: Mon Oct 08, 2007 2:00 pm
State: NSW
Location: Sydney, Australia

Re: EK Wagon project - Total rebuild

Post by Harv »

Finny,

i could be wrong, but I thought EK wagons had 5-leaf rear spring assemblies (havn't got my Workshop Manual here in front of me to check, and my wagon is out at Daves for rust paint and panel, though FE/FC is definietly 5-leaf on the wagons).

The MasterParts shows FB/EK wagons as 5-leaf, and that the only early Holden with 7- leaf rear springs is (early!) FX. Looks like yours has been modified at some stage (gasser with the wrong end lifted!!!!!!! :P :lol: 8) )

Cheers,
Harv
327 Chev EK wagon, original EK ute for Number 1 Daughter, an FB sedan meth monster project and a BB/MD grey motored FED.
Grimbo

Re: EK Wagon project - Total rebuild

Post by Grimbo »

Harv wrote:
Looks like yours has been modified at some stage (gasser with the wrong end lifted!!!!!!! :P :lol: 8) )

Cheers,
Harv
Or just going for the 70's rake.
Finny
Posts: 1895
Joined: Tue Mar 18, 2008 10:30 pm
State: QLD
Location: Brisbane North
Contact:

Re: EK Wagon project - Total rebuild

Post by Finny »

Just checked the EK Workshop manual and it states.
"Three types of rear springs are used in production, a four leaf spring on Models 215 and 225, a six leaf spring on Models 219 and 229, and a six leaf spring of higher load carrying capacity on Models 2104 and 2016."
It had a tow bar on it and was probably used to haul some heavy stuff around at some stage.
If it's possible to remove a leaf or two that would work well, but I'm sure it's not that easy. :? :?
Image
IT's LIKE WATCHING DRUNK MONKEYS TRYING TO HUMP A FOOTBALL.
Blacky
Posts: 12359
Joined: Tue Jul 20, 2004 8:58 am
State: WA
Location: up in the Perth hills

Re: EK Wagon project - Total rebuild

Post by Blacky »

No reason why not Finny , not that hard a job mate .....
When you're faced with an unpleasant task that you really don't want to do, sometimes you just have to dig deep down inside and somehow find the patience to wait for someone else to do it for you.


Foundation member #61 of FB/EK Holden club of W.A.
User avatar
NoMAD
Posts: 1992
Joined: Thu Sep 29, 2005 5:07 pm
State: WA
Location: Perth, WA

Re: EK Wagon project - Total rebuild

Post by NoMAD »

haha i was wondering where the first time i wrote that it went...

keep up the work Finny!

Cheers
Nathan
Last edited by NoMAD on Mon Jan 20, 2014 5:39 pm, edited 1 time in total.
FB/EK Holden Car Club of W.A. Inc
Foundation Member
Blacky
Posts: 12359
Joined: Tue Jul 20, 2004 8:58 am
State: WA
Location: up in the Perth hills

Re: EK Wagon project - Total rebuild

Post by Blacky »

That's kinda what I was thinking :shh: :ewink:
Apologies for the hijack Finny ....
When you're faced with an unpleasant task that you really don't want to do, sometimes you just have to dig deep down inside and somehow find the patience to wait for someone else to do it for you.


Foundation member #61 of FB/EK Holden club of W.A.
Finny
Posts: 1895
Joined: Tue Mar 18, 2008 10:30 pm
State: QLD
Location: Brisbane North
Contact:

Re: EK Wagon project - Total rebuild

Post by Finny »

Hector is officially on the road. :D :D :D :D :D
This is however, far from the end of the journey. Image
But at least now it will be a lot easier and I can get it from place to place as required. :D :D
Probably only a couple of pages of items still to complete, and I know it will always need something.
One page of standard stuff, like easy door closing, external trims all back on, new exhaust, stereo, patching up the fluid leaks that are now coming from everywhere, etc.

Whilst the trip for the steering alignment and Safety Certificate went well, the follow-on trip to Qld Transport and return home, has highlighted a few more things to be addressed.
I think Hec just isn't used to getting driven more than 20 metres at a time.
And yes I have slimline number plates coming.

Image

Image

This was one of a couple of my inspirations, that kept me on track.
I'm mostly referring to he Car. :lol: :lol: :D

Image

Image

I'll keep posting as the rest of the rebuild continues, it still doesn't match my initial vision, yet. 8) 8) 8)
Image
IT's LIKE WATCHING DRUNK MONKEYS TRYING TO HUMP A FOOTBALL.
User avatar
bumper
Posts: 717
Joined: Mon Dec 31, 2007 10:07 am
State: TAS
Location: Devonport tasmania
Contact:

Re: EK Wagon project - Total rebuild

Post by bumper »

Congrats mate, love the before and after shots :thumbsup:
wanker????
I'd rather consider myself as an "owner operator"!!

FBEKHOLDENFANS page
https://www.facebook.com/groups/253705454864/
Blacky
Posts: 12359
Joined: Tue Jul 20, 2004 8:58 am
State: WA
Location: up in the Perth hills

Re: EK Wagon project - Total rebuild

Post by Blacky »

Happy days mate, congratulations 8) 8) 8) 8) 8)
When you're faced with an unpleasant task that you really don't want to do, sometimes you just have to dig deep down inside and somehow find the patience to wait for someone else to do it for you.


Foundation member #61 of FB/EK Holden club of W.A.
Trev
Posts: 7819
Joined: Thu Apr 15, 2004 6:43 pm
State: NOT ENTERED
Location: Wonthaggi

Re: EK Wagon project - Total rebuild

Post by Trev »

Nice :clap:
[img]http://i47.photobucket.com/albums/f177/trevwood/WOOFTOsmall.jpg[/img]
Woofto Car Club Member No3
Woody01
Posts: 321
Joined: Thu May 12, 2011 7:00 pm
State: WA
Location: Dampier - WA

Re: EK Wagon project - Total rebuild

Post by Woody01 »

Good stuff! Nothing beats the feeling of driving your project for the first time legally.

Keep the updates coming - it's good inspiration and learning for my wagon build
Woody - UMX-282
FB EK Club WA
Foundation Member # 138
User avatar
Devilrod
Posts: 7394
Joined: Fri Apr 30, 2004 12:55 pm
State: VIC
Location: Beaconsfield, Vic

Re: EK Wagon project - Total rebuild

Post by Devilrod »

Great stuff Finny. Stick to finishing off your list. It is harder when you can drive hem though....
Speed and Style........... One day I'll get the speed bit.
rosco
Posts: 2569
Joined: Wed Feb 04, 2004 8:34 pm
State: VIC
Location: Melbourne

Re: EK Wagon project - Total rebuild

Post by rosco »

Congratulations, Finny - cleared with flying colours?.... dibs to you....
Devilrod wrote:Great stuff Finny. Stick to finishing off your list. It is harder when you can drive hem though....
Brett, couldn't agree more! - when they're shackled to the workshop, the impetus is getting them on the road... when they get their freedom, it's often hard to commit them to incarceration again....

Finny, I have a couple of suggestions as to why you have 7 leaves in your rear spring -
1/ - better fuel economy......... always running down hill!
2/- Dragways..... a lot of people found that by fitting the "original" or "classic" (types 1 and 2) 5 spoke Dragway wheels - there were clearance issues with the rear tyres scrubbing the top of the rear wheel-arches. Lifting the back with either over-riding springs or adding additional leaves prevented the tyres from coming into contact.
I now note that when you picked the wagon up, it had some sort of alloys on it... they too, might have had an offset which the owner considered problematic....

Yes - leaks, rattles, things that work intermittently and stuff which needs some distance and time to settle in - these are all the norms of a build.... mine has now gone on for 31 years - and I'm still tinkering and adjusting the little quirks when they come to the surface - goes a long way to support how these old buses were built at the factory.... not great, but they'd go broke if they had each vehicle come back in to fix what we go through to finish our builds....

You have done your inspiration proud - bit hard to compete with the likes of the pix shown... but I can now relate to what you based your scheme on.... very well done, Finny.

Please keep this thread going... it's not over until you say so...... there's a bit to do yet, as you very well know..... the frequency of posts will probably taper off now that you're out and about....

Finally, insurance and anti-theft?.... I'm confident you've got both these covered...... lot of work, lot of time, lots of parts and priceless "one off's", Finny.....
Even though the addition and disciplined use of cheap and almost useless visual anti-theft devices is perceived by most as a waste of time - they are a definite positive to the joy-rider who is looking for an easy steal... of course, your main security system is of paramount importance - but the visual cheapies might just prevent damage by the break and enter brigade.... and, we note your build is a daily driver.... lock it, or lose it..... (sorry for the stern words, but I believe them warranted).

frats,
Rosco
Last edited by rosco on Tue Jan 21, 2014 9:13 am, edited 1 time in total.
Post Reply