EK Wagon project - Total rebuild
-
parisian62
- Posts: 3997
- Joined: Wed May 11, 2005 2:19 pm
- State: NSW
- Location: Sydney
- Contact:
Re: EK Wagon project - Total rebuild
Great work Adrian. It's really taking shape now 
Feelin free in a '61 FB.
Member of FB-EK Holden Car Club Of NSW Inc.
Check out the Rebuild of Old Timer
Member of FB-EK Holden Car Club Of NSW Inc.
Check out the Rebuild of Old Timer

Re: EK Wagon project - Total rebuild
G'day Finny,
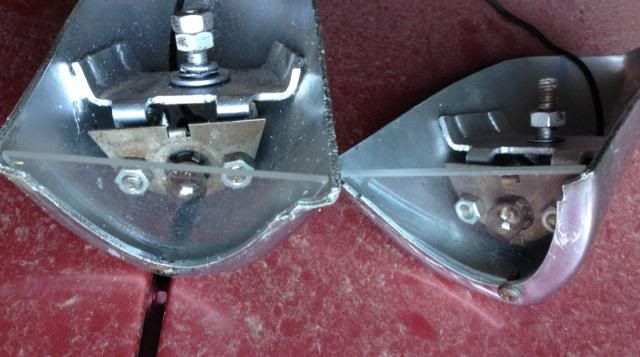
The reverse lights are a factory NASCO option. Most FB/EKs don't have them, but GMH got cute and prepared each vehicle ready for them. You should have a green wire already in place. It starts at the drivers side kick panel, near your right foot, and should have a bullet terminal on the end of it. The wire runs along the floor (taped to the brake lights and indicators), past the back seat and finishes on the drivers side behind the rear qurter trim (doesn't quite make it to the taillights). The photo below shows where someone has stripped this wire out and coiled it up. Your steering column will also have four holes drilled into it ready to mount the switch. The reverse light holders are already in place in the taillights, but are covered by rubber plugs.
What you will need to get hold of is the switch and some globe terminals:

For the switch try eBay, or the Parts Wanted section of the forum. This guy currently has two for sale:
http://www.ebay.com.au/itm/STEERING-COL ... 523wt_1125
whilst earlybitz has 5:
http://www.ebay.com.au/itm/STEERING-BOX ... 459wt_1125
Note that you need the curved bracket that the switch bolts to (you can see it in the photo above with four holes in it)... a lot of "eBay specials" don't have this plate. You can make one out of a bit of plate and a bolt, but it is fiddly without one to work from as a template (plate needs to be curved to suit steering column). The globe terminals can be be scavenged from a scrap wiring harness (I thought Rares or MTS were selling them, but cannot find the part number... only the pigtail ones that do not twist-lock in place). Note that you want the single lead-terminal ones (to suit BA15s bulbs), not the twin terminal ones (BAY15d).
The switch screws onto the steering column with self tappers, and gets moved by the gearshift linkage.

Two wires to run through the firewall grommet - one for power, and one to connect to your green wire. Bulb holders need to be joined together and fitted into the taillights, then connected to the other end of the green wire. Bit of adjustment to make sure that the switch only works in reverse, need a helper for this one to operate the gear lever while you move the switch on it's mounting bolt. Good idea not to mount the switch until you are ready (and have a helper) to adjust it... if it is in the wrong spot, the gearshift linkage can bend the snot out of the little plastic arm on the switch.
Instructions below are EJ/EH, but damn similar to FB/EK:


Cheers,
Harv
327 Chev EK wagon, original EK ute for Number 1 Daughter, an FB sedan meth monster project and a BB/MD grey motored FED.
Re: EK Wagon project - Total rebuild
What you talking about WayneWayneXG95 wrote:Im liking this....
Don't forget the rubber dust stopper that runs under the rear beaver panel between the tail lights..
I haven't seen that before.
Are there any photos on the forum anywhere ?

IT's LIKE WATCHING DRUNK MONKEYS TRYING TO HUMP A FOOTBALL.
Re: EK Wagon project - Total rebuild
Thanks Harv, that is awesome. 
It now doesn't seem that difficult.
I noticed the green wire that finished around the rear wheel, and wondered what it was for.
As you said, it didn't even make it to the back of the car.
It now doesn't seem that difficult.
I noticed the green wire that finished around the rear wheel, and wondered what it was for.
As you said, it didn't even make it to the back of the car.
IT's LIKE WATCHING DRUNK MONKEYS TRYING TO HUMP A FOOTBALL.

Re: EK Wagon project - Total rebuild
Finny wrote:What you talking about WayneWayneXG95 wrote:Im liking this....
Don't forget the rubber dust stopper that runs under the rear beaver panel between the tail lights..

I haven't seen that before.
Are there any photos on the forum anywhere ?
That's the part that runs along the beaver panel under the tailgate between the tail lights which you have already attached the rubber dust protectors...
This pic shows the rubber protector I brought from Clark Rubber in place behind the bumper bar.

OK here is the two pieces you need.
I/ The steel bar that the rubber protector fits in.
2/ The rubber protector itself

Close up, see the ridge the bar fits into before it's screwed to the beaver panel.


if you don't have the bar you might get on one here or try a steel supplier I guess?
Someone else maybe able to explain it better.
Cheers Wayne..
Wayne Chambers
President
FB EK Holden Car Club of N.S.W
President
FB EK Holden Car Club of N.S.W
Re: EK Wagon project - Total rebuild
I hope you never need to get the tail lights out if you sikaflexed them in 
sometimes yor just better off shitting in yor hands and clapping
W.S.C.C.A
Woodstock chapter
W.S.C.C.A
Woodstock chapter
Re: EK Wagon project - Total rebuild
Yes should have used bumastic..Mick wrote:I hope you never need to get the tail lights out if you sikaflexed them in
Wayne Chambers
President
FB EK Holden Car Club of N.S.W
President
FB EK Holden Car Club of N.S.W
Re: EK Wagon project - Total rebuild
Looking back on earlier photos it doesn't look like one came with the car but it just stops dust and grime coming from under the rear bumper bar
Wayne Chambers
President
FB EK Holden Car Club of N.S.W
President
FB EK Holden Car Club of N.S.W
Re: EK Wagon project - Total rebuild
Thanks Wayne, I can see where it is supposed to be mounted.
Now that I know it exists, I can make something up and fit it in place.
I thought the Sikaflex and Butyl Mastic was a similar product.
I did one tail light with each.
Today was actually back to doing work work.
But I got over to collect some more parts this afternoon.
The old girl is looking a little worst for wear these days.
And not much of her still together, and what's left to slowly sinking into the ground.


But her sacrifices have been for a good cause.

Finally found all the brackets I was missing off the rear seats, and sanded them down.
Now I can give them a rust treatment and paint, and put the rear seats back together and install them.
Now that I know it exists, I can make something up and fit it in place.
I thought the Sikaflex and Butyl Mastic was a similar product.
I did one tail light with each.
Today was actually back to doing work work.
But I got over to collect some more parts this afternoon.
The old girl is looking a little worst for wear these days.
And not much of her still together, and what's left to slowly sinking into the ground.
But her sacrifices have been for a good cause.
Finally found all the brackets I was missing off the rear seats, and sanded them down.
Now I can give them a rust treatment and paint, and put the rear seats back together and install them.
Last edited by Finny on Tue Dec 17, 2013 9:50 pm, edited 1 time in total.
IT's LIKE WATCHING DRUNK MONKEYS TRYING TO HUMP A FOOTBALL.
Re: EK Wagon project - Total rebuild
Couldn't find anything in the workshop manual, but made up a bracket, glued on some protectant and screwed it back in place.

Then had a go at cleaning up all the trim off the rear seats.
Finally got to give them a coat of aluminium rustproof paint and waiting to dry.

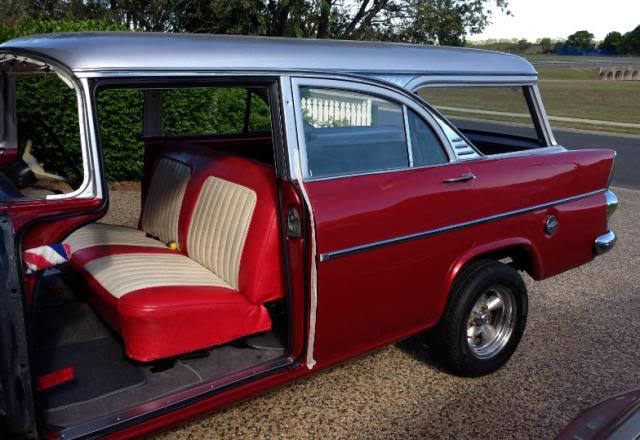
Wasn't sure what to do with the rear seats, as they didn't go with the front seat.
Thought I'd try to get them to match a little more closely.
The secret was in getting the preparation right, clean and masked very finely.


Thought about painting the inserts White.
That way they would match the front seat.
But the silver / red goes with the car.
Back to the rear end, and needed to get the number plate lights working.
Out with the Dremel again and cut up some clear perspex for the covers for the lights.
They actually fitted really well.
Lights all working, but not sure if they are on upside down ??????
They have a R and a L stamped on them. Is R the drivers side and L the passenger side ?

Still no windows or doors added.
I know this is a two person job, and I just have to wait.
With 2 days to go, I'm starting to think I may not be finished on time.

Then had a go at cleaning up all the trim off the rear seats.
Finally got to give them a coat of aluminium rustproof paint and waiting to dry.
Wasn't sure what to do with the rear seats, as they didn't go with the front seat.
Thought I'd try to get them to match a little more closely.
The secret was in getting the preparation right, clean and masked very finely.
Thought about painting the inserts White.
That way they would match the front seat.
But the silver / red goes with the car.
Back to the rear end, and needed to get the number plate lights working.
Out with the Dremel again and cut up some clear perspex for the covers for the lights.
They actually fitted really well.
Lights all working, but not sure if they are on upside down ??????
They have a R and a L stamped on them. Is R the drivers side and L the passenger side ?
Still no windows or doors added.
I know this is a two person job, and I just have to wait.
With 2 days to go, I'm starting to think I may not be finished on time.
IT's LIKE WATCHING DRUNK MONKEYS TRYING TO HUMP A FOOTBALL.
Re: EK Wagon project - Total rebuild
Good work, love the seats... 
Wayne Chambers
President
FB EK Holden Car Club of N.S.W
President
FB EK Holden Car Club of N.S.W
Re: EK Wagon project - Total rebuild
Seats dried out and ready to buy some new backing material and re-install.

Had a helping hand today so got the rear bumper and two rear doors back on.
Took several attempts to get them on and even then they just don't quite fit.
Doors seem to need to move forward a bit and getting the door to hold closed on the second click is difficult.
But they are on.
Had to take the side moulding off one (and will need to do the other) and change the clips.


Got my number plate on also, but it just doesn't seem right.
I know I've mounted it too low, I just didn't want to drill any new holes until I know why the standard holes don't line up.
The standard number plate holes seem upside down.
And the number plate lights still seem to not line up. Big Gaps at the top and bottom.
I wonder if I have the middle section on upside down ?


I also noted the hole (seen to the right in the last photo) needs a bolt but doesn't seem to serve any real purpose.
Does anyone know if the middle and end sections on rear bumpers, are the same on sedans and wagons.
Had a helping hand today so got the rear bumper and two rear doors back on.
Took several attempts to get them on and even then they just don't quite fit.
Doors seem to need to move forward a bit and getting the door to hold closed on the second click is difficult.
But they are on.
Had to take the side moulding off one (and will need to do the other) and change the clips.
Got my number plate on also, but it just doesn't seem right.
I know I've mounted it too low, I just didn't want to drill any new holes until I know why the standard holes don't line up.
The standard number plate holes seem upside down.
And the number plate lights still seem to not line up. Big Gaps at the top and bottom.
I wonder if I have the middle section on upside down ?
I also noted the hole (seen to the right in the last photo) needs a bolt but doesn't seem to serve any real purpose.
Does anyone know if the middle and end sections on rear bumpers, are the same on sedans and wagons.
IT's LIKE WATCHING DRUNK MONKEYS TRYING TO HUMP A FOOTBALL.
Re: EK Wagon project - Total rebuild
I'm sure you'll get a visit from someone who'll inform you how to fit them... 
Wayne Chambers
President
FB EK Holden Car Club of N.S.W
President
FB EK Holden Car Club of N.S.W
Re: EK Wagon project - Total rebuild
Finny,
FB/EK's shared a common "front centre" and "front ends". The "front centre" was also used as the sedan "rear centre". Wagons had different "rear ends" and "rear centres". FB utes and vans had different "rear ends". From memory the wagon rear bumper centres have slots in them that show up if they are used as sedan centres (ask me how I know... if the FB was here I'd take photos for you).
Those painted seats came up damn well. What product did you use for the red colour?
Cheers,
Harv.
327 Chev EK wagon, original EK ute for Number 1 Daughter, an FB sedan meth monster project and a BB/MD grey motored FED.
-
parisian62
- Posts: 3997
- Joined: Wed May 11, 2005 2:19 pm
- State: NSW
- Location: Sydney
- Contact:
Re: EK Wagon project - Total rebuild
Hi Adrian
Lookin good
I think your centre bar is upside down.
Stewart
Lookin good
I think your centre bar is upside down.
Stewart
Feelin free in a '61 FB.
Member of FB-EK Holden Car Club Of NSW Inc.
Check out the Rebuild of Old Timer
Member of FB-EK Holden Car Club Of NSW Inc.
Check out the Rebuild of Old Timer