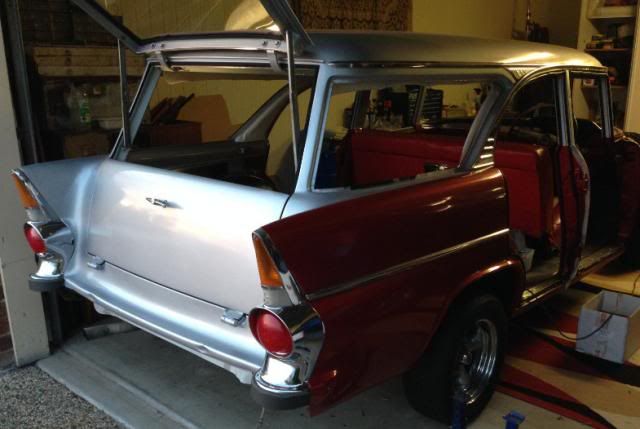
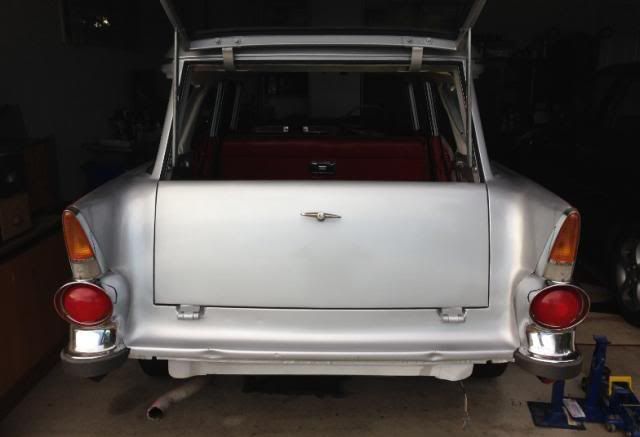
EK Wagon project - Total rebuild

Post photos of your pride and joy, or updates on your rebuild!

Moderators: reidy, Blacky

Finny
Posts: 1895
Joined: Tue Mar 18, 2008 10:30 pm
State: QLD
Location: Brisbane North
Contact:

Re: EK Wagon project - Total rebuild

Post by Finny »

Where does the time go...... :? :? :?
Finding drill bits, finding nuts and washers. buying glue, finding the tool you just hand in your hand 10 seconds ago, that is now missing. :lol: :lol: :lol:

I saw someone else mention their carpet not going all the way back, I wonder if it's a wagon issue.
So I used the off cuts to glue the extra bits back on and fill the gap.

Image

Another issue resolved.

Image

The last lot of photos showed the scuff plates, but they were just sitting in position.
Unfortunately one side had been completed filled up so I had to redrill them.
Now fully installed and complete.

Image

Image

Moving on to those outer door rubbers. :D :( :shock:
Drivers side completed.

Image

And what rubbers did I end up using. :D :D :D
Their service was by far the best, and it's an expensive purchase, so I picked the best and also the safest option.

Image

Haven't got the doors on yet, but I'm confident that if I did have any issues, Rare Spares will look after it.

The only thing I recommend is stop when it starts getting dark.
Otherwise you risk getting glue onto your fingers, :(
Then your fingers stuck together :oops:
Then your finger stuck onto the rubber :shock: Maybe a couple of times as you try to remove it :esurprised:
Then you have a permanent reminder not to do it again. :lol: :lol: :lol:

Image

Really feels annoying, and I believe I just have to wait....... :( :( :(

Doors and seats, here I come. :D :D
Apparently it has to be after I take my wife Christmas shopping tomorrow. :roll: :roll:

Only 7 days left on my original goal, and I think I may be well and truly behind the 8 ball. :wtf: :wtf: :wtf:
Image
IT's LIKE WATCHING DRUNK MONKEYS TRYING TO HUMP A FOOTBALL.
rosco
Posts: 2569
Joined: Wed Feb 04, 2004 8:34 pm
State: VIC
Location: Melbourne

Re: EK Wagon project - Total rebuild

Post by rosco »

Forget the 8 ball, Finny!... you'll need to rack up the table again - this is where most of us make irrepairable mistakes.... "rusho"!....
You should now be starting to realise that your goal is probably a bit "ambit".. don't lose the option to now enjoy every little bit as you put the last major pieces of the puzzle back together...

Oh, and that glue issue on fingers..... one word ..... "Acetone".... aka nail polish remover... but no-where near your precious paintwork!

frats,
Rosco
Trev
Posts: 7897
Joined: Thu Apr 15, 2004 6:43 pm
State: NOT ENTERED
Location: Wonthaggi

Re: EK Wagon project - Total rebuild

Post by Trev »

Looking really good there Adrian, love the colours you've gone for :thumbsup:
[img]http://i47.photobucket.com/albums/f177/trevwood/WOOFTOsmall.jpg[/img]
Woofto Car Club Member No3
muza
Posts: 807
Joined: Tue Mar 01, 2011 6:09 pm
State: NOT ENTERED
Location: Gippsland Vic

Re: EK Wagon project - Total rebuild

Post by muza »

Flying along mate!!
Looks awesome
FB Holden Fernando Yellow/Arctic Beige flash
Stock as a rock
75 series Landcruiser 350 Chev
Not so stock
Finny
Posts: 1895
Joined: Tue Mar 18, 2008 10:30 pm
State: QLD
Location: Brisbane North
Contact:

Re: EK Wagon project - Total rebuild

Post by Finny »

Got back to it this afternoon.

Finished the Passenger side outer door rubbers.
Without glueing anymore fingers to the rubber. :oops: :lol:
A few of the other items, like drain rubbers installed.

Image

Image

Finished re-installing the cover on the seat,.
This tool make putting the wire garrard clips back on, so much easier and quicker. Thanks Dad. :D :D :D

Image

Front seat back into the car.

Image

Just unfortunate that I can only get one bolt to line up enough to bolt down.
ANY SUGGESTIONS ? :? :? :?: :?:

Image

Found half the seat belts. And started cleaning them up to re-install.
Just wonder where I put the others ? :oops: :oops:

Image

Really big smile. :D :D :D :D :D
I think I actually let out a few passionate words of success :lol: :lol:

Image

Now that I have the window put together, Just need to actually install it. Just sitting in place at the moment. :?

Image

Image

And finally got my first moulding back onto the car. :D :D
The top one is just sitting there as I have to drill the holes yet.
Absolutely amazing how many things go into making up a car. :shock: :shock:
Really starting to sense it all coming together.

Image

Image

Tomorrow will be aiming at getting the marks sanded out of the doors, completing them and back on the car.....
Image
IT's LIKE WATCHING DRUNK MONKEYS TRYING TO HUMP A FOOTBALL.
rosco
Posts: 2569
Joined: Wed Feb 04, 2004 8:34 pm
State: VIC
Location: Melbourne

Re: EK Wagon project - Total rebuild

Post by rosco »

Jeeze, Finny - none of us thought you'd be up to this stage by now.... I have to wonder if you actually are getting any sleep....?

Did you pop out the window again to fit the trims..... I just don't know how you would have fitted them with the glass in the rubber...
And - I don't doubt for one moment that you neglected to do this.... did you apply heaps of butyl-mastic to the glass channel before fitting the rubber...

That blasted rubber seal around the glass will leak just as badly as the rubber seal does into the window aperture.... butyl-mastic is very easily removed..and won't damage your paintwork.. but I would suggest caulking heaps of the blasted sticky stuff in to and onto everything when you fit that window...

As soon as you posted the pic of the window sitting over the aperture - my immediate thoughts were.... this is almost ready to drive.... don't worry 'bout the doors... but something just tells me when the window is in... it's driveable....

Absolutely amazed at your pace..... are you getting enough to eat?... getting your vitiamins?.... you need to rest, dear.....oops - sounding like my late mother....

frats,
Rosco
Trev
Posts: 7897
Joined: Thu Apr 15, 2004 6:43 pm
State: NOT ENTERED
Location: Wonthaggi

Re: EK Wagon project - Total rebuild

Post by Trev »

With your seat bolts, obviously the bolts go in with no seat in the way so you may have to modify the holes in the runners to line up a bit better.
Easier than trying to move the holes in the floor. :idea:
[img]http://i47.photobucket.com/albums/f177/trevwood/WOOFTOsmall.jpg[/img]
Woofto Car Club Member No3
User avatar
Harv
Posts: 5488
Joined: Mon Oct 08, 2007 2:00 pm
State: NSW
Location: Sydney, Australia

Re: EK Wagon project - Total rebuild

Post by Harv »

Looking awesome Finny 8) .
Just unfortunate that I can only get one bolt to line up enough to bolt down.
ANY SUGGESTIONS ?
You've probably tried this, but if not:
a) Take all the bolts out and run a tap down the threads in the floor. If you don't have a 5/16" UNF tap, use a clean bolt. Use plenty of sewing machine oil to leave the threads nice and slippery.
b) Start the "easy" bolts until they are only just engaged. This gives you the most amount of slop to allign the "hard" one.
b) Have a helper lift the corner of the seat up. This frees you up to "feel" the bolt holes better. They may have to wiggle the seat a bit as you feel the bolt engaging.
b) Start the "hard" one.
c) Tighten each bolt.

Cheers,
Harv
327 Chev EK wagon, original EK ute for Number 1 Daughter, an FB sedan meth monster project and a BB/MD grey motored FED.
Finny
Posts: 1895
Joined: Tue Mar 18, 2008 10:30 pm
State: QLD
Location: Brisbane North
Contact:

Re: EK Wagon project - Total rebuild

Post by Finny »

My first thought was to move the holes.
But seeing Trev doesn't think it a great idea, I wont. :roll: :roll:

Thanks Harv, I'll give it a try.
I really need some extra hands.
Obviously the carpet has make it tighter,
I was probably thinking of removing the seat and bending the floor brackets,
The holes are close, just on a slight angle, and can't get the thread to start.

Long day today, without much change.
Needed to make up my own clips, which took forever. Cut, file, shape, drill.
Far from prefect, but for something that's hidden away they definitely do the job.
Will need to make more for the front doors. :roll:

Image

Spent a lot of time sanding back the rear doors and compounding.
Got them back to acceptable condition, but you can still see some marks.
But still disappointed that I've lost the perfect finish. :( :(
Up close it looks like lots a miniscule chips were the paint has actually gone.
Still it's good enough for a daily driver, and may redo it the future.
Two rear doors completed on the outside with moulding installed, just need the inside trim.

Image

Tried to get the doors on but looks like I need to remove the brackets off the car and put them on the doors first :? :? :?: :?:
Lots of things would be much easier with 2 or more people. :(
Haven't done the windows yet, as definitely need some extra hands for that one. :clap: :clap:
Looks like putting the rear end back together may be the easier option for tomorrow.

Image
Image
IT's LIKE WATCHING DRUNK MONKEYS TRYING TO HUMP A FOOTBALL.
rosco
Posts: 2569
Joined: Wed Feb 04, 2004 8:34 pm
State: VIC
Location: Melbourne

Re: EK Wagon project - Total rebuild

Post by rosco »

Finny, I can't pick your paint issue... I know pix don't do justice - but to me from the pic you post - looks pretty darned scmick to me....

Doors - no, I left the hinges on the body then added the doors....
If you undo them both - you'll have one heck of a job getting them aligned again... I understand it can be done - but there's just so much room for alteration - I found it better to leave one mount as it was and just try and re-fit the door to it.
I scribed around the hinge arms before removing mine... it made a world of difference when it came time to re-fit them...

Don't be afraid to really load those tail lights up with butyl-mastic.... as you bolt them in, the excess will ooze out and you can gently scrape it off with a small piece of nylon card onto a cardboard waste...

I can't say what your clips are for ... I don't recall any of mine looking like that.
If it is for the mid level exterior trim - I used hexagonal nylon ones and stainless self tappers - butyl-mastic under the clips to seal them to the doors.

I note you are an advocate for the infamous Dremel.. I would be absolutely lost without mine.. everything from modeling planes/cars/trains/heli's... to grinding away defects on the old bus.... it is just such a versatile rotary tool... anyone who doesn't have one - you're in for a treat...

Yes - at least two people for the front window - you'll still need to "bang" a bit whilst pulling out the cord.. it will go in, contrary to what you might think as you are trying to fit it... press, pull the cord and gently bang away with a palm of your hand... the last bit just "pops" in.. and then you wonder what all the fuss was about... heap up the butyl-mastic both in the channel and on the aperture.... the stuff won't hurt anything if you wipe it off as it comes out.
Mine took about two weeks before the last of it made its way out... but I know there's heaps in there and my window doesn't leak.....

Don't forget to fit those rubber (neoprene) shields when you come to fit you door windows... they deflect all the crud which washes down from the glass pane onto your winder mechs...
There's a drain tube for the quarter vent make sure it gets past the quarter vent spring and washer assembly.
Don't forget to fit those cloth tubes over the door lever rods... or they will rattle.

You're running well ahead of where I thought you be at the moment... I had you back with the seat....

frats,
Rosco
Trev
Posts: 7897
Joined: Thu Apr 15, 2004 6:43 pm
State: NOT ENTERED
Location: Wonthaggi

Re: EK Wagon project - Total rebuild

Post by Trev »

Finny wrote:My first thought was to move the holes.
But seeing Trev doesn't think it a great idea, I wont. :roll: :
I did mean move the holes in the runners not the floor.
New and longer bolts do help to go through the carpet, aswel as running a tap through the thread first.
[img]http://i47.photobucket.com/albums/f177/trevwood/WOOFTOsmall.jpg[/img]
Woofto Car Club Member No3
Finny
Posts: 1895
Joined: Tue Mar 18, 2008 10:30 pm
State: QLD
Location: Brisbane North
Contact:

Re: EK Wagon project - Total rebuild

Post by Finny »

Rosco, I can understand from the photos, but trust me, you can see the blemishes in real life. :(
I separated the hinges from the doors and the frame some time ago and painted them separately, so they are going to be difficult regardless. :(
I haven't glued the rubbers over the hinges yet, until I get them into the correct positions.
It just looked easier to get to the screws on the frame, them the ones on the doors, when putting the back on, in the confined space.
I already found I had to take the bracket off the inside of the rear door to get the door spring thingy in. :? :?

Clips are for the ends of the mouldings on the EK doors.

Thanks Trev, I was just having a dig. :lol: :lol:

Stripped down the rear seat and cleaned it up.
It feels really good and only a few minor marks. It's original and has weathered really well.
Will be painting the trim and putting new backing onto the seat. And the rest of the rear area.

Image

Did a bit of checking on the wiring, before putting the rear lights in.
This old girl doesn't have any reverse light wiring.
Is that going to be a problem getting a SAFETY CERTIFICATE ??? :? :?
Even mapped out all the wires, so I knew what went where and what was being used in the trailer wiring.

Image

That done I got the rear lights back in.
Yes using lots of Sikaflex.
I actually found the stuff goes everywhere :shock: :shock: :(
Using a wet rag (rags, as it takes a lot) is a little better.
Using a rag with "Grease and Wax remover" is absolutely fantastic.. :D :D :D :D :D :D :D

Image Image

Image

Image

Image

Went to install the bumper, and spent an hour getting the number plate lights working.
I worked out that it needed to be earthed to work, but had rubber grommets holding in on.
A some dodgy wires tying to earth it as the correct earth was too rusted to work.
Pulled the lights apart, and sanded it all back so it had contact.
Then decided to bolt in back on so it can get it's negative directly from the bolts.
Had to make up some special U bolts to fits. using the old tap and die set.

Image

Seems to be a little more challenging than I first imagined. :? :? :oops:

Image

Image

No Doors and No glass for today.
Image
IT's LIKE WATCHING DRUNK MONKEYS TRYING TO HUMP A FOOTBALL.
Finny
Posts: 1895
Joined: Tue Mar 18, 2008 10:30 pm
State: QLD
Location: Brisbane North
Contact:

Re: EK Wagon project - Total rebuild

Post by Finny »

Thanks Tim, I found that out when I did the RWC on the sedan.
Although I would actually like to have them.
I rang an extra wire under the carpet so I could have a light in the rear,
Maybe I'll use it for reverse lights, but I'll need a switch , somewhere...????
I think I'll highlight it before they start, and maybe keep the seat belts off the car, as it doesn't have a mod plate for them anyhow.
Image
IT's LIKE WATCHING DRUNK MONKEYS TRYING TO HUMP A FOOTBALL.
User avatar
WayneXG95
Posts: 2565
Joined: Wed Sep 07, 2011 9:42 am
State: NSW
Location: Sydney

Re: EK Wagon project - Total rebuild

Post by WayneXG95 »

Im liking this.... :thumbsup:
Don't forget the rubber dust stopper that runs under the rear beaver panel between the tail lights.. :D
Wayne Chambers
President
FB EK Holden Car Club of N.S.W
rosco
Posts: 2569
Joined: Wed Feb 04, 2004 8:34 pm
State: VIC
Location: Melbourne

Re: EK Wagon project - Total rebuild

Post by rosco »

Your build pace is exciting, Finny..... do your family remember who you are.....?

Ok - rear bumper.... this isn't as important on the front one - but I would seriously suggest coating the inside of the bumper with some sound paint system.
It gets an awful lot of crap thrown up at it from the wash of the car running along the road/gravel etc...
The over-riders on a wagon might not be so bad as the sedan - but I'd treat them as well - and provide little drainage ports at the lowest place.
One of my original over-riders began to rust out - because the back of it was open to anything which could get in.... I made up some neoprene blanking plates for mine and sikaflexed them in... I also opened up the tiny drainage port a bit at he bottom.
I note you have one of those classic bumper iron mods to both sides of the beaver/floor bend.... I didn't beat/fill mine either ... I should have, and it drives me crazy.... oh well, maybe next spray....

Ok - reverse lights - easy peasy....... well, for a man of your capabilities..
Yes, there is a Nasco electro-mechanical reverse switch available - if you can find one...
but, to be perfectly honest - you can make up a simple switch which "fingers" the reverse position of the shift mechanism.... all you need is for the rod to close a thin stainless length of strip to the body of a home made cover - and get earth. You can drill two holes into the cover and secure it to whatever is handy around the linkage.
Once you get earth - you fit a 12v relay somewhere up under the dash - fuse a positive supply feed from an Ign controlled terminal of your fuse panel to pins 87 and 85, connect your reverse light wire to pin 30 and the earth lead from your new fandangled switch to pin 86.
The relay will only work when your Ign key is "on" and the switch makes earth to the relay to close the contacts of the positive feed in your relay to your
reverse lights.
This is exactly what I did with mine - and it works perfectly...... I have the 4 speed Aussie - and had to make up a switch box to mount on top of the gearbox.... the reverse lever closes the contacts in my switch box when the lever reaches its detent position....
Reverse lights are good - much better than not having them -... you can go insane and fit a surrounding array of superbright LED's as well as the incandescent globe if you want....

Seat belts - I can't comment... I don't know what the RTA in Qld require - but my last recollection for a standard re-registration (unmodified vehicle) down here was that only front belts were required...
It would be prudent of you to check anonymously with your authority before you book the inspection.... or find the document on line....

Something is telling me that down here we need two speed wipers, washers and seat belts for all occupants.... and something else... but I can't remember...

Ummmmm think I've addressed all your above...

Oh - the trim fittings you made - great work.
I made up a full set for one door - then found the nylon ones... what I couldn't get, I made from stainless sheet.... and used stainless tappers for every fixing.

I'm a bit iffy about using Sikaflex for the tail lights.... sure - it will be a great permanent seal, Finny - but I'm a bit concerned if you ever need to pull them out again.... Sikaflex is a marvellous sealant - I expect you used 221?... I use the Marine version with the caravan... but there are only a few places on my old bus where I have used it.... neoprene gaskets for the seat belt/floor plates and stuff like that where it never needs to come out again....

To anyone reading my ever growing length of dribble in this thread.... do NOT use SILICONE - it's acetic and even through it will give every impression that it has sealed your joint... it will etch into the metal and the process begins.... Sikaflex is non-acetic.. and is perfect - but I'd still make sure to seal the metal with an appropriate paint system prior to applying the Sikaflex.....

Your thread, Finny - not mine.... although you might not think so over the past week....... I might dry up for a while and let you run the show....

Keep up the great work - I don't believe I could keep pace with you.... and I'm (supposedly) retired.....

frats,
Rosco
Post Reply