Hi Malcolm,
got the POR 15 on, but won't post until tonight - just had to send off some mail whilst on my wife's machine............
I'm probably about half way around - I started back in around the mid '80's - always said this was going to be a "Harbour Bridge" project.............
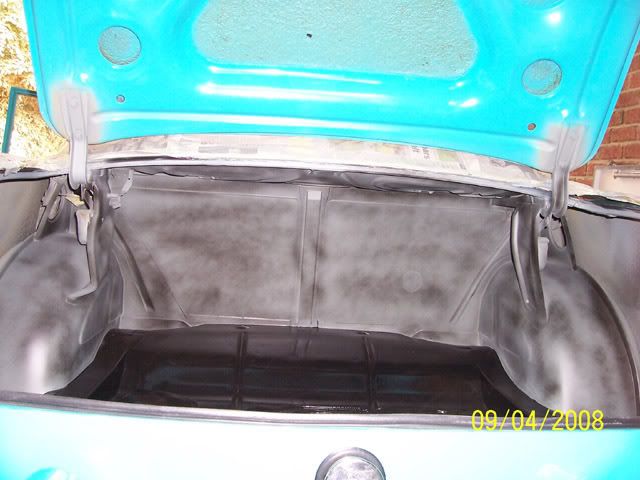
underneath, l/hs, roof, rear, engine bay, and now the luggage compartmen (almost) are done........... you'll see in Yamba - it's a bit of a mess, but will be finished if I don't run out of years - you are going to be disappointed, Malcolm - it's not what I expect most think it will be - but I'm reasonably happy with most of it - keeps my mind (and fingers) occupied...........
frats,
Rosco
ps - looks as if I've been hit by a truck - I've got two black eyes (POR 15 - where my glasses sat against my nose)...............
Rosco's paint tips
working acrylic
This is starting to jump around a bit - when we're done - I'll edit all material and categorize it into respective chapters......... for now it's coming as topics arise....................
This one is back to working up acrylic...........
Ben, if you have solid colour as your base - this is good practice. if it is metallic or pearl - it must be COB top-coated - that stuff won't stand the rigors of every day life without protection......... it's the one big down side of having an "enhanced" finish............along with trying to match it if damaged.........
As for cutting compounds, I have stated many times I do mine by hand - yes it takes forever - but I find removes the very least amount of paint and affords much "hands on" (no pun intended) enjoyment in working the finish.
I am onto another product for working up a 1200 + soap blocked down finish - it's Meguiar's Diamond cutting compound 2.0 - it has a rank of 10 on the 1-10 abrasion scale ( it took me a long time to remember where I'd smelled the aroma of it - it's Almond -as in wedding cake icing!) and I believe is intended for machine use - I find their cutters work fine for me by hand - I use a "pad" made up by a 1/4" thick hard rubber oblong and wrap a "stockingnette" pad tightly around it.
Applying just enough cutter to work the paint, I rub for and aft alternating cross-cuts at 90 degrees - check the pad surface and once clogged - clean or replace. I also find keeping the pad damp with water whilst using the heavy cutters prevents gouging the removed paint into the surface.
When working in concave or convex curves - I have learned to bend the pad and "roll" my wrists to prevent creating "flats"...........I never cut across an edge or convex curve - I also apply more paint onto these places when spraying as protection against breaking through..............
When I start to get some "shine" I move up to the fine cutters (scale of 3 and 2's) still working in straight runs (still cross-cutting at 90 degs) - it is only when I go to the finishing cutters (Meguiar's call them "cleaners") that I start working circles - overlapping by one third (as in spraying runs).......
This is my method - again, most will turn on the buff and breeze through the paint to bring up the finish...............I'm a dinosaur, I'm afraid but enjoy every opportunity to bring the finish to "life".......
frats,
Rosco
Hi John,
yes, I know a little of machines - guess I'm just a bit Amish in this respect......
I must be a dinosaur - my career is driving trains - yes, we have computers to take care of things like traction control, wheelslip, compressor governors, transitions and automatic lubrication........and just about everything the company no longer wants us to "drive" atd risk destroying - I love working steam engines - almost everything is driver or fireman controlled -yes, labour intensive - quite demanding, but so too is my preferred practice........... I know, you're going to say things like cutting the lawn with a scythe - sorry, this practice relates only to things I enjoy and can "insulate" myself from everyday insanity......... this temporary insanity is quite comforting - but disturbing to those looking on from outside...........
Insulator or Barrier coating
Ok - this as another "jump" but for the purpose of the exercise - will post it now before I forget and leave it from the "manual" I hope to compile at the conclusion of my knowledge and experiences posts..............
I had fitted replacement panels to the rear seat backrest of my sedan - the original ones were badly damaged when the rear window developed a leak and the material decayed - I fitted some "Verti-board" panels (very thin bituminous embedded cardboard sheet) which bent/buckled/deformed not long after fitting.
During stripping the entire interior metal-work to bare steel, I decided to fabricate three ply panels - at the time believing wood was the best option and therefore using "wood" paint - ie Dulux enamel primer and top-coat.
I worked and worked the primer until I attained a suitable finish on which to spray the enamel............ and I was well rewarded for it.......... until November last year when I again set to the next part of my refurb project....the luggage compartment.
I felt the enamel partitions would be satisfactory to support the intended black acrylic lacquer for the interior (except the fender and rear end panel).
I masked off these panels and worked up the "build" on the metal components.
Three days ago, I made amid-course change and opted to finish those partitions also in acrylic lacquer - readers will be aware at this time I am "trialling" a new (to me) paint system (POR) and have made my initial trials of it in this location - with excellent results.......... except.
One of the POR system coatings is called Tie Coat - it is intended to provide a marrying of POR 15 to any other paint system - bingo - this will cover the enamel and according to the"almost impenetrable" barrier which is clearly stated on the packaging, will permit over-coating in acrylic lacquer - NOT!
A lot of work went into blocking down, building up and prepping the enamel for Tie Coat - the tie coat went on like a dream - with a very satisfying insight into what the acrylic finish would be rewarded in............
Keyed the tie coat and hit it with acrylic primer/surfacer - only to have the enamel "blister" by the acrylic solvent - not happy, Jan!
Blocked it back, etch primed with 531 then hit it with the primer/surfacer again - exactly the same blistering.
Contacted POR and questioned the marketing - along with my dis-satisfaction of "almost impenetrable". Was then told volatile solvents (such as acrylic) would certainly penetrate the tie coat and this is why the enamel has blistered.
So, readers - don't do it!
I am now onto another product (also marketed by a related POR company
- Upol, called Insulator - it is alcohol based and I have been assured it will contain the acrylic solvent from reaching the underlying enamel............
Tomorrow is another blocking back - application of this Insulator and a further number of acrylic primer/surfacers............. stay tuned..
frats,
Rosco
luggage comparatment acrylic
Hello everyone,
as you can see, I have re-named this to my tips.......................
Those following the POR thread - this is a companion post but the acrylic aspect of the luggage compartment.
This explains blocking back the primer/surfacer using "guide coat"
Guide coat is a pre-mixed black paint which dries very quickly and is intended to "mist" over primer - we do NOT want it to embed into the primer in any way..
When the thinners has escaped from the primer/surfacer, guide coat is very thinly sprayed over the surface as a "mist coat" - I tend to drop my air pressure down a bit and hold the gun further away - it only needs to "stick on" but must "stick" to the paint or it will rub off without being of any assistance..
As you can see (and to those who have seen this many times on vehicles being driven around whilst the primer "pulls down" and do not know what it is) this appears as a blotchy spattering of black over the grey primer/surfacer..........
What we do now is "block back" using 600 or 800 wet and dry ( I use 400 - personally I find this "mechanically" ties the two different paints as well as chemically fusing one into the other - there is a risk - if your first top coat is very "wet" it can cause the deeper cuts of the 400 to show up in the surface............... we'll discuss how I apply my colour coats shortly.......
A "block" pad supports the paper as it is worked into the surface.
I try to "cross hatch" as I rub - that it, cut one way then rub at 90 degrees to the first direction - I find this cuts much quicker and provides some "control" as to how much is removed.
For absolutely flat areas I use a small (1" x 2") steel plate........... it will give you an absolute "flat" finish which will be reflected in the colour coats.
For areas where curves exist, I use as firm a pad as possible, but which provides just enough "bend" to follow the contour.......
What we are aiming for is to remove all the guide coat without breaking through the primer to the underlying 1K etch........... if we do this, we have to prime again (this is how the surface is "built up".
Once the guide coat is removed, don't Keep going - you are defeating the purpose - we want to get down to just taking the guide coat off with as few cuts as possible.........
For a mirror finish - you may need to prime, guide and block back a number of times until you can rub off the guide coat with only a few strokes of the paper.
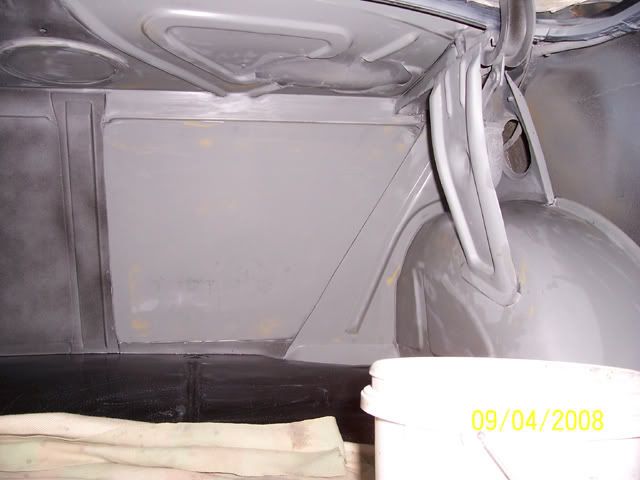
In the next pic, I have blocked back the r/hs of the rear partition - but left the lower portion only partly done with black spots showing where the surface still needs rubbing down - you will see the flat, grey surface above, but the yet to be flattened uneven surface below.....................
Having blocked the entire acrylic primer down to a satisfactory state we now prepare the area for top-coating by washing down, driying, cleaning with a wax and grease remover and dustting off.
Mix up the colour coat to the recommended ratio and set yourself up to spray.
I have found by mistakes that I can obtain a much better finish and enjoy the task more if I allow more than enough time, set everything up ready (pots, thinners, rags, bottles and anything else I may need to "rush" to and use.
For an external panel, I like to spread a bucketful of water over the floor to stop any dust getting thrown up by the dragging hose, scuffing feet etc.
When you are set to "shoot", go outside and blow yourself clean with the air duster - you'll be surprised at how much dust you shed.........
Back to the job, close doors, turn on lights (you need good lighting to "look" at the reflection of teh paint as you lay it down).
Finally a light air dust of the panel, lightly wipe a "tack rag" over it to pick up the very last of anything on the surface - and we're ready to go.........
With acrylic, I run my first coat as a medium wet - I want the thinners in the paint to soften and chemically "bite" into the primer/surfacer, but don't want to get is sopping wet - or those 400 grit cuts will show up in the dried surface............. it's a bit of "what is going to work for you, I'm afraid".
I can only tell you what "I" do............
when the panel has its first coat - walk away.
Go get some fresh air - have a cuppa or whatever - but let the paint "flash off" - let the wet thinners escape.
After about 10 min or so - I come back in and run a "double wet coat" over it - I want it to look wet, but not run - and that's it for today.............
Here is the pic as it sits tonight untouched - dust all over it - don't be tempted to wipe the dust of and "see" how good your finish is............. the paint is soft and very easily marked/dented/finger printed........ leave it - another cuppa - whatever........ keep out for ten minutes or so.
Come back then open everything up - and let the area "clear"............. the surface will look very dusty - it's dry over-spray sitting on everything - leave it!................. don't touch.
Now you can clean all your painting equipment and just let the paint do its stuff - un-assisted...........
Oh yes, the pics........

The hinge supports look very good - the rest looks as if it's got sand thrown all over it - this is normal - especially in confined spaces.........
Late tomorrow I'll dust it off (very lightly) and see what further work needs doing................ probably going to block back once more and spray a further 2 or 3 coats to get the finish I want................. stay tuned...........
frats,
Rosco
as you can see, I have re-named this to my tips.......................
Those following the POR thread - this is a companion post but the acrylic aspect of the luggage compartment.
This explains blocking back the primer/surfacer using "guide coat"
Guide coat is a pre-mixed black paint which dries very quickly and is intended to "mist" over primer - we do NOT want it to embed into the primer in any way..
When the thinners has escaped from the primer/surfacer, guide coat is very thinly sprayed over the surface as a "mist coat" - I tend to drop my air pressure down a bit and hold the gun further away - it only needs to "stick on" but must "stick" to the paint or it will rub off without being of any assistance..
As you can see (and to those who have seen this many times on vehicles being driven around whilst the primer "pulls down" and do not know what it is) this appears as a blotchy spattering of black over the grey primer/surfacer..........
What we do now is "block back" using 600 or 800 wet and dry ( I use 400 - personally I find this "mechanically" ties the two different paints as well as chemically fusing one into the other - there is a risk - if your first top coat is very "wet" it can cause the deeper cuts of the 400 to show up in the surface............... we'll discuss how I apply my colour coats shortly.......
A "block" pad supports the paper as it is worked into the surface.
I try to "cross hatch" as I rub - that it, cut one way then rub at 90 degrees to the first direction - I find this cuts much quicker and provides some "control" as to how much is removed.
For absolutely flat areas I use a small (1" x 2") steel plate........... it will give you an absolute "flat" finish which will be reflected in the colour coats.
For areas where curves exist, I use as firm a pad as possible, but which provides just enough "bend" to follow the contour.......
What we are aiming for is to remove all the guide coat without breaking through the primer to the underlying 1K etch........... if we do this, we have to prime again (this is how the surface is "built up".
Once the guide coat is removed, don't Keep going - you are defeating the purpose - we want to get down to just taking the guide coat off with as few cuts as possible.........
For a mirror finish - you may need to prime, guide and block back a number of times until you can rub off the guide coat with only a few strokes of the paper.
In the next pic, I have blocked back the r/hs of the rear partition - but left the lower portion only partly done with black spots showing where the surface still needs rubbing down - you will see the flat, grey surface above, but the yet to be flattened uneven surface below.....................
Having blocked the entire acrylic primer down to a satisfactory state we now prepare the area for top-coating by washing down, driying, cleaning with a wax and grease remover and dustting off.
Mix up the colour coat to the recommended ratio and set yourself up to spray.
I have found by mistakes that I can obtain a much better finish and enjoy the task more if I allow more than enough time, set everything up ready (pots, thinners, rags, bottles and anything else I may need to "rush" to and use.
For an external panel, I like to spread a bucketful of water over the floor to stop any dust getting thrown up by the dragging hose, scuffing feet etc.
When you are set to "shoot", go outside and blow yourself clean with the air duster - you'll be surprised at how much dust you shed.........
Back to the job, close doors, turn on lights (you need good lighting to "look" at the reflection of teh paint as you lay it down).
Finally a light air dust of the panel, lightly wipe a "tack rag" over it to pick up the very last of anything on the surface - and we're ready to go.........
With acrylic, I run my first coat as a medium wet - I want the thinners in the paint to soften and chemically "bite" into the primer/surfacer, but don't want to get is sopping wet - or those 400 grit cuts will show up in the dried surface............. it's a bit of "what is going to work for you, I'm afraid".
I can only tell you what "I" do............
when the panel has its first coat - walk away.
Go get some fresh air - have a cuppa or whatever - but let the paint "flash off" - let the wet thinners escape.
After about 10 min or so - I come back in and run a "double wet coat" over it - I want it to look wet, but not run - and that's it for today.............
Here is the pic as it sits tonight untouched - dust all over it - don't be tempted to wipe the dust of and "see" how good your finish is............. the paint is soft and very easily marked/dented/finger printed........ leave it - another cuppa - whatever........ keep out for ten minutes or so.
Come back then open everything up - and let the area "clear"............. the surface will look very dusty - it's dry over-spray sitting on everything - leave it!................. don't touch.
Now you can clean all your painting equipment and just let the paint do its stuff - un-assisted...........
Oh yes, the pics........
The hinge supports look very good - the rest looks as if it's got sand thrown all over it - this is normal - especially in confined spaces.........
Late tomorrow I'll dust it off (very lightly) and see what further work needs doing................ probably going to block back once more and spray a further 2 or 3 coats to get the finish I want................. stay tuned...........
frats,
Rosco
10 days later.......................
After the fifth day I started to wipe off the dust and found that it had deeply embedded into whatever fresh paint it could find - result another blocking back of the entire acrylic.
For those contemplating spraying out the luggage compartment - one word of advice - mask off and spray small areas ................this is what I have spent this week doing.
I also thinned out the paint a further 10% and dropped the pressure down from 25 psi to 20, narrowing the "fan" at the same time - this seems to have reduced overspray in a confined workspace considerably......
Masking ensured isolation, thinners gave good flow at lower pressure and lower pressure with narrower fan reduced overspray but provided good "flow"........ I had to work a bit harder to ensure the overlap was effective and slowed the pass down a fair bit to keep it wet........... result was quite satisfying.......
It took around an hour to mask off for each of the six "targets" I decided to focus on.
First pic is of the under deck - it was the first area - I considered that dust from other areas would not fall uphill.................... it didn't
Next, I masked off the vertical supports - inner ones first - outer's second.
Then the wheel arches and finally the backrest.
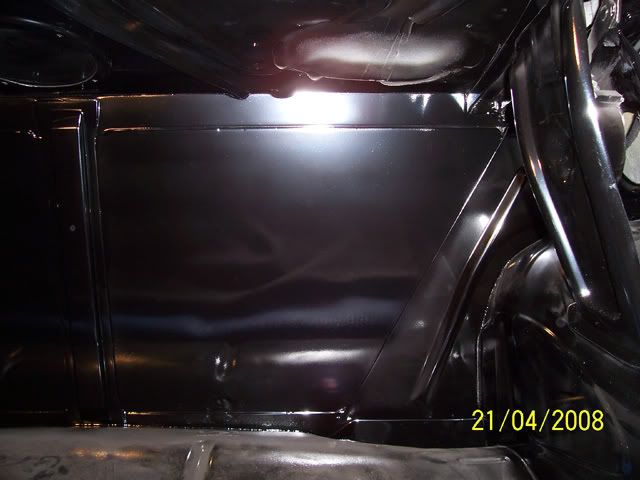

Pix are as it sits - untouched from the gun, except to remove the masks......
This will be the last spraying I will do until late October - the "window" for spraying is just about closed - humidity is far too high and temperatures too low to work within my garage - I will return to the POR system - which cures by humidity and will be brushed...................
Return to this post in October.......next project will hopefully be those two r/hs doors - total strip, beat, fill and spray.......
frats,
Rosco
After the fifth day I started to wipe off the dust and found that it had deeply embedded into whatever fresh paint it could find - result another blocking back of the entire acrylic.
For those contemplating spraying out the luggage compartment - one word of advice - mask off and spray small areas ................this is what I have spent this week doing.
I also thinned out the paint a further 10% and dropped the pressure down from 25 psi to 20, narrowing the "fan" at the same time - this seems to have reduced overspray in a confined workspace considerably......
Masking ensured isolation, thinners gave good flow at lower pressure and lower pressure with narrower fan reduced overspray but provided good "flow"........ I had to work a bit harder to ensure the overlap was effective and slowed the pass down a fair bit to keep it wet........... result was quite satisfying.......
It took around an hour to mask off for each of the six "targets" I decided to focus on.
First pic is of the under deck - it was the first area - I considered that dust from other areas would not fall uphill.................... it didn't
Next, I masked off the vertical supports - inner ones first - outer's second.
Then the wheel arches and finally the backrest.
Pix are as it sits - untouched from the gun, except to remove the masks......
This will be the last spraying I will do until late October - the "window" for spraying is just about closed - humidity is far too high and temperatures too low to work within my garage - I will return to the POR system - which cures by humidity and will be brushed...................
Return to this post in October.......next project will hopefully be those two r/hs doors - total strip, beat, fill and spray.......
frats,
Rosco
rosco's paint tips
Rosco,
Even you being the fussy one will have to be happy with the finish you have on that. Look great.
Glad you finally have it done. Will be looking forward to the next step
Cheers
Mal
Even you being the fussy one will have to be happy with the finish you have on that. Look great.
Glad you finally have it done. Will be looking forward to the next step
Cheers
Mal
Malcolm W.
-
parisian62
- Posts: 3996
- Joined: Wed May 11, 2005 2:19 pm
- State: NSW
- Location: Sydney
- Contact:
Hi Rosco,
well done! I would have given up months back. Is there a special judging category for luggage compartments at the Nats you're not telling us about?
regards
Stewart
well done! I would have given up months back. Is there a special judging category for luggage compartments at the Nats you're not telling us about?
regards
Stewart
Feelin free in a '61 FB.
Member of FB-EK Holden Car Club Of NSW Inc.
Check out the Rebuild of Old Timer
Member of FB-EK Holden Car Club Of NSW Inc.
Check out the Rebuild of Old Timer

This will be the last "spray" post for a while - the window is just about closed for me - won't open again 'til late October................
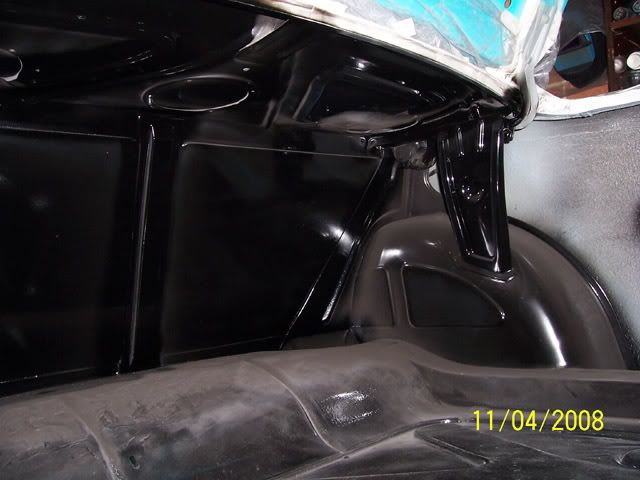
Masked up and sprayed the turquoise to the boot-lid seal channel and hinges/boot-lid mounts today - happy enough with result.
Removed all masks and dusted everything down tonight - have found two blatant "misses" - boot-lid springs and retract belt covers - will "hand paint" those.
I am very happy with the final finish - see pic below - this is untouched as it came from the gun - probably the "best" I have ever managed in laying down acrylic - it will certainly come up a treat when I block down with 1200 & soap then work up through the cutters and polish - I am leaning towards not doing this until later in the year when it "pulls" down in a few months.
New boot rubber mat ordered.
May get time to replace all bolts/screws with polished stainless (as in engine bay).
Tomorrow, resuming back under car to cover the sub-floor Tie Coat on the sub floor and get at least two coats of Black Cote on before Yamba - will jump back to the POR 15 post for the next few "issues".
This is how the final coats have come up - untouched........ very happy, this time - after 3 months I would expect to get some satisfaction.
Don't think I will ever do a "boot" again - it's a very awkward and confined space to work in - not to mention the fact that when spraying, you get a 10 second window to watch before everything turns to "clouds"...................
frats,
Rosco
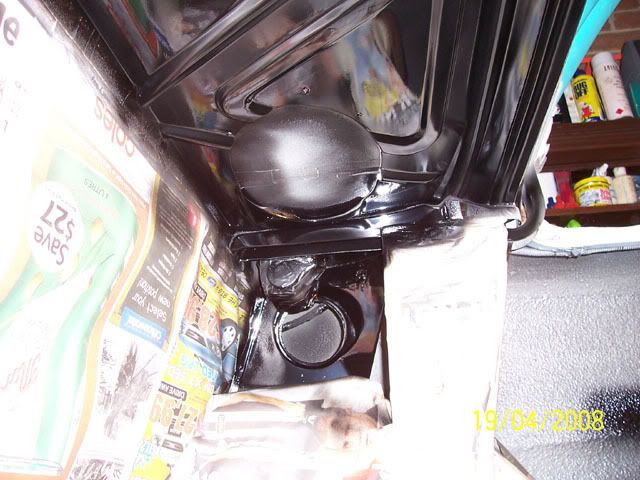
ps the pic
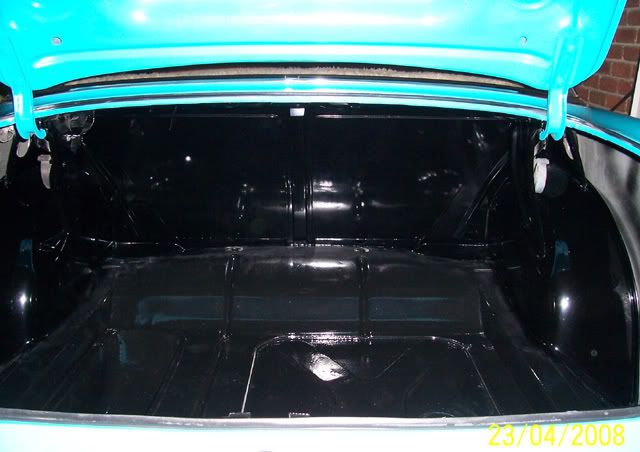
notice the different "hue" in black - the acrylic is jet black Standox (number 471) - the floor and end panel is Black Cote POR................
Masked up and sprayed the turquoise to the boot-lid seal channel and hinges/boot-lid mounts today - happy enough with result.
Removed all masks and dusted everything down tonight - have found two blatant "misses" - boot-lid springs and retract belt covers - will "hand paint" those.
I am very happy with the final finish - see pic below - this is untouched as it came from the gun - probably the "best" I have ever managed in laying down acrylic - it will certainly come up a treat when I block down with 1200 & soap then work up through the cutters and polish - I am leaning towards not doing this until later in the year when it "pulls" down in a few months.
New boot rubber mat ordered.
May get time to replace all bolts/screws with polished stainless (as in engine bay).
Tomorrow, resuming back under car to cover the sub-floor Tie Coat on the sub floor and get at least two coats of Black Cote on before Yamba - will jump back to the POR 15 post for the next few "issues".
This is how the final coats have come up - untouched........ very happy, this time - after 3 months I would expect to get some satisfaction.
Don't think I will ever do a "boot" again - it's a very awkward and confined space to work in - not to mention the fact that when spraying, you get a 10 second window to watch before everything turns to "clouds"...................
frats,
Rosco
ps the pic
notice the different "hue" in black - the acrylic is jet black Standox (number 471) - the floor and end panel is Black Cote POR................