Wilma FB project
Re: Wilma FB project
Ye gods, I have cut up many shells in better condition than that over the years ....................
When you're faced with an unpleasant task that you really don't want to do, sometimes you just have to dig deep down inside and somehow find the patience to wait for someone else to do it for you.
Foundation member #61 of FB/EK Holden club of W.A.
Foundation member #61 of FB/EK Holden club of W.A.

Re: Wilma FB project
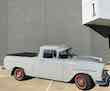
Ha Blacky. That's why I gave you grief over your garden art ute. It was a cracker of a body wasted.... . Wilma is training wheels for Project 2
Sent from my SM-G975F using Tapatalk
. Wilma is training wheels for Project 2
Sent from my SM-G975F using Tapatalk
Sucker for a rusty bomb
Re: Wilma FB project
Brett,
There's a famous scene in "Monty Python's Meaning of Life": The Miracle of Birth (Yorkshire), where the father comes home from t'mill to see a stork drop a swaddled object (yet another child) down his chimney, and he says, "Oh bloody hell." As if he didn't already have enough.
You might want to head over to FE-FC and look up "Found Object" to see how I braced my rotisserie. But your body' s mounted, so maybe let sleeping dogs lie.
Do you want an FB gear lever? I have one, complete with knob.
Rob
Re: Wilma FB project
Gee Rob, you are an observant fellow. I better put Vaseline on the lens.
Yes the rotisserie is ok until you come to raising or lowering the car when it tends to stick. I didn't grease the bits and that didn't help either. I've had a good run though and it rolled around on the floor easily and the car spinned easily as well.
Thanks for the gear knob offer but I have 3 stashed away now. It was one of the first bits I noticed was missing. Lever was there.
The shell has been off the rotiserie for some months now. The last post relates to work done in May last year.
Sent from my SM-G975F using Tapatalk
Sucker for a rusty bomb
Re: Wilma FB project
In respect to Monty Python sketch, here are the other babies the stork has delivered . The one under the tarp is the EK ute fondly described as Project 2. The other 1.5 are its supporters.

Sent from my SM-G975F using Tapatalk
. The one under the tarp is the EK ute fondly described as Project 2. The other 1.5 are its supporters.

Sent from my SM-G975F using Tapatalk
Sucker for a rusty bomb

Re: Wilma FB project
You’ve got some good stock there and presumably an understanding or at least tolerant wife.
FB ute fixer upper, EK van on rotisserie
FB ute fixer upper, EK van on rotisserie
getting my FB ute on the road
EK van on rotisserie
EK van on rotisserie
Re: Wilma FB project
Brett,
You're at Bungendore . . .
No. The roadside EK I'm thinking of is at Tarago, after you turn right at the Loaded Dog, cross the railway, and start the climb out of town towards . . . Bungendore.
Rob
You're at Bungendore . . .
No. The roadside EK I'm thinking of is at Tarago, after you turn right at the Loaded Dog, cross the railway, and start the climb out of town towards . . . Bungendore.
Rob
Re: Wilma FB project
Clay yes you are right on both counts
Rob, I've not noticed that one, There is one near Captains Flat in a paddock. I'm not allowed any more. See point one above

Rob, I've not noticed that one, There is one near Captains Flat in a paddock. I'm not allowed any more. See point one above

Sucker for a rusty bomb
-
Orange Betty
- Posts: 150
- Joined: Wed May 30, 2018 4:46 pm
- State: NSW
- Location: Canberra Region
Re: Wilma FB project
Nice work Brett! Very inspiring and handy for me to have you around the corner and up the highway  I might have Betty ready to meet Wilma one day.
Also saw an FB/EK in a yard in Burra the other day. Might just be garden art or a sign that I should go to the open house this weekend...
Catch up soon
Dave
Also saw an FB/EK in a yard in Burra the other day. Might just be garden art or a sign that I should go to the open house this weekend...
Catch up soon
Dave
62 EK Sedan in slow progress
Re: Wilma FB project
Thanks Dave. Its very cold this morning, so a good time to post a bit more while in front of the fire.
Having completed the inner sills, it was time to remove blocks and utilise the wonderful access that a rotisserie provides. Began the replacement of the floor. As it turns out it was everything from the top of the accelerator pedal to the parcel shelf! Nothing particularly notable here. Used Rare's panels and where there was enough original metal left, placed panels over the top and cut about 3mm oversize and tacked them in. Used self tappers to hold them down where I could and took a bit of time to line them up with existing mouldings. 0.6mm wire on the mig and pretty low voltage and wire speed. I made two sets of marks on my mig dials - one for thin metal, one for thick. Pretty much used those two settings for the whole build. I had a WIA mig from farming days but it couldn't feed the 0.6mm wire reliably and was pretty cumbersome, so bought a smaller Unimig unit and used 5kg wire rolls. Much easier to move around and has proven to be very reliable. 15litres/min argon/CO2 mix.
Included a picture of some of Blacky's bits from EK Mart.


Sent from my SM-T865 using Tapatalk
Sucker for a rusty bomb
Re: Wilma FB project
There were many, many hours consumed doing the flooring but got there in the end. The section under the back seat needed replacing and of course no Rares panels for that bit. Ended up taking the whole piece off the donor rear cut and replaced a few structural member bits along the way. The parcel shelf was also past it, and more difficult again, the channel around the rear window on the bottom rhs was gone. The solution was to replace the whole shelf, including the rhs window channel in one piece. A relatively straightforward cut once I worked out that I could leave the boot spring arm in one piece and weld back in. 


Sent from my SM-T865 using Tapatalk


Sent from my SM-T865 using Tapatalk
Sucker for a rusty bomb
Re: Wilma FB project
After floors, lots of rust repairs around body. Doglegs are not my friends and probably were the most complicated repairs to do. Multi-layered mess! There was a smattering of rust everywhere and it took many hours. Just when I thought I was finished, something else turned up. I didn't sand blast the body and those of you who do, have the advantage of knowing where all the rust is from day one. Partly I didn't sand blast to save dollars, and partly because I had a perfect roof and didn't want to risk it. 


Sent from my SM-T865 using Tapatalk


Sent from my SM-T865 using Tapatalk
Sucker for a rusty bomb
Re: Wilma FB project
Rust repairs: bits and pieces everywhere. A few pics of scattered repairs. Many more but need to move on to some good stuff now! 


Sent from my SM-T865 using Tapatalk


Sent from my SM-T865 using Tapatalk
Sucker for a rusty bomb
Re: Wilma FB project
Ok. Time for some nice stuff. POR 15 on floors. Still to finish outer sills, and final bog smears but getting past the troubles.


Sent from my SM-T865 using Tapatalk


Sent from my SM-T865 using Tapatalk
Sucker for a rusty bomb
Re: Wilma FB project
Awesome work Brett - saved what was really just scrap metal 


Sent from my iPhone using Tapatalk Pro
Sent from my iPhone using Tapatalk Pro
You will find me lost somewhere!